跳转到主内容

Back Panel Removal

你所需要的

  1. Back Panel Removal, Battery: 步骤 1 中的图像 1,1
    • Power down the computer and unplug the power adapter.

  2. Back Panel Removal: 步骤 2 中的图像 1,1
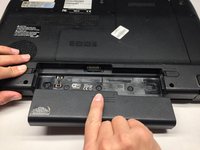
    • Flip the laptop upside down. Locate the two latches on both sides of the battery.

  3. Back Panel Removal: 步骤 3 中的图像 1,3 Back Panel Removal: 步骤 3 中的图像 2,3 Back Panel Removal: 步骤 3 中的图像 3,3
    • Slide the latch on the right outwards, releasing the lock. The latch stays unlocked once moved.

    • Simultaneously slide the latch on the left outwards while pulling the battery towards you.

    • Do not touch the metal connectors on the laptop and the battery.

  4. Back Panel Removal, Back Panel Removal: 步骤 4 中的图像 1,1
    • Remove the single captive screw on the back panel with your Phillips #1 screwdriver.

  5. Back Panel Removal: 步骤 5 中的图像 1,2 Back Panel Removal: 步骤 5 中的图像 2,2
    • Pry the removal tab up. You will feel and hear the first clip release, popping up slightly.

    • Work your way around the border of the panel, releasing the rest of the clips.

    • Once all clips are released, lift the cover up and pull towards you.

结论

To replace the back panel, follow the steps in reverse.

2等其他人完成本指南。

Austin Bons

于09/22/16注册

1,131 声望

创作了8篇指南

团队

UC Davis, Team 2-2, Oliver Fall 2016 UC Davis, Team 2-2, Oliver Fall 2016 的会员

UCD-OLIVER-F16S2G2

5 名成员

创作了10篇指南

0条评论

添加评论

浏览统计数据:

过去 24 小时: 3

过去 7 天: 17

过去 30 天: 69

总计 7,453