跳转到主内容

BIOS battery replacement by why! W253EU

你所需要的

  1. BIOS battery replacement by why! W253EU, Battery from why! Remove W253EU: 步骤 1 中的图像 1,3 BIOS battery replacement by why! W253EU, Battery from why! Remove W253EU: 步骤 1 中的图像 2,3 BIOS battery replacement by why! W253EU, Battery from why! Remove W253EU: 步骤 1 中的图像 3,3
    • Turn off the computer.

    • Before each operation it is important to start with the removal of the accumulator.

    • Take the slide unlocked into position, remove the battery.

  2. BIOS battery replacement by why! W253EU, Access to RAM and CPU from why! W253EU: 步骤 2 中的图像 1,2 BIOS battery replacement by why! W253EU, Access to RAM and CPU from why! W253EU: 步骤 2 中的图像 2,2
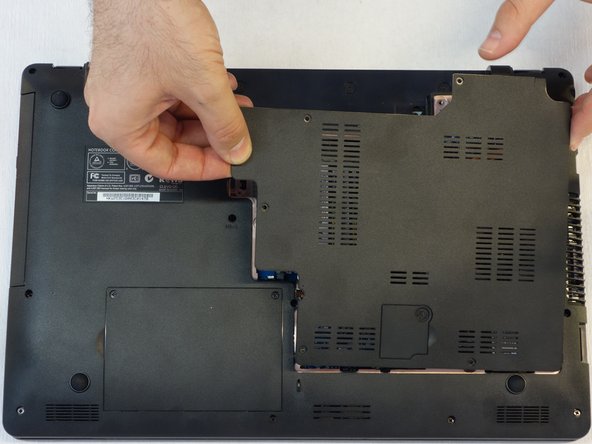
    • Using a Philips #1 screwdriver, unscrew the 5 screws securing the cover.

  3. BIOS battery replacement by why! W253EU: 步骤 3 中的图像 1,3 BIOS battery replacement by why! W253EU: 步骤 3 中的图像 2,3 BIOS battery replacement by why! W253EU: 步骤 3 中的图像 3,3
    • Push the screwdriver a few millimeters under the cover so that it can be touched with your fingers.

    • Now lift the cover carefully.

    • Attention! Disconnect the ventillator cable so that the cover can be completely removed (see next step).

  4. BIOS battery replacement by why! W253EU: 步骤 4 中的图像 1,1
    • Since the ventillator is mounted under the cover, its power supply cable must first be disconnected so that the cover can then be completely removed.

  5. BIOS battery replacement by why! W253EU, BIOS battery: 步骤 5 中的图像 1,1
    • Carefully remove the BIOS battery from its holder.

    • Do not throw away the battery! In Switzerland, the electrical shops are obliged to accept all batteries and accumulators for disposal.

结论

For reassembly, follow the instructions in reverse order.

另外一个人完成了本指南。

由衷感谢以下译者:

de en

100%

Martin Kubica正在帮助我们修复这个世界! 您也想加入吗?
开始翻译 ›

Felice Suglia

于06/15/13注册

30,884 声望

创作了264篇指南

0条评论

添加评论

浏览统计数据:

过去 24 小时: 0

过去 7 天: 2

过去 30 天: 8

总计 728