跳转到主内容

Asus X200CA-HCL 1104G Headphone Jack Replacement

你所需要的

  1. Asus X200CA-HCL 1104G Headphone Jack Replacement, Headphone Jack: 步骤 1 中的图像 1,1
    • Using the Phillips 1 screwdriver, remove the laptop's back panel.

    • The parts you see underneath that panel are called the laptop's "internals".

  2. Asus X200CA-HCL 1104G Headphone Jack Replacement: 步骤 2 中的图像 1,1
    • Now, locate the audio board. This model has an L-shaped board. It can be found in the far left region of the internals.

  3. Asus X200CA-HCL 1104G Headphone Jack Replacement: 步骤 3 中的图像 1,1
    • Firstly, disconnect the two tiny wires that connect the audio board to other components. They can be found on a black square near the green decoder strip. Remember to be gentle with these delicate components.

  4. Asus X200CA-HCL 1104G Headphone Jack Replacement: 步骤 4 中的图像 1,2 Asus X200CA-HCL 1104G Headphone Jack Replacement: 步骤 4 中的图像 2,2
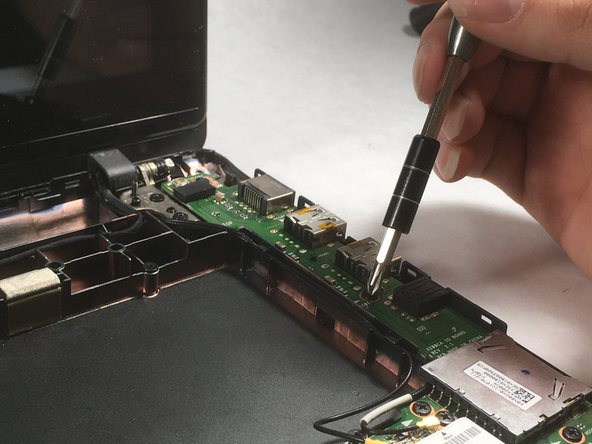
    • Using the Phillips 1 screwdriver, remove the six screws that hold the audio board in place.

    • Hint: the sixth screw may not be readily visible. It can be found in the bottom left corner of the audio board, under a small black flap.

    • With the screws removed, the audio board can be easily lifted out.

结论

To reassemble your device, follow these instructions in reverse order.

Samantha Wahl

于10/17/17注册

301 声望

创作了3篇指南

团队

UMass Dartmouth, Team S1-G2, Simcock Fall 2017 UMass Dartmouth, Team S1-G2, Simcock Fall 2017 的会员

UMASSD-SIMCOCK-F17S1G2

3 名成员

创作了5篇指南

0条评论

添加评论

浏览统计数据:

过去 24 小时: 0

过去 7 天: 1

过去 30 天: 1

总计 115