跳转到主内容

Asus V500CA-DB51T Battery Replacement

你所需要的

  1. Asus V500CA-DB51T Battery  Replacement, Battery: 步骤 1 中的图像 1,2 Asus V500CA-DB51T Battery  Replacement, Battery: 步骤 1 中的图像 2,2
    • Remove the following ten screws securing the lower case to the upper case:

    • The top left and right corners have .7 cm screws.

    • The two top-middle and four bottom are .4 cm screws.

    • The middle left and right are .8 cm screws.

    • Remove the screws using the Phillips #00 screwdriver.

  2. Asus V500CA-DB51T Battery  Replacement: 步骤 2 中的图像 1,2 Asus V500CA-DB51T Battery  Replacement: 步骤 2 中的图像 2,2
    • Wedge your fingers between the upper case and the lower case.

    • Gently pull the lower case away from the upper case.

    • Remove the lower case and set it aside.

  3. Asus V500CA-DB51T Battery  Replacement: 步骤 3 中的图像 1,1
    • Use the flat end of the blue plastic opening tool to lift the battery connector up out of its socket on the motherboard.

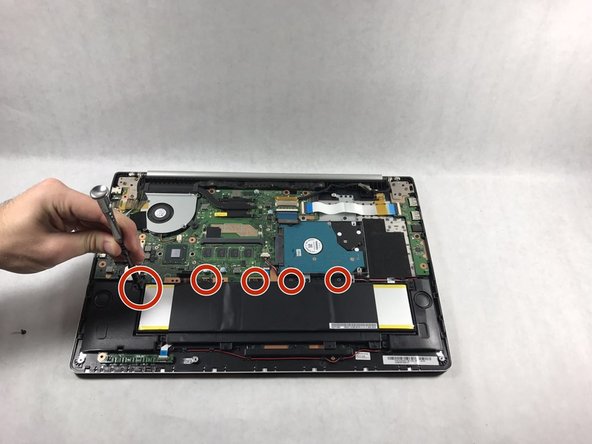
  4. Asus V500CA-DB51T Battery  Replacement: 步骤 4 中的图像 1,2 Asus V500CA-DB51T Battery  Replacement: 步骤 4 中的图像 2,2
    • Remove the tri-point screws that secure the battery to the casing.

    • All screws securing the battery in place are .5 cm tri-point screws.

  5. Asus V500CA-DB51T Battery  Replacement: 步骤 5 中的图像 1,3 Asus V500CA-DB51T Battery  Replacement: 步骤 5 中的图像 2,3 Asus V500CA-DB51T Battery  Replacement: 步骤 5 中的图像 3,3
    • Use the opening tool to pop up the battery away from the casing.

结论

To reassemble your device, follow these instructions in reverse order.

另外一个人完成了本指南。

团队

UMass Dartmouth, Team S6-G2, Rockett Fall 2017 UMass Dartmouth, Team S6-G2, Rockett Fall 2017 的会员

UMASSD-ROCKETT-F17S6G2

3 名成员

创作了6篇指南

0条评论

添加评论

浏览统计数据:

过去 24 小时: 0

过去 7 天: 0

过去 30 天: 5

总计 401