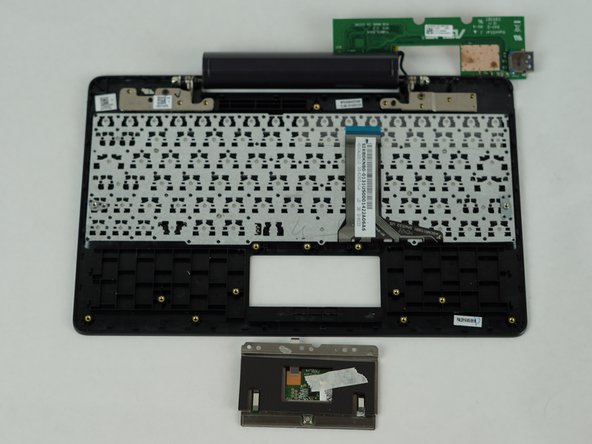
跳转到主内容

Asus Transformer Book T100TAR Trackpad Replacement

你所需要的

  1. Asus Transformer Book T100TAR Trackpad Replacement, Trackpad: 步骤 1 中的图像 1,2 Asus Transformer Book T100TAR Trackpad Replacement, Trackpad: 步骤 1 中的图像 2,2
    • Detach and separate the screen from the keyboard by pressing the silver release button at the base of the tablet.

  2. Asus Transformer Book T100TAR Trackpad Replacement: 步骤 2 中的图像 1,3 Asus Transformer Book T100TAR Trackpad Replacement: 步骤 2 中的图像 2,3 Asus Transformer Book T100TAR Trackpad Replacement: 步骤 2 中的图像 3,3
    • Using a Phillips #0 screwdriver, unscrew six 4mm screws from the rear cover of the keyboard.

    • The rest of the screws for this guide will be Phillips #0 head screws.

    • Use the metal spudger to remove the rubber feet nearest to the top of the keyboard, where the connecting dock to the screen is. There are two 6mm screws under these rubber feet.

  3. Asus Transformer Book T100TAR Trackpad Replacement: 步骤 3 中的图像 1,1
    • Take the metal spudger and insert it into the seam of the rear cover casing and gently pry upwards.

    • If done correctly, you should feel the clips release.

    • Do not force the clips to release. This will cause them to break, and if broken, the screen will become loose. Open the rear cover gently and with caution.

  4. Asus Transformer Book T100TAR Trackpad Replacement: 步骤 4 中的图像 1,1
    • Unscrew the screws on the base plate of the keyboard dock. There should be four 4mm screws along the bottom and four 6mm screws along the top, apart from a single 4mm screw (annotated in orange)

  5. Asus Transformer Book T100TAR Trackpad Replacement: 步骤 5 中的图像 1,1
    在这个步骤中使用的工具:
    Tweezers
    $4.99
    购买
    • Very carefully remove the black tape holding the metal plate in place.

    • This tape is very sticky, so you might want to use tweezers to get it loose before peeling it off.

  6. Asus Transformer Book T100TAR Trackpad Replacement: 步骤 6 中的图像 1,2 Asus Transformer Book T100TAR Trackpad Replacement: 步骤 6 中的图像 2,2
    • Unscrew three 4mm screws holding the trackpad in place and remove the trackpad.

结论

To reassemble your device, follow these instructions in reverse order.

团队

USF Tampa, Team 6-1, Remmell Fall 2016 USF Tampa, Team 6-1, Remmell Fall 2016 的会员

USFT-REMMELL-F16S6G1

4 名成员

创作了5篇指南

0条评论

添加评论

浏览统计数据:

过去 24 小时: 3

过去 7 天: 5

过去 30 天: 8

总计 316