跳转到主内容

Asus ROG STRIX GL502V Motherboard Replacement

你所需要的

  1. Asus ROG STRIX GL502V Motherboard Replacement, Asus ROG STRIX GL502V Lower Case: 步骤 1 中的图像 1,2 Asus ROG STRIX GL502V Motherboard Replacement, Asus ROG STRIX GL502V Lower Case: 步骤 1 中的图像 2,2
    • Remove 10 screws.

    • Note: front screws (blue) are 10mm long, central and rear (brown) are 12mm.

  2. Asus ROG STRIX GL502V Motherboard Replacement: 步骤 2 中的图像 1,2 Asus ROG STRIX GL502V Motherboard Replacement: 步骤 2 中的图像 2,2
    • With opening tool or pick go around the case starting from back corner.

  3. Asus ROG STRIX GL502V Motherboard Replacement: 步骤 3 中的图像 1,1
    • Lift cover and now you have access to most of the components.

  4. Asus ROG STRIX GL502V Motherboard Replacement, Battery: 步骤 4 中的图像 1,1
    • Disconnect battery connect by pulling it up.

  5. Asus ROG STRIX GL502V Motherboard Replacement: 步骤 5 中的图像 1,1
    • Remove 4 screws

  6. Asus ROG STRIX GL502V Motherboard Replacement: 步骤 6 中的图像 1,1
    • Lift battery up and out.

  7. Asus ROG STRIX GL502V Motherboard Replacement, Remove memory module: 步骤 7 中的图像 1,1
    • Pull spring locks out.

    • Lift module up and out of the connector.

  8. Asus ROG STRIX GL502V Motherboard Replacement, M.2 SSD: 步骤 8 中的图像 1,1
    • remove screw.

    • pull up and right from the connector.

  9. Asus ROG STRIX GL502V Motherboard Replacement, Connectors: 步骤 9 中的图像 1,1
    • Antenna (orange)

    • Speakers (yellow)

    • Power and miscellaneous LED (blue)

    • Keyboard (green)

    • Display (pink)

  10. Asus ROG STRIX GL502V Motherboard Replacement, Remove speaker connector: 步骤 10 中的图像 1,2 Asus ROG STRIX GL502V Motherboard Replacement, Remove speaker connector: 步骤 10 中的图像 2,2
    • Remove speaker connector by pulling it out.

  11. Asus ROG STRIX GL502V Motherboard Replacement, Remove keyboard connector: 步骤 11 中的图像 1,3 Asus ROG STRIX GL502V Motherboard Replacement, Remove keyboard connector: 步骤 11 中的图像 2,3 Asus ROG STRIX GL502V Motherboard Replacement, Remove keyboard connector: 步骤 11 中的图像 3,3
    • Lift locking mechanism up

    • Pull ribbon cable from connector

  12. Asus ROG STRIX GL502V Motherboard Replacement, Remove miscellanious connectors: 步骤 12 中的图像 1,2 Asus ROG STRIX GL502V Motherboard Replacement, Remove miscellanious connectors: 步骤 12 中的图像 2,2
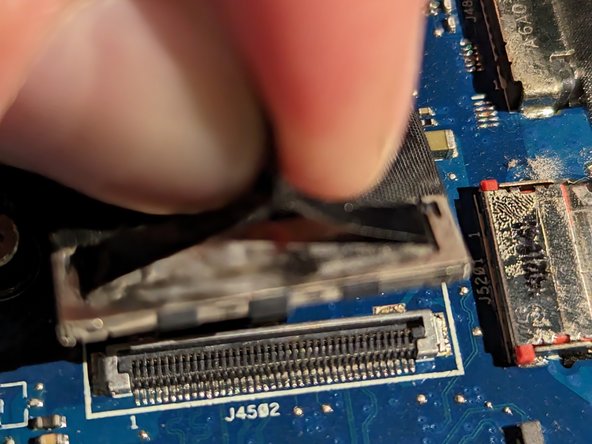
    • Lift locking tab on each connector (3x)

    • Pull each ribbon cable out

  13. Asus ROG STRIX GL502V Motherboard Replacement, Display cable: 步骤 13 中的图像 1,3 Asus ROG STRIX GL502V Motherboard Replacement, Display cable: 步骤 13 中的图像 2,3 Asus ROG STRIX GL502V Motherboard Replacement, Display cable: 步骤 13 中的图像 3,3
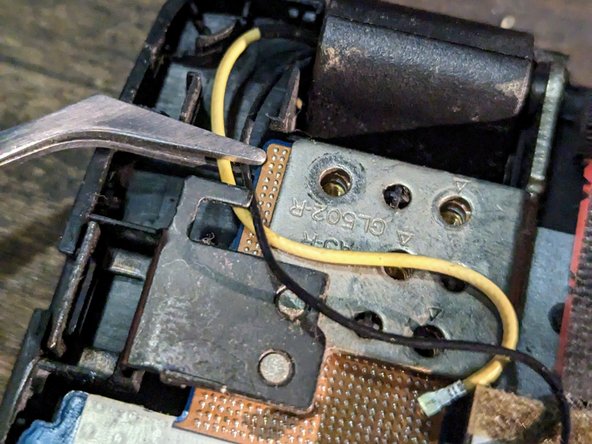
    • Remove screw holding display cable

    • Remove plastic shield over display cable

    • Pull cable out of the clip

  14. Asus ROG STRIX GL502V Motherboard Replacement, Display connector: 步骤 14 中的图像 1,2 Asus ROG STRIX GL502V Motherboard Replacement, Display connector: 步骤 14 中的图像 2,2
    • Pull display connector straight up by the pull strap

  15. Asus ROG STRIX GL502V Motherboard Replacement, Antenna connector: 步骤 15 中的图像 1,3 Asus ROG STRIX GL502V Motherboard Replacement, Antenna connector: 步骤 15 中的图像 2,3 Asus ROG STRIX GL502V Motherboard Replacement, Antenna connector: 步骤 15 中的图像 3,3
    • Carefully holding by metal part pull connector up.

    • Repeat for second connector.

  16. Asus ROG STRIX GL502V Motherboard Replacement, Antenna connector cable: 步骤 16 中的图像 1,2 Asus ROG STRIX GL502V Motherboard Replacement, Antenna connector cable: 步骤 16 中的图像 2,2
    • Move connector out of the guide.

  17. Asus ROG STRIX GL502V Motherboard Replacement, Hinges screws: 步骤 17 中的图像 1,2 Asus ROG STRIX GL502V Motherboard Replacement, Hinges screws: 步骤 17 中的图像 2,2
    • Remove remaining hinges screws (5)

    • Note: one screw was holding display cable.

  18. Asus ROG STRIX GL502V Motherboard Replacement, Lift Hinghes: 步骤 18 中的图像 1,2 Asus ROG STRIX GL502V Motherboard Replacement, Lift Hinghes: 步骤 18 中的图像 2,2
    • Lift left hinge up.

    • Lift right hinge up.

  19. Asus ROG STRIX GL502V Motherboard Replacement, Motherboard screws: 步骤 19 中的图像 1,1
    • Remove two side motherboard screws (yellow marks)

    • Remove 4 center screws (green marks)

    • Note: side screws silver and slighter longer.

  20. Asus ROG STRIX GL502V Motherboard Replacement, Remove motherboard: 步骤 20 中的图像 1,3 Asus ROG STRIX GL502V Motherboard Replacement, Remove motherboard: 步骤 20 中的图像 2,3 Asus ROG STRIX GL502V Motherboard Replacement, Remove motherboard: 步骤 20 中的图像 3,3
    • NOTE: Headset connector is holding in the case.

    • Lift motherboard from HDMI connector side and pull towards it.

  21. Asus ROG STRIX GL502V Motherboard Replacement, Remove fans, heat sink and radio module: 步骤 21 中的图像 1,1
    • Remove radio module screw (red) and pull it out of connector.

    • Disconnect fans connectors and remove 6x screws. Pull fans out.

    • Remove 8 screws from heat sink and remove it.

    • Note: heat sink use thermal paste on CPU and GPU - you will need to clean and use new before putting it together.

结论

To reassemble your device, follow these instructions in reverse order.

Sergei

于09/10/12注册

622 声望

创作了5篇指南

一条评论

Hello I am interested motherboard, how much it's the price ?

Leonard Cristian - 回复

添加评论

浏览统计数据:

过去 24 小时: 0

过去 7 天: 7

过去 30 天: 40

总计 563