跳转到主内容

Asus ROG G751JL-DS71 Battery Replacement

你所需要的

  1. Asus ROG G751JL-DS71 Battery Replacement, CD-ROM Player: 步骤 1 中的图像 1,2 Asus ROG G751JL-DS71 Battery Replacement, CD-ROM Player: 步骤 1 中的图像 2,2
    • Lift the rubber cover found on the bottom of the laptop.

    • Remove the 5.2 mm screw with a Phillips 1 Screwdriver.

  2. Asus ROG G751JL-DS71 Battery Replacement: 步骤 2 中的图像 1,3 Asus ROG G751JL-DS71 Battery Replacement: 步骤 2 中的图像 2,3 Asus ROG G751JL-DS71 Battery Replacement: 步骤 2 中的图像 3,3
    • Use the nylon spudger to remove the back center panel.

  3. Asus ROG G751JL-DS71 Battery Replacement: 步骤 3 中的图像 1,2 Asus ROG G751JL-DS71 Battery Replacement: 步骤 3 中的图像 2,2
    • Use a Phillips 1 Screwdriver to remove the 5 mm screw that is located underneath the back panel.

  4. Asus ROG G751JL-DS71 Battery Replacement: 步骤 4 中的图像 1,2 Asus ROG G751JL-DS71 Battery Replacement: 步骤 4 中的图像 2,2
    • Pull out the optical drive found on the side of the laptop.

  5. Asus ROG G751JL-DS71 Battery Replacement, Top Rear Panel: 步骤 5 中的图像 1,2 Asus ROG G751JL-DS71 Battery Replacement, Top Rear Panel: 步骤 5 中的图像 2,2
    • Use a pair of tweezers to remove the top four rubber stoppers found on the bottom of the laptop.

  6. Asus ROG G751JL-DS71 Battery Replacement: 步骤 6 中的图像 1,2 Asus ROG G751JL-DS71 Battery Replacement: 步骤 6 中的图像 2,2
    • Use a Phillips 1 Screwdriver to remove the top four 8.5 mm screws.

  7. Asus ROG G751JL-DS71 Battery Replacement: 步骤 7 中的图像 1,3 Asus ROG G751JL-DS71 Battery Replacement: 步骤 7 中的图像 2,3 Asus ROG G751JL-DS71 Battery Replacement: 步骤 7 中的图像 3,3
    • Use a nylon spudger to carefully pry the top back panel off.

    • While removing the top back panel, be careful not to break the four pin connector located underneath.

    • Disconnect the four-pin connector and remove the top back panel from the computer.

  8. Asus ROG G751JL-DS71 Battery Replacement, Keyboard: 步骤 8 中的图像 1,3 Asus ROG G751JL-DS71 Battery Replacement, Keyboard: 步骤 8 中的图像 2,3 Asus ROG G751JL-DS71 Battery Replacement, Keyboard: 步骤 8 中的图像 3,3
    • Use a Phillips 1 Screwdriver to remove the four 6.8 mm screws underneath the back panel.

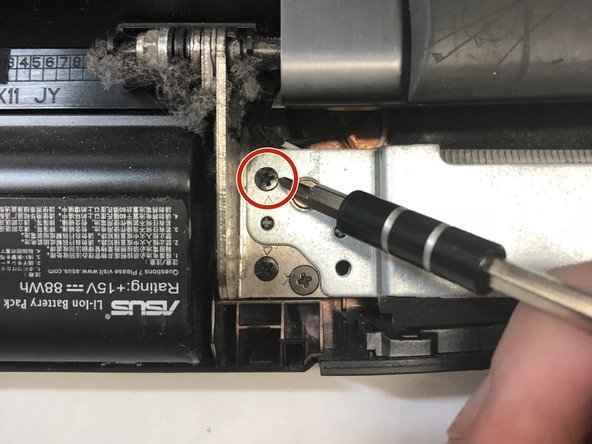
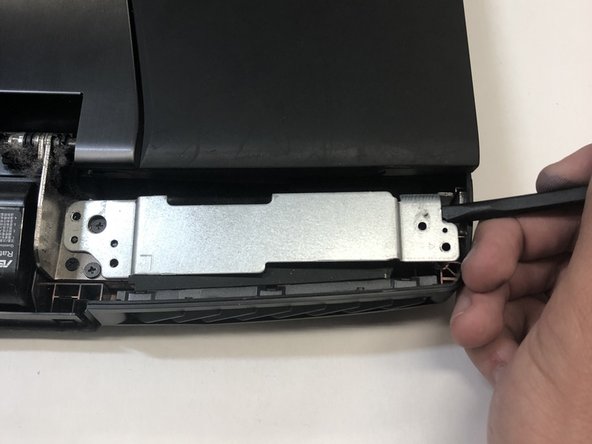
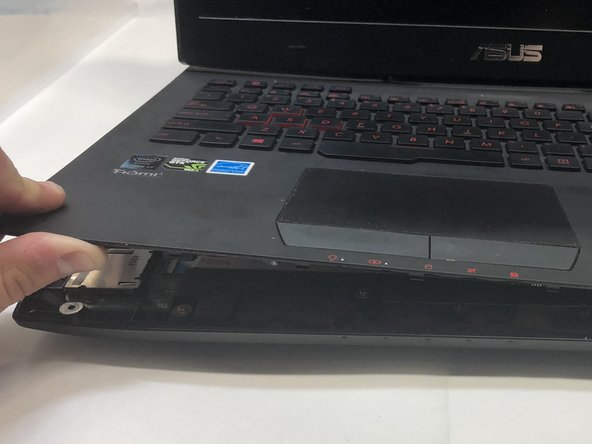
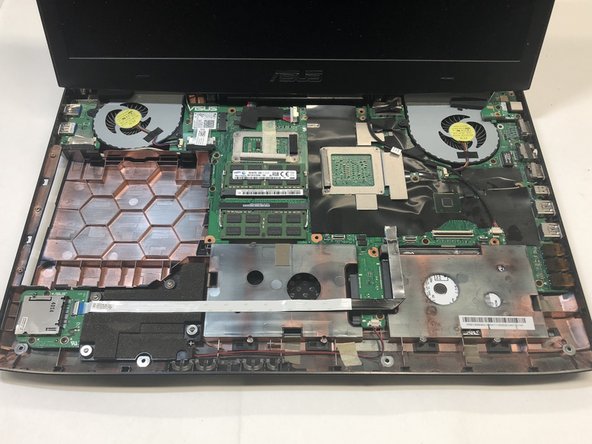
    • Lift away the metal housings from each side of the laptop.

  9. Asus ROG G751JL-DS71 Battery Replacement: 步骤 9 中的图像 1,2 Asus ROG G751JL-DS71 Battery Replacement: 步骤 9 中的图像 2,2
    • Use a Phillips 1 Screwdriver to remove the ten 5.2 mm screws holding the main panel in place.

    • Use a Phillips 1 Screwdriver to remove the four 5.2 mm screws underneath the center panel.

  10. Asus ROG G751JL-DS71 Battery Replacement: 步骤 10 中的图像 1,3 Asus ROG G751JL-DS71 Battery Replacement: 步骤 10 中的图像 2,3 Asus ROG G751JL-DS71 Battery Replacement: 步骤 10 中的图像 3,3
    • Use a plastic opening tool to pry the keyboard from the base of the laptop.

    • Lift the keyboard carefully so as to not tear or break the four ribbon connectors underneath the keyboard.

  11. Asus ROG G751JL-DS71 Battery Replacement: 步骤 11 中的图像 1,2 Asus ROG G751JL-DS71 Battery Replacement: 步骤 11 中的图像 2,2
    • Use a pair of tweezers to undo each of the four ribbon connectors.

    • The keyboard is now completely disconnected from the laptop and you can remove it.

  12. Asus ROG G751JL-DS71 Battery Replacement, Monitor: 步骤 12 中的图像 1,2 Asus ROG G751JL-DS71 Battery Replacement, Monitor: 步骤 12 中的图像 2,2
    • Use a pair of tweezers to carefully disconnect the pin connector.

  13. Asus ROG G751JL-DS71 Battery Replacement: 步骤 13 中的图像 1,3 Asus ROG G751JL-DS71 Battery Replacement: 步骤 13 中的图像 2,3 Asus ROG G751JL-DS71 Battery Replacement: 步骤 13 中的图像 3,3
    • Use a Phillips 1 Screwdriver to remove the final four remaining 6.8 mm screws located underneath the back panel.

    • The monitor is now free to be completely lifted off the laptop.

  14. Asus ROG G751JL-DS71 Battery Replacement, Battery: 步骤 14 中的图像 1,2 Asus ROG G751JL-DS71 Battery Replacement, Battery: 步骤 14 中的图像 2,2
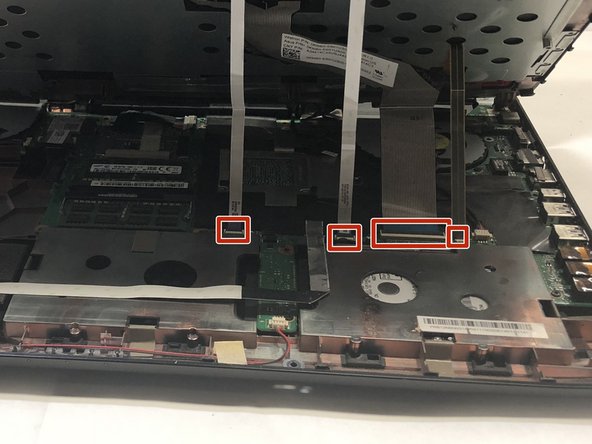
    • Disconnect the pin connector that attaches the battery to the motherboard.

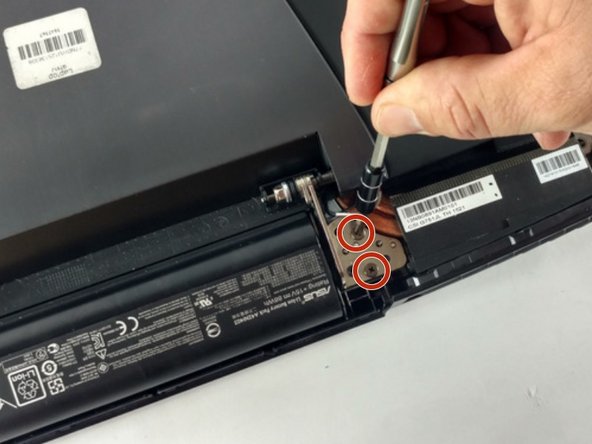
    • Use a Phillips 1 Screwdriver to remove the two 5.4 mm screws.

  15. Asus ROG G751JL-DS71 Battery Replacement: 步骤 15 中的图像 1,2 Asus ROG G751JL-DS71 Battery Replacement: 步骤 15 中的图像 2,2
    • The battery can now be lifted away from the laptop.

结论

To reassemble your device, follow these instructions in reverse order.

7等其他人完成本指南。

Aurora Rios

于01/22/18注册

917 声望

创作了4篇指南

团队

Cal Poly, Team S16-G1, Banghart Winter 2018 Cal Poly, Team S16-G1, Banghart Winter 2018 的会员

CPSU-BANGHART-W18S16G1

4 名成员

创作了22篇指南

3条评论

Can yo please share the review of this battery? Should I go for original battery or ifixit battery?

Chintan Goyal - 回复

Thank you so much for this Aurora it really helped me work on my ROG, hope my extra notes on Section 11 & 12 help others! Blessings!

Off Duty Pastor - 回复

I have a G751JT-CH71 & I'm not sure if the models are slightly different but I cannot remove the battery by simply lifting it out of the compartment. The battery has 4 lock-in tabs towards the back of the laptop AND 2 additional tabs that are beneath the board. I'm going to carefully pry the battery out, but I'm unsure if there's a recommended method to prying the battery out…

Daniel Sierra - 回复

添加评论

浏览统计数据:

过去 24 小时: 4

过去 7 天: 15

过去 30 天: 64

总计 5,590