跳转到主内容

本指南有最近更改,您可查看未经巡查的最新版本

Asus Q534U CPU Fan/Heat Sink Replacement

你所需要的

  1. Asus Q534U CPU Fan/Heat Sink Replacement, Back Case Removal: 步骤 1 中的图像 1,1
    • Make sure the device is turned off and unplugged from the charger.

    • Use a T5 screwdriver to remove all 10 screws that secure the bottom cover.

    • Pull off the back cover of the laptop.

    • A pry tool may be needed to pull off the back cover.

  2. Asus Q534U CPU Fan/Heat Sink Replacement: 步骤 2 中的图像 1,2 Asus Q534U CPU Fan/Heat Sink Replacement: 步骤 2 中的图像 2,2
    • Wedge an opening tool under the battery's bundled cable connector, and gently pry the connector up and to disconnect the battery.

    Awesome step!

    Mi Pa Si - 回复

    Thanks yet again!!

    syellon - 回复

    Step 2 I did not realize that the pictures to the right were enlarged for easier understanding of the step. Great walk through even a 66 year old man could understand and do it. Got the I Fix It tools which made opening the case and working with the tiny screws a breeze.

    Steven CARTER - 回复

  3. Asus Q534U CPU Fan/Heat Sink Replacement: 步骤 3 中的图像 1,2 Asus Q534U CPU Fan/Heat Sink Replacement: 步骤 3 中的图像 2,2
    • Lift up the black tab next to the silver ribbon cable.

    • Pull lightly on the blue tabs until the silver cable is free.

    Before doing anything here I would highly recommend disconnecting the buttery. I didn't do it myself at the beginning and when removing this ribbon cable I caused sparks going off the right connector.

    Alex Vasko - 回复

    Great suggestion, Alex! This guide should now reflect a safer and more accurate procedure. Thanks for the heads-up.

    Richard -

    To clarify: you need to flip up the black plastic tab of the recepticle, not the cable. Then don't pull the blue tab up, you need to angle it up just a little bit, about 15 degrees, then slide the cable out.

    Gaspard van Ko - 回复

  4. Asus Q534U CPU Fan/Heat Sink Replacement: 步骤 4 中的图像 1,1
    • Use a Phillips #00 screwdriver to remove the 5 marked screws.

    • Gently remove the battery.

    • Do not bend or puncture the laptop's lithium-polymer pattery.

  5. Asus Q534U CPU Fan/Heat Sink Replacement, CPU Fan/Heat Sink: 步骤 5 中的图像 1,2 Asus Q534U CPU Fan/Heat Sink Replacement, CPU Fan/Heat Sink: 步骤 5 中的图像 2,2
    • Using the iFixit opening tool, gently pry the CPU fan connector out of the socket.

  6. Asus Q534U CPU Fan/Heat Sink Replacement: 步骤 6 中的图像 1,2 Asus Q534U CPU Fan/Heat Sink Replacement: 步骤 6 中的图像 2,2
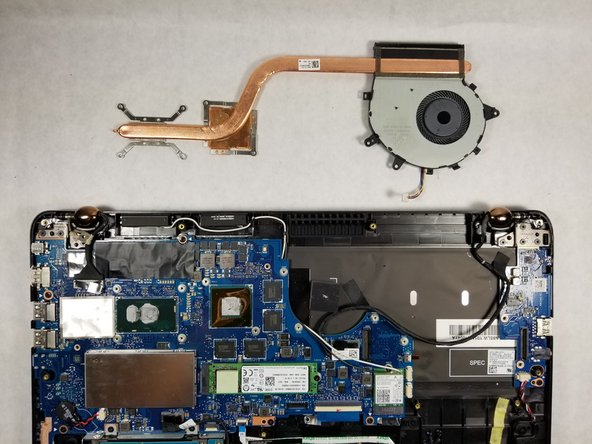
    • Move the black cable located around the CPU fan out of the holder.

    • Remove the following 9 screws:

    • Three Phillips screws

    • Six Phillips screws

    • Make sure not to mix up both types of screws.

    • Gently pull vertically on the CPU fan/ heat sink assembly until it is free.

    • Before placing a new CPU fan/heat sink assembly, the CPU and GPU surfaces must be cleaned off and thermal compound must be reapplied.

结论

To reassemble your device, follow these instructions in reverse order.

4等其他人完成本指南。

mmedina

于04/07/16注册

749 声望

创作了2篇指南

团队

UMass Dartmouth, Team S66-G6, Rockett Fall 2017 UMass Dartmouth, Team S66-G6, Rockett Fall 2017 的会员

UMASSD-ROCKETT-F17S66G6

3 名成员

创作了5篇指南

一条评论

Is it possible to replace the fan only without removing the full heatsink or is it fused together as one unit?

Bork Bois - 回复

添加评论

浏览统计数据:

过去 24 小时: 0

过去 7 天: 2

过去 30 天: 11

总计 2,870