跳转到主内容

Asus MeMO Pad 7 ME170C Rear Facing Camera Replacement

你所需要的

  1. Asus MeMO Pad 7 ME170C Rear Facing Camera Replacement, Motherboard: 步骤 1 中的图像 1,3 Asus MeMO Pad 7 ME170C Rear Facing Camera Replacement, Motherboard: 步骤 1 中的图像 2,3 Asus MeMO Pad 7 ME170C Rear Facing Camera Replacement, Motherboard: 步骤 1 中的图像 3,3
    • Power off the device before disassembly.

    • Be gentle; excessive force can result in a damaged or cracked screen.

    • Gently pry a Jimmy all around the seam of the device until the back panel detaches.

  2. Asus MeMO Pad 7 ME170C Rear Facing Camera Replacement: 步骤 2 中的图像 1,3 Asus MeMO Pad 7 ME170C Rear Facing Camera Replacement: 步骤 2 中的图像 2,3 Asus MeMO Pad 7 ME170C Rear Facing Camera Replacement: 步骤 2 中的图像 3,3
    • Use an iFixit opening tool to gently push the black bundle cable connector in a forward motion until it loosens without pushing down on the bundle cable connector.

  3. Asus MeMO Pad 7 ME170C Rear Facing Camera Replacement: 步骤 3 中的图像 1,3 Asus MeMO Pad 7 ME170C Rear Facing Camera Replacement: 步骤 3 中的图像 2,3 Asus MeMO Pad 7 ME170C Rear Facing Camera Replacement: 步骤 3 中的图像 3,3
    • Use the plastic opening tool to pry around the edges of the battery.

    • The battery should be laying freely in its port.

    • Lift the battery out of its port.

  4. Asus MeMO Pad 7 ME170C Rear Facing Camera Replacement: 步骤 4 中的图像 1,3 Asus MeMO Pad 7 ME170C Rear Facing Camera Replacement: 步骤 4 中的图像 2,3 Asus MeMO Pad 7 ME170C Rear Facing Camera Replacement: 步骤 4 中的图像 3,3
    • Use a plastic opening tool to slide the white cable connector completely out of the port.

  5. Asus MeMO Pad 7 ME170C Rear Facing Camera Replacement: 步骤 5 中的图像 1,3 Asus MeMO Pad 7 ME170C Rear Facing Camera Replacement: 步骤 5 中的图像 2,3 Asus MeMO Pad 7 ME170C Rear Facing Camera Replacement: 步骤 5 中的图像 3,3
    在这个步骤中使用的工具:
    Tweezers
    $4.99
    购买
    • Flip up the beige clip to loosen the cable.

    • Use the wide nosed tweezers to pinch the blue tab attached to the ribbon cable.

    • Pull the blue tab gently in a lateral motion until it is completely out of its port.

  6. Asus MeMO Pad 7 ME170C Rear Facing Camera Replacement: 步骤 6 中的图像 1,3 Asus MeMO Pad 7 ME170C Rear Facing Camera Replacement: 步骤 6 中的图像 2,3 Asus MeMO Pad 7 ME170C Rear Facing Camera Replacement: 步骤 6 中的图像 3,3
    • Use the wide nosed tweezers to gently pull out the orange ribbon inserted in the port on the motherboard.

  7. Asus MeMO Pad 7 ME170C Rear Facing Camera Replacement: 步骤 7 中的图像 1,3 Asus MeMO Pad 7 ME170C Rear Facing Camera Replacement: 步骤 7 中的图像 2,3 Asus MeMO Pad 7 ME170C Rear Facing Camera Replacement: 步骤 7 中的图像 3,3
    • Use a plastic opening tool to push the white cable connector out of its port in a side to side motion.

  8. Asus MeMO Pad 7 ME170C Rear Facing Camera Replacement: 步骤 8 中的图像 1,2 Asus MeMO Pad 7 ME170C Rear Facing Camera Replacement: 步骤 8 中的图像 2,2
    • Use the Phillips #000 screwdriver to unscrew the seven screws.

    • There should be two silver and five black screws.

  9. Asus MeMO Pad 7 ME170C Rear Facing Camera Replacement: 步骤 9 中的图像 1,2 Asus MeMO Pad 7 ME170C Rear Facing Camera Replacement: 步骤 9 中的图像 2,2
    • Once the screws are removed, the speaker component will be loosely laying in the track.

    • Use the metal spudger tool to remove the speaker by gently lifting the edge of it.

  10. Asus MeMO Pad 7 ME170C Rear Facing Camera Replacement: 步骤 10 中的图像 1,3 Asus MeMO Pad 7 ME170C Rear Facing Camera Replacement: 步骤 10 中的图像 2,3 Asus MeMO Pad 7 ME170C Rear Facing Camera Replacement: 步骤 10 中的图像 3,3
    • Remove the silver tape on one corner with the needle nosed tweezers, and remove the tape from the motherboard.

  11. Asus MeMO Pad 7 ME170C Rear Facing Camera Replacement: 步骤 11 中的图像 1,3 Asus MeMO Pad 7 ME170C Rear Facing Camera Replacement: 步骤 11 中的图像 2,3 Asus MeMO Pad 7 ME170C Rear Facing Camera Replacement: 步骤 11 中的图像 3,3
    • Use the needle nosed tweezers to gently pull both of the orange ribbon cables out of their ports.

  12. Asus MeMO Pad 7 ME170C Rear Facing Camera Replacement: 步骤 12 中的图像 1,3 Asus MeMO Pad 7 ME170C Rear Facing Camera Replacement: 步骤 12 中的图像 2,3 Asus MeMO Pad 7 ME170C Rear Facing Camera Replacement: 步骤 12 中的图像 3,3
    • Use the Phillips #000 screwdriver to unscrew all five screws.

  13. Asus MeMO Pad 7 ME170C Rear Facing Camera Replacement: 步骤 13 中的图像 1,2 Asus MeMO Pad 7 ME170C Rear Facing Camera Replacement: 步骤 13 中的图像 2,2
    • To uninstall the motherboard, use the metal spudger tool to lift it out of the device.

  14. Asus MeMO Pad 7 ME170C Rear Facing Camera Replacement, Rear Facing Camera: 步骤 14 中的图像 1,3 Asus MeMO Pad 7 ME170C Rear Facing Camera Replacement, Rear Facing Camera: 步骤 14 中的图像 2,3 Asus MeMO Pad 7 ME170C Rear Facing Camera Replacement, Rear Facing Camera: 步骤 14 中的图像 3,3
    在这个步骤中使用的工具:
    Tweezers
    $4.99
    购买
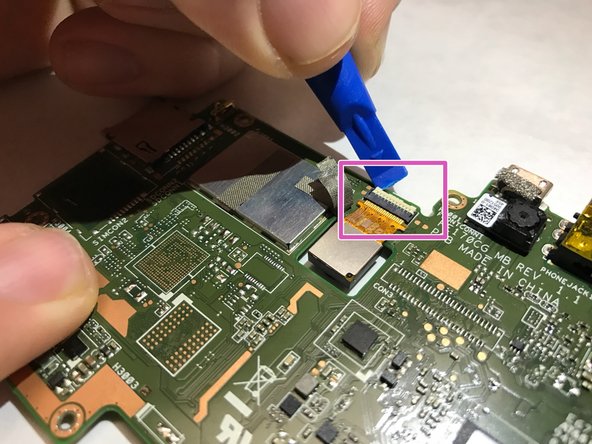
    • Gently remove grey tape that is holding down connector for camera using the tweezers.

    • When tape is removed, use the plastic prying tool to gently unlock connector between camera wiring and motherboard. The connector lock rotates upward away from motherboard to release.

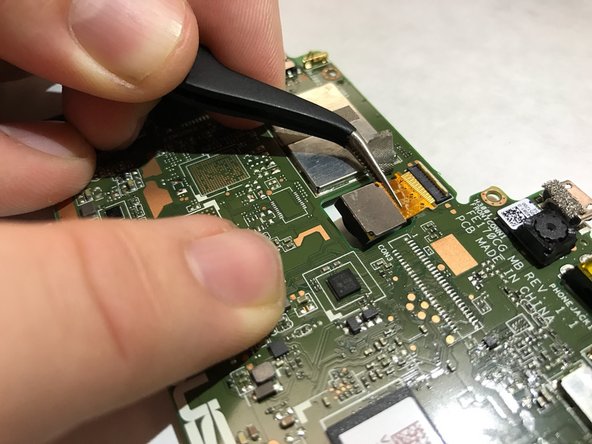
    • Carefully remove camera from motherboard using tweezers by pulling directly upward. Camera should release easily without much resistance.

结论

To reassemble your device, follow these instructions in reverse order.

Thomas Brooks

于03/04/17注册

301 声望

创作了3篇指南

团队

IUPUI, Team S3-G3, Wilson Spring 2017 IUPUI, Team S3-G3, Wilson Spring 2017 的会员

IUPUI-WILSON-S17S3G3

5 名成员

创作了6篇指南

0条评论

添加评论

浏览统计数据:

过去 24 小时: 1

过去 7 天: 4

过去 30 天: 4

总计 132