跳转到主内容

Asus K53E-BBR3 Optical Drive Replacement

你所需要的

  1. Asus K53E-BBR3 Optical Drive Replacement, Battery: 步骤 1 中的图像 1,3 Asus K53E-BBR3 Optical Drive Replacement, Battery: 步骤 1 中的图像 2,3 Asus K53E-BBR3 Optical Drive Replacement, Battery: 步骤 1 中的图像 3,3
    • Place your laptop face down in front of you.

    • Slide the button in the top right corner to the right so that the orange marker is showing.

    • Press the spring loaded latch to release the battery from the computer.

  2. Asus K53E-BBR3 Optical Drive Replacement, Back Panel: 步骤 2 中的图像 1,1
    • Unscrew two 5mm Phillips #1 screws.

  3. Asus K53E-BBR3 Optical Drive Replacement: 步骤 3 中的图像 1,1
    • Pull down and lift up on the back panel to remove it.

  4. Asus K53E-BBR3 Optical Drive Replacement, Keyboard: 步骤 4 中的图像 1,3 Asus K53E-BBR3 Optical Drive Replacement, Keyboard: 步骤 4 中的图像 2,3 Asus K53E-BBR3 Optical Drive Replacement, Keyboard: 步骤 4 中的图像 3,3
    • There is a ribbon connector underneath the keyboard. When lifting up the keyboard be gentle and carefully it up.

    • Insert the spudger into the indent near the "ESC" key.

    • Firmly wiggle the spudger across the keyboard in between the space until you can remove the keyboard.

  5. Asus K53E-BBR3 Optical Drive Replacement: 步骤 5 中的图像 1,1
    • Gently pull the ribbon cable to the right and out of its port.

  6. Asus K53E-BBR3 Optical Drive Replacement, Optical Drive: 步骤 6 中的图像 1,3 Asus K53E-BBR3 Optical Drive Replacement, Optical Drive: 步骤 6 中的图像 2,3 Asus K53E-BBR3 Optical Drive Replacement, Optical Drive: 步骤 6 中的图像 3,3
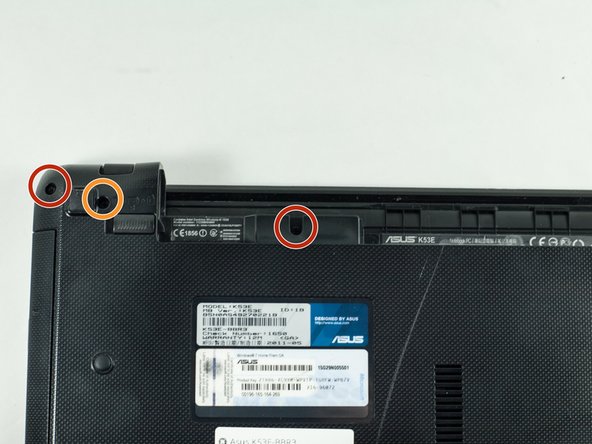
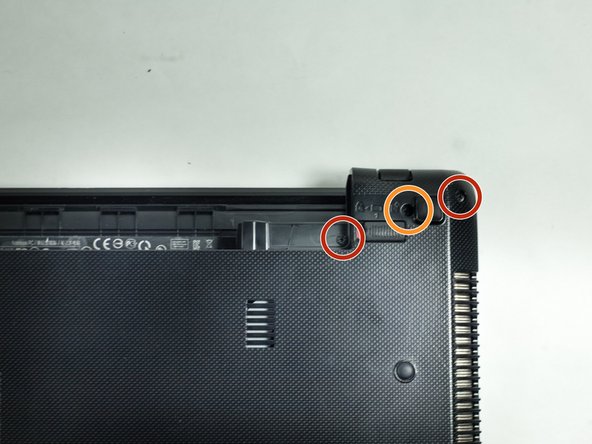
    • On the back of the laptop unscrew the eighteen 5mm Phillips #1 screws.

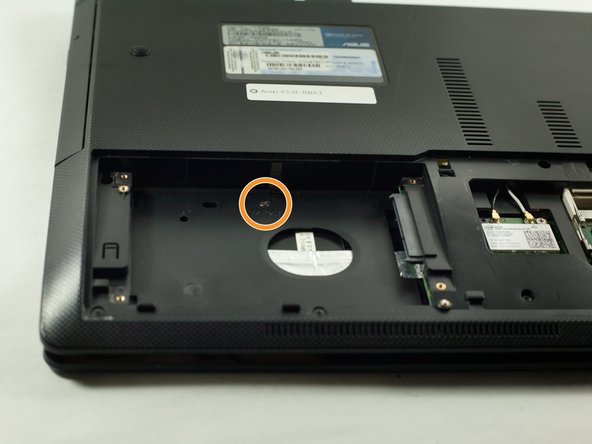
    • Unscrew the two 5mm Phillips #1 screws.

    • The screws highlighted in orange are slightly thicker than those in red, however they are the same length and head type.

  7. Asus K53E-BBR3 Optical Drive Replacement: 步骤 7 中的图像 1,2 Asus K53E-BBR3 Optical Drive Replacement: 步骤 7 中的图像 2,2
    • Unscrew the four highlighted 5mm Phillips #1 screws, and remove the hard drive.

    • Unscrew the 3mm Phillips #1 screw.

  8. Asus K53E-BBR3 Optical Drive Replacement: 步骤 8 中的图像 1,1
    • Flip the laptop over and remove the seven 5mm Phillips #1 screws.

  9. Asus K53E-BBR3 Optical Drive Replacement: 步骤 9 中的图像 1,2 Asus K53E-BBR3 Optical Drive Replacement: 步骤 9 中的图像 2,2
    • There is a ribbon connector that is connecting the two halves of the laptop. So when opening the two plastic pieces be careful not to damage the cable.

    • Using the plastic opening tool, firmly pry apart the two sections of plastic.

    • Firmly shimmy the opening tool around the laptop prying the two sections of plastic apart.

    • Disconnect the highlighted ribbon cable, by pulling up on the black tab and gently pulling the cable out of its port.

  10. Asus K53E-BBR3 Optical Drive Replacement: 步骤 10 中的图像 1,2 Asus K53E-BBR3 Optical Drive Replacement: 步骤 10 中的图像 2,2
    • Unscrew the three 3mm Phillips #0 screws.

    • Slide the optical drive to the right.

    • Remove the optical drive.

结论

To reassemble your device, follow these instructions in reverse order.

Jacob O'Donnell

于10/17/16注册

323 声望

创作了3篇指南

团队

UMass Dartmouth, Team 1-1, Catania Fall 2016 UMass Dartmouth, Team 1-1, Catania Fall 2016 的会员

UMASSD-CATANIA-F16S1G1

3 名成员

创作了7篇指南

0条评论

添加评论

浏览统计数据:

过去 24 小时: 0

过去 7 天: 1

过去 30 天: 2

总计 628