跳转到主内容

Asus G750JW-BBI7N05 Hard Drive Replacement

你所需要的

  1. Asus G750JW-BBI7N05 Hard Drive Replacement, Battery: 步骤 1 中的图像 1,1
    • Power off and unplug your laptop, then turn it over.

  2. Asus G750JW-BBI7N05 Hard Drive Replacement: 步骤 2 中的图像 1,1
    • Slide the battery release latch all the way to the right. This will cause the battery to "pop" out slightly.

  3. Asus G750JW-BBI7N05 Hard Drive Replacement: 步骤 3 中的图像 1,1
    • Remove the battery from its compartment.

  4. Asus G750JW-BBI7N05 Hard Drive Replacement, Hard Drive: 步骤 4 中的图像 1,2 Asus G750JW-BBI7N05 Hard Drive Replacement, Hard Drive: 步骤 4 中的图像 2,2
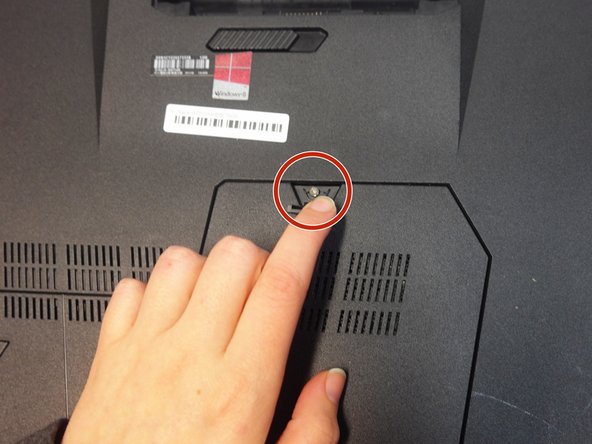
    • Lift up the rubber stopper on the backplate to expose one Phillips #00 screw. Unscrew it until it becomes loose.

    • This screw is permanently connected to the backplate and cannot be removed. Unscrewing it only allows you to remove the lower case from the laptop.

    • The backpate is the plastic plate on the underside of the laptop that covers some of its easily accessible internal components.

  5. Asus G750JW-BBI7N05 Hard Drive Replacement: 步骤 5 中的图像 1,1
    • Use an opening tool to pry up the backplate along its edges, then remove it.

    • You may need to apply some force when prying up the backplate.

    • Keep in mind: During reassembly, replace the backplate starting from the bottom.

  6. Asus G750JW-BBI7N05 Hard Drive Replacement: 步骤 6 中的图像 1,2 Asus G750JW-BBI7N05 Hard Drive Replacement: 步骤 6 中的图像 2,2
    • On the left metal hard drive casing, unscrew and remove the indicated three 4mm Phillips #00 screws.

    • The right hard drive casing is for optional secondary hard drives.

  7. Asus G750JW-BBI7N05 Hard Drive Replacement: 步骤 7 中的图像 1,2 Asus G750JW-BBI7N05 Hard Drive Replacement: 步骤 7 中的图像 2,2
    • Use the black tab as leverage to slide the metal hard drive casing all the way to the left.

    • Still holding the black tab, pull the hard drive casing up to remove it from the laptop.

  8. Asus G750JW-BBI7N05 Hard Drive Replacement: 步骤 8 中的图像 1,1
    • Unscrew and remove the four 4mm Phillips #00 screws around the metal casing. Each side has two screws.

    • Slide the hard drive out of its metal casing.

结论

To reassemble your device, follow these instructions in reverse order.

2等其他人完成本指南。

0条评论

添加评论

浏览统计数据:

过去 24 小时: 0

过去 7 天: 1

过去 30 天: 6

总计 2,251