跳转到主内容

当前版本的文档还未经巡查,您可以查看最新的已查核版本

你所需要的

  1. 这个步骤还没有翻译 帮忙翻译一下

    : 步骤 1 中的图像 1,2 : 步骤 1 中的图像 2,2
    • Begin by removing the six square rubber pads around the edge of the frame. These cover the screws to remove the outer frame. They can be taken out by hand or with a pair of tweezers.

    • The squares are attached by a light adhesive which may need to be replaced if it wears off due to constant removal

    • Next, remove the six 6mm Phillip #0 screws from the frame using a Phillips #0 screwdriver.

  2. 这个步骤还没有翻译 帮忙翻译一下

    : 步骤 2 中的图像 1,1
    • Use a spudger to remove the frame. It should come off easier at the top than the bottom so start at the top and work your way down.

    • Be careful when prying off frame so as not to damage the screen or the frame itself.

  3. 这个步骤还没有翻译 帮忙翻译一下

    : 步骤 3 中的图像 1,2 : 步骤 3 中的图像 2,2
    • Remove the two 6mm Phillips #0 screws from the top left and right corners using a Phillips #0 screwdriver.

    • Gently lift the top bracket off of the screen and set it aside.

  4. 这个步骤还没有翻译 帮忙翻译一下

    : 步骤 4 中的图像 1,3 : 步骤 4 中的图像 2,3 : 步骤 4 中的图像 3,3
    • Repeat the last step with the bottom bracket, removing eight 6 mm Phillips #0 screws using a Phillips #0 screwdriver. Set the bracket aside.

  5. 这个步骤还没有翻译 帮忙翻译一下

    : 步骤 5 中的图像 1,3 : 步骤 5 中的图像 2,3 : 步骤 5 中的图像 3,3
    • Remove four 6mm Phillips #0 screws from the hinges at the bottom of the screen using a Phillips #0 screwdriver.

    • The top section of the laptop will no longer be attached, so gently lay it back on the table.

  6. 这个步骤还没有翻译 帮忙翻译一下

    : 步骤 6 中的图像 1,2 : 步骤 6 中的图像 2,2
    • Remove the two 6mm Phillips #0 screws on either side of the screen using a Phillips #0 screwdriver.

  7. 这个步骤还没有翻译 帮忙翻译一下

    : 步骤 7 中的图像 1,2 : 步骤 7 中的图像 2,2
    • Remove the screen from the laptop casing and flip it over. Peel the sticker above the connector back and firmly pull the connector out.

  8. 这个步骤还没有翻译 帮忙翻译一下

    : 步骤 8 中的图像 1,2 : 步骤 8 中的图像 2,2
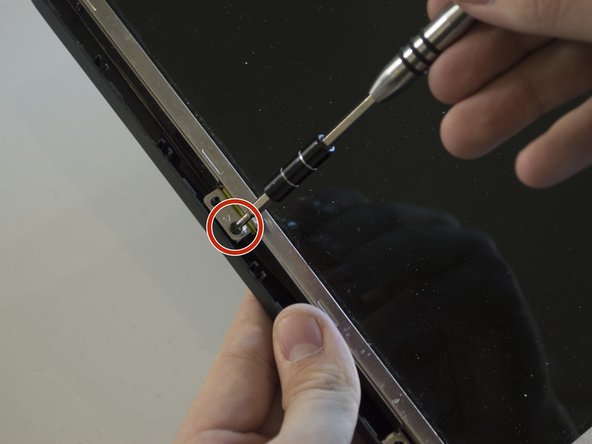
    • The last step is to remove eight 3mm Phillip #0 screws from both side brackets of the screen itself using a Phillips #0 screwdriver. There are four screws on each side.

终点

4等其他人完成本指南。

Ryan Lawrence

于04/14/15注册

611 声望

创作了5篇指南

团队

Cal Poly, Team 5-10, Maness Spring 2015 Cal Poly, Team 5-10, Maness Spring 2015 的会员

CPSU-MANESS-S15S5G10

4 名成员

创作了6篇指南

一条评论

I replace a motherboard in computer AND W0NT SHOW 0N THE SCREEN BUT IT DOSE TURN ON

nicholasvotolato - 回复

添加评论

浏览统计数据:

过去 24 小时: 1

过去 7 天: 9

过去 30 天: 17

总计 2,144