跳转到主内容

Asus Chromebook C300SA-DS02 LED Screen Replacement

你所需要的

  1. Asus Chromebook C300SA-DS02 LED Screen Replacement, Keyboard: 步骤 1 中的图像 1,2 Asus Chromebook C300SA-DS02 LED Screen Replacement, Keyboard: 步骤 1 中的图像 2,2
    • Power the laptop off and make sure the charger is unplugged before starting.

    • Remove the eight 8.0mm Phillips #0 screws on the bottom of the laptop.

    • Remove the three 6.0mm Phillips #0 screws.

    I appear to have FIVE of the smaller screws. The four securing the near edge and the one in the center are smaller than the four securing the far edge and the left and right sides. Either your diagram is wrong, or someone screwed mine together incorrectly.

    brucegreer - 回复

    Mine is the same way — six long screws, five short ones. The screw paths seem to correspond accordingly.

    Paul Wagenseil - 回复

  2. Asus Chromebook C300SA-DS02 LED Screen Replacement: 步骤 2 中的图像 1,3 Asus Chromebook C300SA-DS02 LED Screen Replacement: 步骤 2 中的图像 2,3 Asus Chromebook C300SA-DS02 LED Screen Replacement: 步骤 2 中的图像 3,3
    • Open the laptop.

    • Using an iFixit opening tool, pry along the edges of the keyboard.

    • Lift the keyboard and slide it gently towards you.

    • Do not completely remove the keyboard. It is still connected to the back panel by a pair of ribbon cables.

  3. Asus Chromebook C300SA-DS02 LED Screen Replacement: 步骤 3 中的图像 1,3 Asus Chromebook C300SA-DS02 LED Screen Replacement: 步骤 3 中的图像 2,3 Asus Chromebook C300SA-DS02 LED Screen Replacement: 步骤 3 中的图像 3,3
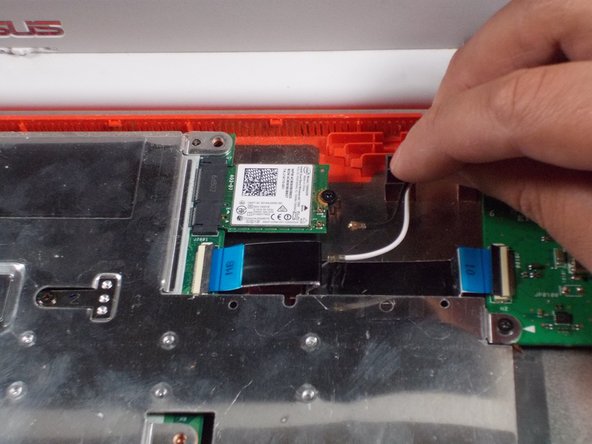
    • Disconnect the two ZIF connectors by prying up the locking bar with a spudger and removing the ribbon cable.

    Peut-on trouver le verrouillage zif en détail sur internet ou autres ?

    Jeremy Audy - 回复

  4. Asus Chromebook C300SA-DS02 LED Screen Replacement: 步骤 4 中的图像 1,1
    • Remove the keyboard from the laptop.

  5. Asus Chromebook C300SA-DS02 LED Screen Replacement, Battery: 步骤 5 中的图像 1,2 Asus Chromebook C300SA-DS02 LED Screen Replacement, Battery: 步骤 5 中的图像 2,2
    • Remove the six 5.6mm Phillips #0 screws around the battery.

  6. Asus Chromebook C300SA-DS02 LED Screen Replacement: 步骤 6 中的图像 1,2 Asus Chromebook C300SA-DS02 LED Screen Replacement: 步骤 6 中的图像 2,2
    • Using your thumb and index finger, pinch the multi-color cable and disconnect it from the motherboard.

    A serious omission is that there is a metal clamp holding the battery connector in place that MUST be slid back in order for the connector to be lifted up and off.

    Rob - 回复

  7. Asus Chromebook C300SA-DS02 LED Screen Replacement: 步骤 7 中的图像 1,1
    • Lift the battery out of the laptop.

  8. Asus Chromebook C300SA-DS02 LED Screen Replacement, LED Screen: 步骤 8 中的图像 1,2 Asus Chromebook C300SA-DS02 LED Screen Replacement, LED Screen: 步骤 8 中的图像 2,2
    • Unplug the black and white cable from the motherboard.

    • These two wires connect to the antenna within the display assembly. The white cable is longer and connects to the bottom import.

  9. Asus Chromebook C300SA-DS02 LED Screen Replacement: 步骤 9 中的图像 1,1
    • Peel back the tape covering the plug.

    • Slide the cable towards the screen and out of the input.

  10. Asus Chromebook C300SA-DS02 LED Screen Replacement: 步骤 10 中的图像 1,1
    • Unscrew the 6 screws (5 millimeter) on the top right and left.

  11. Asus Chromebook C300SA-DS02 LED Screen Replacement: 步骤 11 中的图像 1,1
    • Gently lift the screen up and away from the laptop.

  12. Asus Chromebook C300SA-DS02 LED Screen Replacement: 步骤 12 中的图像 1,1
    • Pry off the face panel on the screen using the blue prying tool.

  13. Asus Chromebook C300SA-DS02 LED Screen Replacement: 步骤 13 中的图像 1,1
    • Remove the four 2mm Phillips #0 screws from the four corners of the screen.

  14. Asus Chromebook C300SA-DS02 LED Screen Replacement: 步骤 14 中的图像 1,2 Asus Chromebook C300SA-DS02 LED Screen Replacement: 步骤 14 中的图像 2,2
    • Gently lift screen

    • Peel back the adhesive covering the cable.

    • Remove the cable to free the screen.

    This method may work, but I realized its too many steps when I got inside the keyboard. Just pry off the curved hinge cover on the back (its a pain), pry off the screen bezel, unscrew 4 screws holding the LCD in place, lower the LCD, disconnect the LCD from the cable at the bottom right of the LCD. Install the new one in reverse order.

    Allen Jones - 回复

结论

To reassemble your device, follow these instructions in reverse order.

另外一个人完成了本指南。

Celina Monteiro

于10/17/17注册

224 声望

创作了2篇指南

团队

UMass Dartmouth, Team S1-G7, Simcock Fall 2017 UMass Dartmouth, Team S1-G7, Simcock Fall 2017 的会员

UMASSD-SIMCOCK-F17S1G7

3 名成员

创作了9篇指南

一条评论

I used this honestly I broke the screen and some of the wires in the screen are severed. Now I know for sure where the wires go and how to deconstruct it. Thank you so much!

Glorybringers Child - 回复

添加评论

浏览统计数据:

过去 24 小时: 0

过去 7 天: 1

过去 30 天: 3

总计 687