跳转到主内容

Asus 1015E-DS03 Motherboard Replacement

你所需要的

  1. Asus 1015E-DS03 Motherboard Replacement, Battery: 步骤 1 中的图像 1,1
    • Hold the laptop using both hands with the battery facing upwards.

  2. Asus 1015E-DS03 Motherboard Replacement: 步骤 2 中的图像 1,1
    • Push the two tabs located below the battery in towards each other using your thumbs.

  3. Asus 1015E-DS03 Motherboard Replacement: 步骤 3 中的图像 1,1
    • Push the battery upwards and out of the laptop as shown.

  4. Asus 1015E-DS03 Motherboard Replacement: 步骤 4 中的图像 1,1
    • Continue to push the battery upwards until it is completely separated from the laptop as shown.

  5. Asus 1015E-DS03 Motherboard Replacement, Keyboard: 步骤 5 中的图像 1,1
    • Once the battery is removed, unscrew the highlighted 3mm screws (4) using a #0 Phillps head screwdriver.

    • Be very careful not to lose the screws, these four screws are very small.

  6. Asus 1015E-DS03 Motherboard Replacement: 步骤 6 中的图像 1,2 Asus 1015E-DS03 Motherboard Replacement: 步骤 6 中的图像 2,2
    • After all four screws are removed, flip the laptop over with the keyboard facing up.

    • Use a spudger to pry up where the keyboard is attached to the laptop on all sides until it is detached from the laptop.

    • It is normal to hear cracking noises when prying off the keyboard.

    • After keyboard is detached from laptop, there is a ribbon cable still attached to the motherboard. See next step before completely removing keyboard.

  7. Asus 1015E-DS03 Motherboard Replacement: 步骤 7 中的图像 1,1
    • After the keyboard is detached, the ribbon cable which connects the keyboard to the laptop's motherboard is exposed.

    • Be careful not to tear or rip the ribbon cable.

  8. Asus 1015E-DS03 Motherboard Replacement: 步骤 8 中的图像 1,1
    • Using the spudger push the white clips upwards that are holding the cable.

  9. Asus 1015E-DS03 Motherboard Replacement: 步骤 9 中的图像 1,2 Asus 1015E-DS03 Motherboard Replacement: 步骤 9 中的图像 2,2
    • Gently pull the strip out of the square slot.

  10. Asus 1015E-DS03 Motherboard Replacement, Motherboard: 步骤 10 中的图像 1,1
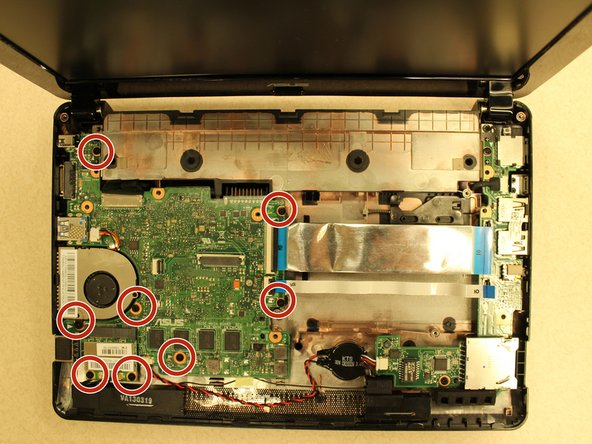
    • Remove the 3mm screws (8) from the motherboard using a #0 Phillips head screwdriver.

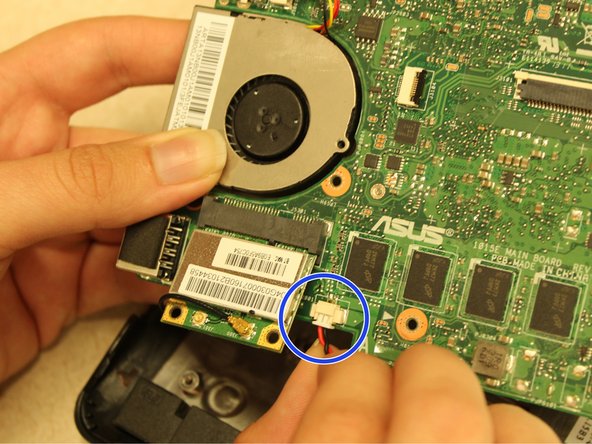
    • Carefully and slowly lift the motherboard out of the base of the laptop.

    • In the picture shown, the hard drive has already been removed, although, it is not necessary to remove the hard drive in order to remove the motherboard. Simply disconnect the two ZIF connectors from the hard drive that are labeled "IO" as shown in the picture and leave the hard drive in place.

  11. Asus 1015E-DS03 Motherboard Replacement: 步骤 11 中的图像 1,3 Asus 1015E-DS03 Motherboard Replacement: 步骤 11 中的图像 2,3 Asus 1015E-DS03 Motherboard Replacement: 步骤 11 中的图像 3,3
    • Detach the 3 components (2 wires and 1 chip) prior to completely removing the motherboard.

    • Gently pull on the wire until it comes loose.

    • The wire will offer resistance, but firmly, yet gently, pulling on the wire will release it from its dock.

    • Gently pull the chip out of its dock.

  12. Asus 1015E-DS03 Motherboard Replacement: 步骤 12 中的图像 1,2 Asus 1015E-DS03 Motherboard Replacement: 步骤 12 中的图像 2,2
    • Gently pull out the final cord.

    • When the wires and chip have been successfully detached from the motherboard, your laptop (and the removed pieces) should resemble the picture.

结论

To reassemble your device, follow these instructions in reverse order.

2等其他人完成本指南。

Joe Capriola

于03/21/16注册

428 声望

创作了3篇指南

团队

Clemson, Team 7-4, Benson Spring 2016 Clemson, Team 7-4, Benson Spring 2016 的会员

CLEM-BENSON-S16S7G4

5 名成员

创作了7篇指南

0条评论

添加评论

浏览统计数据:

过去 24 小时: 2

过去 7 天: 4

过去 30 天: 11

总计 1,796