跳转到主内容

Apex Tablet 7 Volume Control Button Replacement

你所需要的

  1. Apex Tablet 7 Volume Control Button  Replacement, Back Panel: 步骤 1 中的图像 1,1
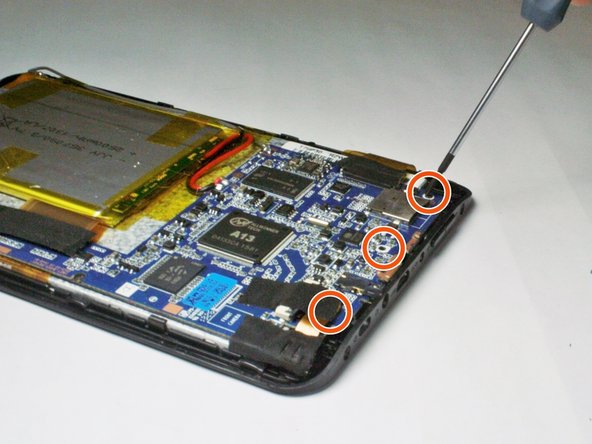
    • Unscrew the two 2.70 mm Phillips #00 screws on the side of the tablet that has the buttons and the headphone jack (bottom side when holding upright).

  2. Apex Tablet 7 Volume Control Button  Replacement: 步骤 2 中的图像 1,2 Apex Tablet 7 Volume Control Button  Replacement: 步骤 2 中的图像 2,2
    • CAUTION: When removing the back panel of the tablet, take caution around the speaker. This is located in the lower right corner when looking at the back of the tablet. There are two wires inside connecting the tablet back panel to the device itself and this connection may be severed if the back is pulled off without care.

    • This connection is shown in red on the pictures.

  3. Apex Tablet 7 Volume Control Button  Replacement: 步骤 3 中的图像 1,2 Apex Tablet 7 Volume Control Button  Replacement: 步骤 3 中的图像 2,2
    • Slide a plastic opening tool in between the edge of the back panel and the the top edge of the device.

    • Run the plastic opening tool along the sides of the tablet while keeping it in the crack between the tablet and the back panel to create an opening.

  4. Apex Tablet 7 Volume Control Button  Replacement: 步骤 4 中的图像 1,1
    • Apply pressure using your hand to pop the back panel off slowly, taking extra care around the speaker connection.

  5. Apex Tablet 7 Volume Control Button  Replacement: 步骤 5 中的图像 1,1
    • The back panel should now be disconnected from the device. This provides access to the components of the device for repairing and replacing parts of the tablet.

  6. Apex Tablet 7 Volume Control Button  Replacement, Volume Control Button: 步骤 6 中的图像 1,1
    • The volume button is located as shown in the picture.

  7. Apex Tablet 7 Volume Control Button  Replacement: 步骤 7 中的图像 1,1
    • With the back cover off, unscrew each of the 3 screws 2.70 mm Phillips #00 holding down the circuit board.

    • NOTE: the left-most screw may be hidden underneath the black piece of tape, so you may need to first lift the corner of the tape up to expose it.

  8. Apex Tablet 7 Volume Control Button  Replacement: 步骤 8 中的图像 1,2 Apex Tablet 7 Volume Control Button  Replacement: 步骤 8 中的图像 2,2
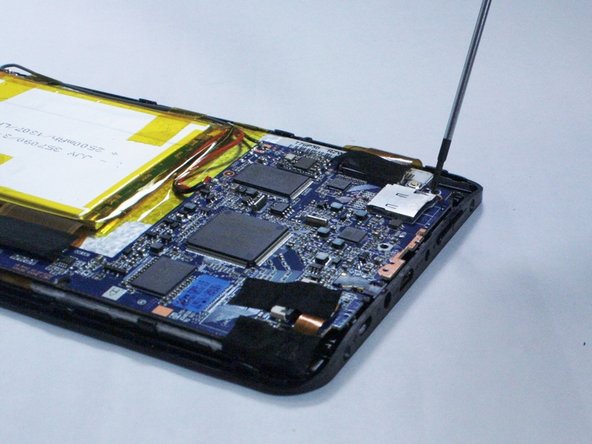
    • Once the screws are out, use a plastic opening tool to gently apply pressure on the edge of the circuit board against the edge of the tablet. This will pop each of the component heads out of their sockets on the edge of the tablet, leaving the circuit board loose inside.

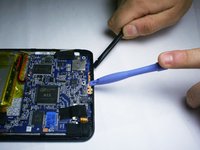
    • Using a plastic opening tool, gently lift the loose circuit board up and away from the back of the tablet.

  9. Apex Tablet 7 Volume Control Button  Replacement: 步骤 9 中的图像 1,1
    • Gently lift the circuit board. The volume button will now be free standing in its slot, and may or may not have already fallen out.

    • This is because the button sits loosely in its slot, and is held there by the edge of the circuit board.

  10. Apex Tablet 7 Volume Control Button  Replacement: 步骤 10 中的图像 1,2 Apex Tablet 7 Volume Control Button  Replacement: 步骤 10 中的图像 2,2
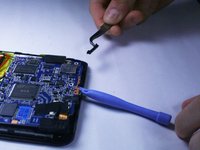
    • If the button did not fall out on its own, push the circuit board up with one tool while gently pushing inwards on the volume button with another tool to dislodge it.

    • The button will fall out under the circuit board.

    • Hold the circuit board up with the prying tool and extract the loose button with tweezers.

结论

To reassemble your device, follow these instructions in reverse order.

团队

Baylor, Team 2-2, Grigsby Spring 2015 Baylor, Team 2-2, Grigsby Spring 2015 的会员

BU-GRIGSBY-S15S2G2

4 名成员

创作了10篇指南

一条评论

Pictures in steps 12 and on are a little too dark.

Jimmy Ta - 回复

添加评论

浏览统计数据:

过去 24 小时: 0

过去 7 天: 1

过去 30 天: 2

总计 585