跳转到主内容

Amazon Kindle Oasis 8th Gen Motherboard Replacement

你所需要的

  1. Amazon Kindle Oasis 8th Gen Motherboard Replacement, Back Panel: 步骤 1 中的图像 1,1
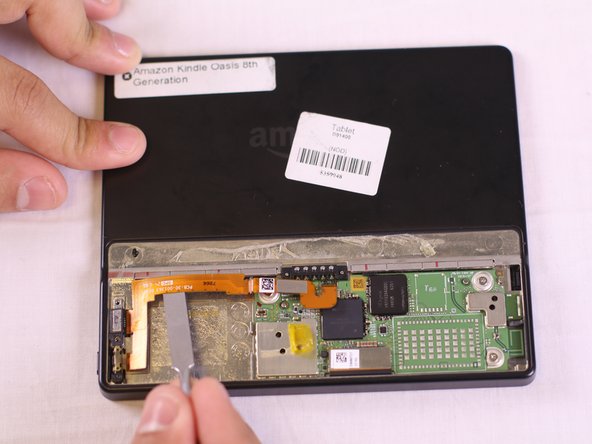
    • Carefully wedge the plastic opening tool between the back panel and the device to free the clips holding the back panel and the device together.

  2. Amazon Kindle Oasis 8th Gen Motherboard Replacement: 步骤 2 中的图像 1,3 Amazon Kindle Oasis 8th Gen Motherboard Replacement: 步骤 2 中的图像 2,3 Amazon Kindle Oasis 8th Gen Motherboard Replacement: 步骤 2 中的图像 3,3
    • Work your way around the back panel to free all the clips.

    • There are 5 clips on the long and thickest side of the oasis, and none on the others.

  3. Amazon Kindle Oasis 8th Gen Motherboard Replacement: 步骤 3 中的图像 1,2 Amazon Kindle Oasis 8th Gen Motherboard Replacement: 步骤 3 中的图像 2,2
    • Carefully remove the back panel from the device.

    • Gently peel the back panel away from the adhesive, being mindful to keep the adhesive strip in good condition so that it can be used again.

  4. Amazon Kindle Oasis 8th Gen Motherboard Replacement, Battery: 步骤 4 中的图像 1,1
    在这个步骤中使用的工具:
    Tweezers
    $4.99
    购买
    • Using tweezers, lift the orange bridge connector off.

    • Place the tweezers in between the battery and the end of the bridge and lift upwards.

  5. Amazon Kindle Oasis 8th Gen Motherboard Replacement: 步骤 5 中的图像 1,2 Amazon Kindle Oasis 8th Gen Motherboard Replacement: 步骤 5 中的图像 2,2
    • Gently wedge the spudger under the battery starting from the left side, and slowly work the spudger around the edge to loosen the battery from the tape. Be careful not to rip the thin foil on the back of the battery.

    • Only use ESD safe tools when working on internal components of your device such as a spudger or opening tool.

    • It is not advised to use a metal spudger, as you could puncture the battery.

  6. Amazon Kindle Oasis 8th Gen Motherboard Replacement: 步骤 6 中的图像 1,1
    • Lift the battery up using a spudger and use your fingers to slowly pull the battery off the adhesive.

  7. Amazon Kindle Oasis 8th Gen Motherboard Replacement: 步骤 7 中的图像 1,2 Amazon Kindle Oasis 8th Gen Motherboard Replacement: 步骤 7 中的图像 2,2
    在这个步骤中使用的工具:
    Tweezers
    $4.99
    购买
    • Using the tweezers, gently lift the tape off of the Power bridge connector. If a new unit comes with a new piece of tape, remove entirely, if not remove and place one corner lightly face down on a clean surface to be used again.

  8. Amazon Kindle Oasis 8th Gen Motherboard Replacement: 步骤 8 中的图像 1,1
    • Once free of the adhesive and connectors, remove the old battery from the device.

    • Attach the new battery by inserting the end of the orange power connector (the end not attached to the battery) clips into a little socket on the device (it's barely visible). You can tell when it clips in by the feel and sound. Make sure that when you put the new battery in, you first clip the connector in before you stick the tape down.

    • Be Aware: Your new battery might not be charged, so it may not power-on immediately! After replacing the battery, plug your Oasis in and let the battery charge to full capacity.

  9. Amazon Kindle Oasis 8th Gen Motherboard Replacement, Charging Port: 步骤 10 中的图像 1,3 Amazon Kindle Oasis 8th Gen Motherboard Replacement, Charging Port: 步骤 10 中的图像 2,3 Amazon Kindle Oasis 8th Gen Motherboard Replacement, Charging Port: 步骤 10 中的图像 3,3
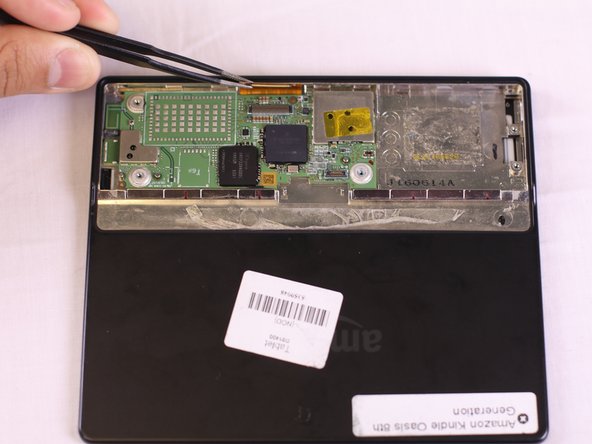
    • Locate the 2 Phillips screws (labeled PH 0) and remove screws using a screwdriver with a PH0 bit.

  10. Amazon Kindle Oasis 8th Gen Motherboard Replacement: 步骤 11 中的图像 1,3 Amazon Kindle Oasis 8th Gen Motherboard Replacement: 步骤 11 中的图像 2,3 Amazon Kindle Oasis 8th Gen Motherboard Replacement: 步骤 11 中的图像 3,3
    • Using the metal spudger, tweezers, and your finger tips, gently lift the orange power bridge connector off of the motherboard first and then off of the kindle.

  11. Amazon Kindle Oasis 8th Gen Motherboard Replacement: 步骤 12 中的图像 1,2 Amazon Kindle Oasis 8th Gen Motherboard Replacement: 步骤 12 中的图像 2,2
    • Use the tweezers to pluck the orange bridge power connector from the Kindle. The charging port and power button is attached to the connector.

  12. Amazon Kindle Oasis 8th Gen Motherboard Replacement, Motherboard: 步骤 13 中的图像 1,3 Amazon Kindle Oasis 8th Gen Motherboard Replacement, Motherboard: 步骤 13 中的图像 2,3 Amazon Kindle Oasis 8th Gen Motherboard Replacement, Motherboard: 步骤 13 中的图像 3,3
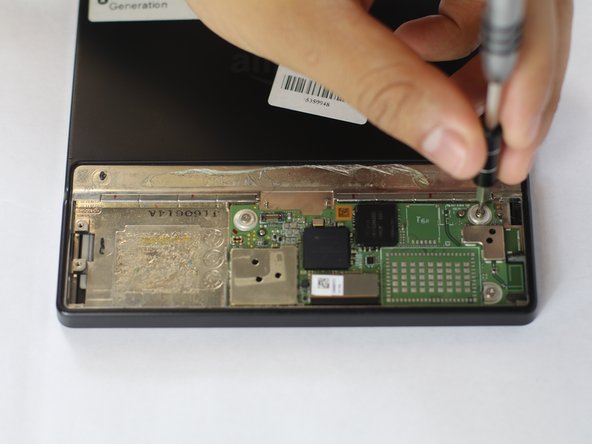
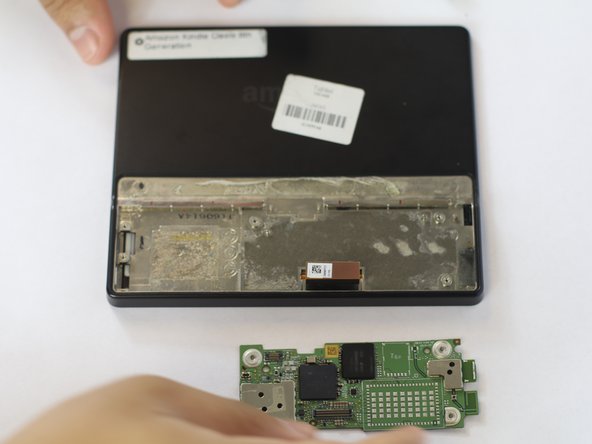
    • Locate the 3 Phillips screws (PH 0) on the motherboard and proceed to unscrew them using a screwdriver with a PH 0 bit.

  13. Amazon Kindle Oasis 8th Gen Motherboard Replacement: 步骤 14 中的图像 1,2 Amazon Kindle Oasis 8th Gen Motherboard Replacement: 步骤 14 中的图像 2,2
    • Locate the connector from the display screen on the motherboard and disconnect it with tweezers

  14. Amazon Kindle Oasis 8th Gen Motherboard Replacement: 步骤 15 中的图像 1,3 Amazon Kindle Oasis 8th Gen Motherboard Replacement: 步骤 15 中的图像 2,3 Amazon Kindle Oasis 8th Gen Motherboard Replacement: 步骤 15 中的图像 3,3
    • Use the metal spudger to wedge out the motherboard from the Kindle.

结论

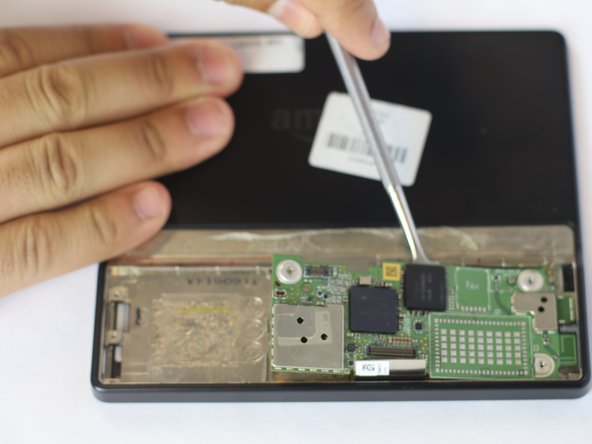
To reassemble your device, follow these instructions in reverse order.

另外一个人完成了本指南。

Mohamed Elzini

于09/27/17注册

416 声望

创作了4篇指南

团队

USF Tampa, Team S16-G5, Eyestone Fall 2017 USF Tampa, Team S16-G5, Eyestone Fall 2017 的会员

USFT-EYESTONE-F17S16G5

4 名成员

创作了16篇指南

一条评论

Hola tendrá es placa base que necesito una pieza. Para ver si lo puedo reparar?

Juan Carlos Pereira - 回复

添加评论

浏览统计数据:

过去 24 小时: 1

过去 7 天: 8

过去 30 天: 39

总计 3,064