跳转到主内容

Amazon Kindle DX LCD Replacement

你所需要的

  1. Amazon Kindle DX LCD Replacement, Liquid Crystal Display (LCD): 步骤 1 中的图像 1,1
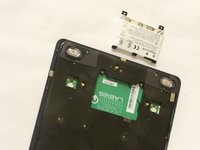
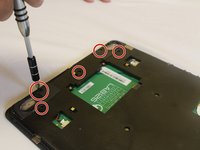
    • Take your Kindle and place it screen side down in order to open it from the back. Use the opening tool from the ifixit tool kit and insert it between the metal casing and plastic top piece.

  2. Amazon Kindle DX LCD Replacement: 步骤 2 中的图像 1,1
    • Once enough pressure is applied the small piece will pop open.

  3. Amazon Kindle DX LCD Replacement: 步骤 3 中的图像 1,1
    • Remove the plastic piece.

  4. Amazon Kindle DX LCD Replacement: 步骤 4 中的图像 1,2 Amazon Kindle DX LCD Replacement: 步骤 4 中的图像 2,2
    • Once the small plastic piece is removed you will need to locate two 40mm screws on both corners of the remaining casing. Use the PH000 Philips Head Screwdriver from the tool kit to remove both screws.

  5. Amazon Kindle DX LCD Replacement: 步骤 5 中的图像 1,1
    • Use the opening tool again to take the off the bigger metal piece.

  6. Amazon Kindle DX LCD Replacement: 步骤 6 中的图像 1,1
    • Once the piece removed, locate the battery.

  7. Amazon Kindle DX LCD Replacement: 步骤 7 中的图像 1,2 Amazon Kindle DX LCD Replacement: 步骤 7 中的图像 2,2
    • Locate the two 30mm screws securing the battery on the bottom of the Kindle DX. Use the PH00 Philips head screw driver from the tool kit to remove both screws.

  8. Amazon Kindle DX LCD Replacement: 步骤 8 中的图像 1,2 Amazon Kindle DX LCD Replacement: 步骤 8 中的图像 2,2
    • Take the battery off once the screws have been removed.

  9. Amazon Kindle DX LCD Replacement: 步骤 9 中的图像 1,2 Amazon Kindle DX LCD Replacement: 步骤 9 中的图像 2,2
    • Unscrew the 30 mm screws using a Phillips #000 screwdriver as shown in the picture.

  10. Amazon Kindle DX LCD Replacement: 步骤 10 中的图像 1,2 Amazon Kindle DX LCD Replacement: 步骤 10 中的图像 2,2
    • Unscrew the 30 mm screws using a Phillips #000 screwdriver as demonstrated in the picture.

  11. Amazon Kindle DX LCD Replacement: 步骤 11 中的图像 1,1
    • Remove the black case to reveal the mother board.

  12. Amazon Kindle DX LCD Replacement: 步骤 12 中的图像 1,1
    • Remove the motherboard from the display assembly.

结论

To reassemble your device, follow these instructions in reverse order.

Lori White

于09/28/16注册

557 声望

创作了3篇指南

团队

USF Tampa, Team 1-5, Cagle Fall 2016 USF Tampa, Team 1-5, Cagle Fall 2016 的会员

USFT-CAGLE-F16S1G5

3 名成员

创作了8篇指南

3条评论

Guide is incomplete :(

Robert Rogers - 回复

I can follow and understand up to step 11.

Steps 12 and 13 loose me, why would one need to remove the metal protection lid / shield? There does not seem to be any screws covered by the lids that need to be removed.

one would need to unclip the screen from the motherboard the lead off board from the wireless card to aerial and unscrew the remaining motherboard screws at least before you could remove the motherboard to access the screen to replace it.

Terry Mummery - 回复

Guide is useless and should be removed or replaced.

golan.benoni - 回复

添加评论

浏览统计数据:

过去 24 小时: 3

过去 7 天: 10

过去 30 天: 33

总计 3,272