跳转到主内容

Amazon Fire HD 8 Battery Replacement

你所需要的

  1. Amazon Fire HD 8 Battery Replacement, Screen: 步骤 1 中的图像 1,2 Amazon Fire HD 8 Battery Replacement, Screen: 步骤 1 中的图像 2,2
    • Heat the edges of the screen with a heat gun on the lowest setting by using sweeping motions from about 8-10 inches away.

    • Make sure you use sweeping motions with the heat gun, instead of hovering over one area.

  2. Amazon Fire HD 8 Battery Replacement: 步骤 2 中的图像 1,1
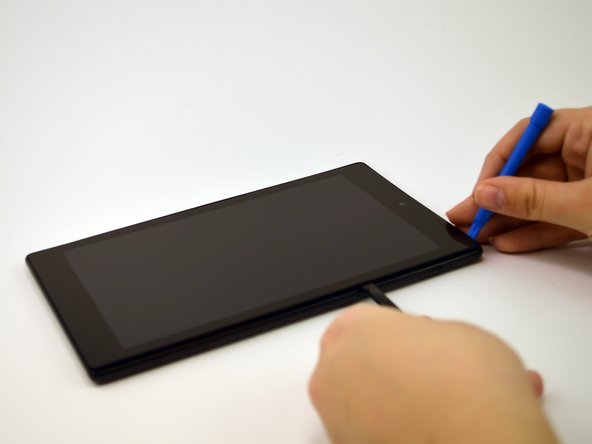
    • After 1-2 minutes, use a plastic opening tool to pry the screen loose. Start at the top right corner and gently pry the screen from the device.

    • Be careful not to bend the screen by pushing it too far from the rest of the device.

  3. Amazon Fire HD 8 Battery Replacement: 步骤 3 中的图像 1,3 Amazon Fire HD 8 Battery Replacement: 步骤 3 中的图像 2,3 Amazon Fire HD 8 Battery Replacement: 步骤 3 中的图像 3,3
    • Slide a plastic opening tool and spudger along the underside of the screen using enough force to peel the screen and the adhesive strip from the other half of the device.

    • Be mindful of the orange cable connecting the screen to the mid-bottom of the device.

  4. Amazon Fire HD 8 Battery Replacement: 步骤 4 中的图像 1,3 Amazon Fire HD 8 Battery Replacement: 步骤 4 中的图像 2,3 Amazon Fire HD 8 Battery Replacement: 步骤 4 中的图像 3,3
    • To remove the screen from the device, use tweezers to gently pull the orange cable from its connection to the screen.

  5. Amazon Fire HD 8 Battery Replacement, Battery: 步骤 5 中的图像 1,3 Amazon Fire HD 8 Battery Replacement, Battery: 步骤 5 中的图像 2,3 Amazon Fire HD 8 Battery Replacement, Battery: 步骤 5 中的图像 3,3
    • Be careful not to bend or puncture the battery.

    • Lift the wired connector on the top-right of the battery with just enough pressure to disconnect it from the connector.

  6. Amazon Fire HD 8 Battery Replacement: 步骤 6 中的图像 1,2 Amazon Fire HD 8 Battery Replacement: 步骤 6 中的图像 2,2
    • There are four black tabs on the bottom of the battery that run strips of adhesive beneath the battery.

    • Pull on each tab individually until all four strips are removed. Once the last adhesive strip is removed, the battery will pop out.

结论

To reassemble your device, follow these instructions in reverse order.

16等其他人完成本指南。

Dan Shimkus

于02/24/16注册

1,184 声望

创作了3篇指南

团队

USF Tampa, Team 1-3, Leahy Spring 2016 USF Tampa, Team 1-3, Leahy Spring 2016 的会员

USFT-LEAHY-S16S1G3

4 名成员

创作了17篇指南

6条评论

After following these instructions and replacing the battery, all works but the screen. We have sound, volume etc..but no screen.

Any ideas what may be wrong?

Paula Eifert - 回复

Make sure the ribbon cable is plugged in.

Thomas Williams - 回复

I got a recent Fire HD 8 in the uk. This isn’t correct for that version. The rear case just unclips with a tool down the side of the case - much simpler. You definitely don’t want to be trying the above method on my version!

Ian Turner - 回复

A further comment about the two connections for first timers would be helpful. The battery cable connection comes straight up and reconnects nested directly straight top down into the female socket. Unfamiliar with small thin video screen cables especially in teh1 to 2 inch working space, I could not understand why the cable would not ‘Plug” in. Eventually I realized that it was a clamp type connection and that the clamp was closed. After I flipped it open, I was able to hold the ribbon in position and flip the clamp closed. I’m glad for the experience, otherwise it would not have seem such an accomplishment for such a simple connection. Do you have a primer that describes these basic procedures? Also, how do you “follow the step in reverse order” with respect to the glue strips, and what is the record measurement for the length you can pull these strips? I got to at least 9” before it let go.

Thanks for the help. Dave B

Dave - 回复

PS. The battery change was a success, but the patient is still ill. The start-up still screen loops over and over, and hard reset does not work. Any ideas? Dave B

Dave - 回复

添加评论

浏览统计数据:

过去 24 小时: 23

过去 7 天: 116

过去 30 天: 536

总计 53,558