跳转到主内容

Alienware x51 r3 CPU Fan Replacement

你所需要的

  1. Alienware x51 r3 CPU Fan Replacement, CPU Fan: 步骤 1 中的图像 1,3 Alienware x51 r3 CPU Fan Replacement, CPU Fan: 步骤 1 中的图像 2,3 Alienware x51 r3 CPU Fan Replacement, CPU Fan: 步骤 1 中的图像 3,3
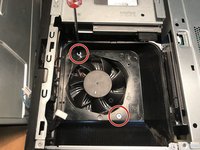
    • Lay down the case so that the power button is on the far right corner and is facing your right.

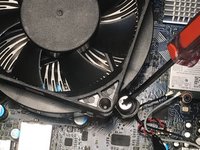
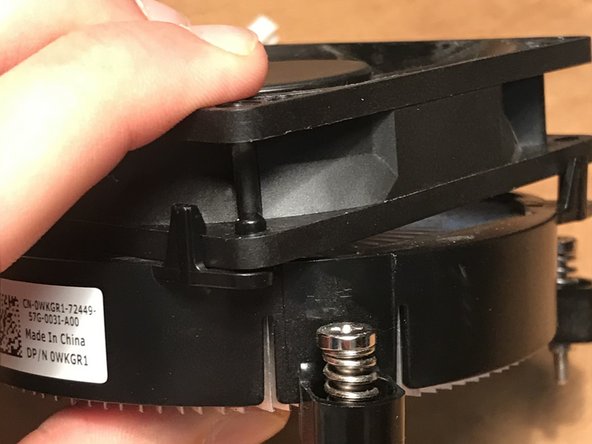
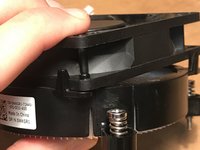
    • Unlock the side panel on the bottom edge by pushing its ridgeline towards the top edge. Lift the panel off of the case.

    • Peel back the cover slowly, as it will still be attached to the case by the cover lights cable. Place the panel against a clean, steady surface in preparation for the next step.

  2. Alienware x51 r3 CPU Fan Replacement: 步骤 2 中的图像 1,2 Alienware x51 r3 CPU Fan Replacement: 步骤 2 中的图像 2,2
    • Use either your hands or the needle nose pliers to disconnect the cable from its port on the desktop. The lighting cable will still be attached to the case.

    • Safely set down the case lid when ready to move on.

  3. Alienware x51 r3 CPU Fan Replacement: 步骤 3 中的图像 1,2 Alienware x51 r3 CPU Fan Replacement: 步骤 3 中的图像 2,2
    • Using a #0 Phillips screwdriver, remove the screws connecting the fan cover to the fan by rotating the screwdriver counter-clockwise. Lift the fan cover out of the desktop and place to the side.

  4. Alienware x51 r3 CPU Fan Replacement: 步骤 4 中的图像 1,2 Alienware x51 r3 CPU Fan Replacement: 步骤 4 中的图像 2,2
    • Using a #0 Phillips screwdriver, remove the screws connecting the fan to the motherboard by rotating the screwdriver counter-clockwise.

    • To prevent bending, try to unscrew each corner a little bit at a time, rather than unscrewing one side completely before moving onto the next.

  5. Alienware x51 r3 CPU Fan Replacement: 步骤 5 中的图像 1,3 Alienware x51 r3 CPU Fan Replacement: 步骤 5 中的图像 2,3 Alienware x51 r3 CPU Fan Replacement: 步骤 5 中的图像 3,3
    • Using either your hands or a small needle nose plier, carefully remove cable connecting the fan to the desktop.

    • Do not rip the cable straight out. Instead, try wiggling the plier back and forth to disconnect.

  6. Alienware x51 r3 CPU Fan Replacement: 步骤 6 中的图像 1,3 Alienware x51 r3 CPU Fan Replacement: 步骤 6 中的图像 2,3 Alienware x51 r3 CPU Fan Replacement: 步骤 6 中的图像 3,3
    • Using your thumb and forefinger, pry off the four clips holding the fan to the heatsink.

  7. Alienware x51 r3 CPU Fan Replacement: 步骤 7 中的图像 1,2 Alienware x51 r3 CPU Fan Replacement: 步骤 7 中的图像 2,2
    • Place the new or cleaned fan onto the heatsink, and press down on the corners to lock the fan onto the heatsink.

    • Make sure that the fan is positioned to blow air into the heatsink, rather than out.

结论

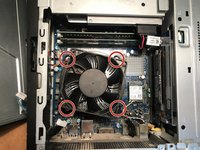
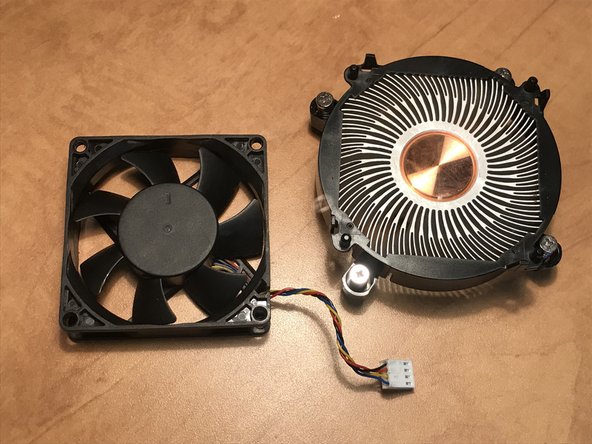
After installation of the new CPU fan, the user’s computer should run more efficiently.

2等其他人完成本指南。

0条评论

添加评论

浏览统计数据:

过去 24 小时: 1

过去 7 天: 12

过去 30 天: 39

总计 1,446