跳转到主内容

Alienware M18x Keyboard Replacement

你所需要的

  1. Alienware M18x Keyboard Replacement, Keyboard: 步骤 1 中的图像 1,3 Alienware M18x Keyboard Replacement, Keyboard: 步骤 1 中的图像 2,3 Alienware M18x Keyboard Replacement, Keyboard: 步骤 1 中的图像 3,3
    • Turn the computer over.

    • Slide the battery latch over and lift the battery out.

  2. Alienware M18x Keyboard Replacement: 步骤 2 中的图像 1,1
    • Unscrew the four 3mm screws with a J000 screwdriver.

  3. Alienware M18x Keyboard Replacement: 步骤 3 中的图像 1,2 Alienware M18x Keyboard Replacement: 步骤 3 中的图像 2,2
    • Use the iFixit opening tool to lift the bottom cover off.

  4. Alienware M18x Keyboard Replacement: 步骤 4 中的图像 1,2 Alienware M18x Keyboard Replacement: 步骤 4 中的图像 2,2
    • Remove the two 4mm screws with the J000 screwdriver.

  5. Alienware M18x Keyboard Replacement: 步骤 5 中的图像 1,3 Alienware M18x Keyboard Replacement: 步骤 5 中的图像 2,3 Alienware M18x Keyboard Replacement: 步骤 5 中的图像 3,3
    • Turn the laptop right-side up, and open the laptop.

    • Use the plastic pryer tool to loosen the flat piece surrounding the keys by gently prying it upwards from the laptop's base.

    • Make sure to go around the entire perimeter of the piece to loosen all areas of it.

  6. Alienware M18x Keyboard Replacement: 步骤 6 中的图像 1,3 Alienware M18x Keyboard Replacement: 步骤 6 中的图像 2,3 Alienware M18x Keyboard Replacement: 步骤 6 中的图像 3,3
    • The piece is now free from its fastenings to the base of the laptop, and can be lifted off.

    • This piece is still connected to the laptop via power cable. Be sure not to lift it off too far or with too much force, as doing so could potentially rip or damage the cables.

  7. Alienware M18x Keyboard Replacement: 步骤 7 中的图像 1,1
    • Gently remove the power cable with your hands or with the help of a prying tool.

  8. Alienware M18x Keyboard Replacement: 步骤 8 中的图像 1,1
    • The keyboard's 3mm fastening screws are now exposed and can be removed with a J000 screwdriver.

  9. Alienware M18x Keyboard Replacement: 步骤 9 中的图像 1,2 Alienware M18x Keyboard Replacement: 步骤 9 中的图像 2,2
    • As before, the keyboard is now unfastened but still connected to the base via cables.

    • Flip the keyboard over towards the edge of the laptop to expose the locations of the connectors. Avoid tugging on the cables when you do this.

  10. Alienware M18x Keyboard Replacement: 步骤 10 中的图像 1,3 Alienware M18x Keyboard Replacement: 步骤 10 中的图像 2,3 Alienware M18x Keyboard Replacement: 步骤 10 中的图像 3,3
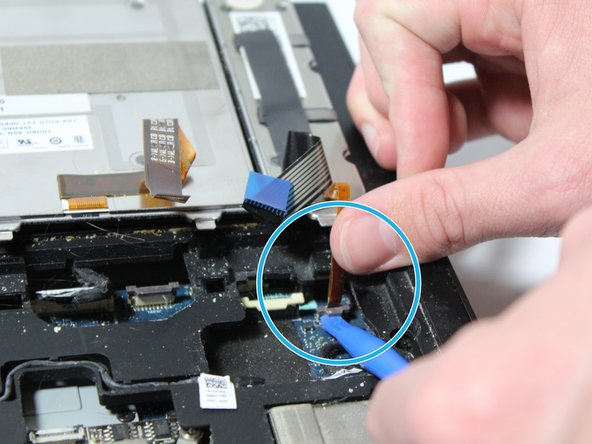
    • Locate and remove the first connector cable.

    • Use a prying tool to assist in unplugging the cable.

  11. Alienware M18x Keyboard Replacement: 步骤 11 中的图像 1,3 Alienware M18x Keyboard Replacement: 步骤 11 中的图像 2,3 Alienware M18x Keyboard Replacement: 步骤 11 中的图像 3,3
    • Locate and remove the second connector cable.

    • Again, use a prying tool to help remove.

  12. Alienware M18x Keyboard Replacement: 步骤 12 中的图像 1,3 Alienware M18x Keyboard Replacement: 步骤 12 中的图像 2,3 Alienware M18x Keyboard Replacement: 步骤 12 中的图像 3,3
    • The left section of the keyboard is connected by a single screw and two connector cables.

    • Remove the 4mm screw with a J000 screwdriver.

    • Remove the connecting cables with a prying bar.

  13. Alienware M18x Keyboard Replacement: 步骤 13 中的图像 1,1
    • All sections of the keyboard are now free to be taken off and replaced!

结论

To reassemble your device, follow these instructions in reverse order.

3等其他人完成本指南。

Jonathan Panella

于02/21/18注册

470 声望

创作了2篇指南

团队

Cal Poly, Team S21-G1, Banghart Winter 2018 Cal Poly, Team S21-G1, Banghart Winter 2018 的会员

CPSU-BANGHART-W18S21G1

3 名成员

创作了5篇指南

0条评论

添加评论

浏览统计数据:

过去 24 小时: 0

过去 7 天: 3

过去 30 天: 15

总计 1,771