跳转到主内容

Alienware 17 R4 Front Speakers Replacement

你所需要的

  1. Alienware 17 R4 Front Speakers Replacement, Base Cover: 步骤 1 中的图像 1,1
    • Use a PH1 screwdriver bit to remove the six M2.5x13 screws (2.4 mm) on the back of the laptop.

    • Use a PH1 screwdriver bit to loosen the one M2x3 screw (1.9 mm).

    • The M2x3 screw (1.9 mm) does not come out completely.

  2. Alienware 17 R4 Front Speakers Replacement: 步骤 2 中的图像 1,2 Alienware 17 R4 Front Speakers Replacement: 步骤 2 中的图像 2,2
    • Pull the base cover up to remove it.

    • If you are having trouble, insert a plastic opening tool into the divots along the laptop's edges to loosen.

    • Removing the cover may require some force.

  3. Alienware 17 R4 Front Speakers Replacement, Hard Disk Drive (HDD): 步骤 3 中的图像 1,3 Alienware 17 R4 Front Speakers Replacement, Hard Disk Drive (HDD): 步骤 3 中的图像 2,3 Alienware 17 R4 Front Speakers Replacement, Hard Disk Drive (HDD): 步骤 3 中的图像 3,3
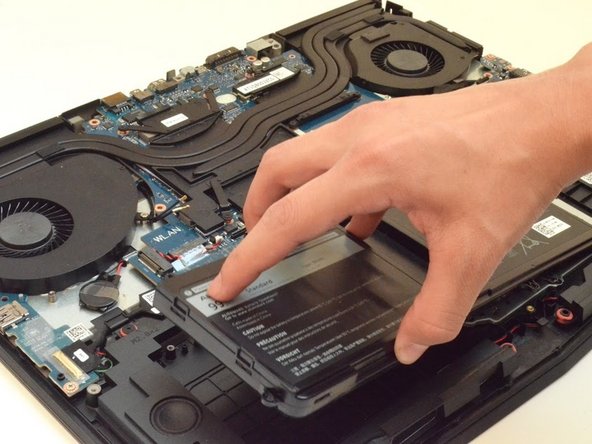
    • Disconnect the battery connector cable, located on the right side of the laptop, above the hard disk drive.

    • Once you have removed the cable, wait 5-10 minutes to allow the laptop to power down.

    • Failure to remove the battery connector cable properly may damage other parts of the laptop.

  4. Alienware 17 R4 Front Speakers Replacement: 步骤 4 中的图像 1,3 Alienware 17 R4 Front Speakers Replacement: 步骤 4 中的图像 2,3 Alienware 17 R4 Front Speakers Replacement: 步骤 4 中的图像 3,3
    • Use a PH1 screwdriver bit to remove the four M2.5x5 screws (2.4 mm) on the hard disk drive.

  5. Alienware 17 R4 Front Speakers Replacement: 步骤 5 中的图像 1,3 Alienware 17 R4 Front Speakers Replacement: 步骤 5 中的图像 2,3 Alienware 17 R4 Front Speakers Replacement: 步骤 5 中的图像 3,3
    • Gently lift the HDD cable to disconnect it from the laptop.

  6. Alienware 17 R4 Front Speakers Replacement: 步骤 6 中的图像 1,2 Alienware 17 R4 Front Speakers Replacement: 步骤 6 中的图像 2,2
    • Pull the hard drive up to remove.

  7. Alienware 17 R4 Front Speakers Replacement, RAM: 步骤 7 中的图像 1,3 Alienware 17 R4 Front Speakers Replacement, RAM: 步骤 7 中的图像 2,3 Alienware 17 R4 Front Speakers Replacement, RAM: 步骤 7 中的图像 3,3
    • Move the metal sidings outward to release the RAM card.

  8. Alienware 17 R4 Front Speakers Replacement: 步骤 8 中的图像 1,1
    • Slide the RAM card out towards yourself to remove it.

    • Repeat the same step for the RAM card above.

    • Slide the RAM card out carefully to avoid damaging it.

  9. Alienware 17 R4 Front Speakers Replacement, Wi-Fi card: 步骤 9 中的图像 1,1
    • Locate the WI-FI card.

  10. Alienware 17 R4 Front Speakers Replacement: 步骤 10 中的图像 1,2 Alienware 17 R4 Front Speakers Replacement: 步骤 10 中的图像 2,2
    • Peel back plastic cover of wi-fi card.

    • Use a PH1 screwdriver bit and remove the one M2x3 screw (1.9 mm)

  11. Alienware 17 R4 Front Speakers Replacement: 步骤 11 中的图像 1,3 Alienware 17 R4 Front Speakers Replacement: 步骤 11 中的图像 2,3 Alienware 17 R4 Front Speakers Replacement: 步骤 11 中的图像 3,3
    • Gently undo the clips attached to the wi-fi card.

    • If the clip is not gently removed it is possible that the entire base will be torn off the wi-fi card. You will need to purchase a new wi-fi card if this occurs.

  12. Alienware 17 R4 Front Speakers Replacement: 步骤 12 中的图像 1,2 Alienware 17 R4 Front Speakers Replacement: 步骤 12 中的图像 2,2
    • Locate the cables that connect the wi-fi card.

    • Gently pull upwards to remove cables and slide the wi-fi card out from its slot.

  13. Alienware 17 R4 Front Speakers Replacement, Solid State Drive: 步骤 13 中的图像 1,2 Alienware 17 R4 Front Speakers Replacement, Solid State Drive: 步骤 13 中的图像 2,2
    • Remove the one M2x3 screw (1.9 mm) using a PH1 screwdriver bit

  14. Alienware 17 R4 Front Speakers Replacement: 步骤 14 中的图像 1,2 Alienware 17 R4 Front Speakers Replacement: 步骤 14 中的图像 2,2
    • Slide the solid state drive towards yourself to prevent damage to the card.

  15. Alienware 17 R4 Front Speakers Replacement, Fan Shroud: 步骤 15 中的图像 1,3 Alienware 17 R4 Front Speakers Replacement, Fan Shroud: 步骤 15 中的图像 2,3 Alienware 17 R4 Front Speakers Replacement, Fan Shroud: 步骤 15 中的图像 3,3
    • Remove the two M2.5x7 screws (2.44 mm) located on the rear panel using a PH1 screwdriver bit.

  16. Alienware 17 R4 Front Speakers Replacement: 步骤 16 中的图像 1,2 Alienware 17 R4 Front Speakers Replacement: 步骤 16 中的图像 2,2
    • Insert the plastic opening tool under the fan shroud to slowly lift it up.

    • Repeat process on the middle and opposite side.

  17. Alienware 17 R4 Front Speakers Replacement: 步骤 17 中的图像 1,2 Alienware 17 R4 Front Speakers Replacement: 步骤 17 中的图像 2,2
    • Firmly lift the plastic opening tool and pull the fan shroud towards you.

    • This will take a large amount of force and will not come out easily the first time.

    • Careful not to tear out the piece causing damage to the fan shroud

  18. Alienware 17 R4 Front Speakers Replacement, Plastic Cover: 步骤 18 中的图像 1,3 Alienware 17 R4 Front Speakers Replacement, Plastic Cover: 步骤 18 中的图像 2,3 Alienware 17 R4 Front Speakers Replacement, Plastic Cover: 步骤 18 中的图像 3,3
    • Unscrew the two M2x3 screws (1.9 mm) at the top right and top left of the laptop that hold the tron lights in place.

  19. Alienware 17 R4 Front Speakers Replacement: 步骤 19 中的图像 1,2 Alienware 17 R4 Front Speakers Replacement: 步骤 19 中的图像 2,2
    • Follow the wiring to unplug the tron lights.

  20. Alienware 17 R4 Front Speakers Replacement: 步骤 20 中的图像 1,3 Alienware 17 R4 Front Speakers Replacement: 步骤 20 中的图像 2,3 Alienware 17 R4 Front Speakers Replacement: 步骤 20 中的图像 3,3
    • Remove the fourteen M2.5XL8' screws (2.4 mm) located in the plastic cover using the PH1 screwdriver.

  21. Alienware 17 R4 Front Speakers Replacement: 步骤 21 中的图像 1,1
    • Use the plastic opening tool to gently lift the sides of the cover.

  22. Alienware 17 R4 Front Speakers Replacement: 步骤 22 中的图像 1,2 Alienware 17 R4 Front Speakers Replacement: 步骤 22 中的图像 2,2
    • Slowly lift up the plastic cover.

  23. Alienware 17 R4 Front Speakers Replacement, Battery: 步骤 23 中的图像 1,3 Alienware 17 R4 Front Speakers Replacement, Battery: 步骤 23 中的图像 2,3 Alienware 17 R4 Front Speakers Replacement, Battery: 步骤 23 中的图像 3,3
    • Unscrew the four M2.5 screws (2.4 mm) with a PH1 screwdriver bit.

  24. Alienware 17 R4 Front Speakers Replacement: 步骤 24 中的图像 1,2 Alienware 17 R4 Front Speakers Replacement: 步骤 24 中的图像 2,2
    • Lift the battery up to remove it.

  25. Alienware 17 R4 Front Speakers Replacement, Front Speakers: 步骤 25 中的图像 1,2 Alienware 17 R4 Front Speakers Replacement, Front Speakers: 步骤 25 中的图像 2,2
    • Unplug the wire that connects the front speakers to the laptop.

  26. Alienware 17 R4 Front Speakers Replacement: 步骤 26 中的图像 1,3 Alienware 17 R4 Front Speakers Replacement: 步骤 26 中的图像 2,3 Alienware 17 R4 Front Speakers Replacement: 步骤 26 中的图像 3,3
    • Gently lift up the front speakers.

    • The speaker does not have screws holding it in place.

结论

To reassemble your device, follow these instructions in reverse order.

5等其他人完成本指南。

Hector Mendez III

于09/11/17注册

1,280 声望

创作了8篇指南

团队

CSU Fullerton, Team S2-G4, Bruce Fall 2017 CSU Fullerton, Team S2-G4, Bruce Fall 2017 的会员

CSUF-BRUCE-F17S2G4

4 名成员

创作了9篇指南

0条评论

添加评论

浏览统计数据:

过去 24 小时: 0

过去 7 天: 3

过去 30 天: 47

总计 3,648