跳转到主内容

当前版本的文档还未经巡查,您可以查看最新的已查核版本

你所需要的

  1. 这个步骤还没有翻译 帮忙翻译一下

    : 步骤 1 中的图像 1,1
    • Make sure that the tablet is turned off and disconnected from any power source.

    • Disconnect the tablet from the keyboard attachment.

    • If you have a Micro SD card in the tablet, remove it now.

    • Remove the two 3.5 mm Phillips #0 screws on either side the keyboard connection.

  2. 这个步骤还没有翻译 帮忙翻译一下

    : 步骤 2 中的图像 1,2 : 步骤 2 中的图像 2,2
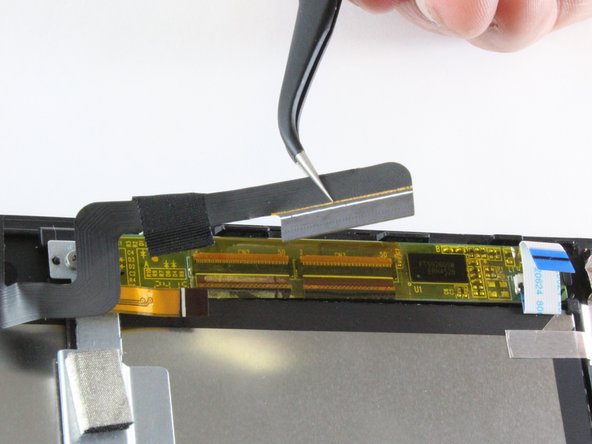
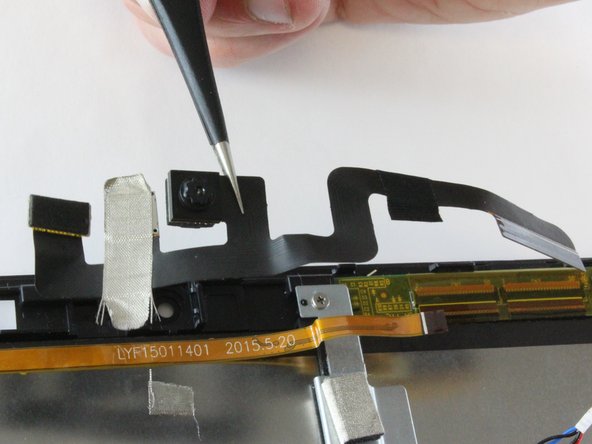
    • Starting from a corner of the tablet, use the plastic opening tool to create a gap between the screen and the back covering.

    • Slowly maneuver the plastic opening tool along the perimeter of the tablet to pry the screen and back covering apart.

    • Separate the back covering from the screen.

  3. 这个步骤还没有翻译 帮忙翻译一下

    : 步骤 3 中的图像 1,3 : 步骤 3 中的图像 2,3 : 步骤 3 中的图像 3,3
    • Peel off all of the Polyimide tape (yellow tape).

    • Remove the metallic tape covering the keyboard connection.

  4. 这个步骤还没有翻译 帮忙翻译一下

    : 步骤 4 中的图像 1,2 : 步骤 4 中的图像 2,2
    • Unscrew the two 3.5mm Phillips #0 screws and open the ZIF latch.

    • Gently remove the silver part covering the battery and set it aside.

  5. 这个步骤还没有翻译 帮忙翻译一下

    : 步骤 5 中的图像 1,3 : 步骤 5 中的图像 2,3 : 步骤 5 中的图像 3,3
  6. 这个步骤还没有翻译 帮忙翻译一下

    : 步骤 6 中的图像 1,2 : 步骤 6 中的图像 2,2
    • Remove the four 4mm screws at the corners of the motherboard with the Phillips#0 bit screw.

    • The screw beneath the metallic tape also needs to be removed.

  7. 这个步骤还没有翻译 帮忙翻译一下

    : 步骤 7 中的图像 1,3 : 步骤 7 中的图像 2,3 : 步骤 7 中的图像 3,3
    • Disconnect the three cables on the motherboard closest to the battery.

    • These cables require some extra prying power to be removed.

  8. 这个步骤还没有翻译 帮忙翻译一下

    : 步骤 8 中的图像 1,1
    • Slide out the motherboard and put it aside.

  9. 这个步骤还没有翻译 帮忙翻译一下

    : 步骤 9 中的图像 1,3 : 步骤 9 中的图像 2,3 : 步骤 9 中的图像 3,3
    • Use the plastic opening tool to separate the glue that holds the battery to the screen.

    • Avoid putting pressure on the glass while separating the battery from the screen.

    • Remove the battery and set it aside.

  10. 这个步骤还没有翻译 帮忙翻译一下

    : 步骤 10 中的图像 1,3 : 步骤 10 中的图像 2,3 : 步骤 10 中的图像 3,3
    • Separate the adhesive cable from the underlying copper ribbon cable.

    • Gently pry off the camera from from tablet backing.

    • Remove the camera and set it aside.

终点

另外一个人完成了本指南。

Shannon Griffin

于10/03/16注册

1,372 声望

创作了5篇指南

团队

USF Tampa, Team 1-3, Sullivan Fall 2016 USF Tampa, Team 1-3, Sullivan Fall 2016 的会员

USFT-SULLIVAN-F16S1G3

4 名成员

创作了5篇指南

3条评论

I was worried camera was broken but discovered after black screen and not working touch screen and mouse, it was not the case:

Got Acer 10 Tablet with Keyboard S1002 12V2 repaired:

1) by removing tablet from keyboard

2)pressing the volume down into volume position and pressing power at same time 30 secs

3)reset menu comes on and screen loads as normal

4) restart device

(when there is a problem with this two in one tablet, the device thinks it's a tablet before a pc)

5) admin prompts given after a restart is done which took about 40 mins; restart and flourish

***after restarting the whole pc began to work including front and rear cameras which was the issue I had contacted acer support about in the first place!)

jenny -

I am facing a big problem right now….!!

There are no screws in my tab

I can’t find those screws as shown in the picture……its just plane with all those holes nearby….

Please help me….I’m facing heavy issues……!!

Abhai - 回复

添加评论

浏览统计数据:

过去 24 小时: 2

过去 7 天: 5

过去 30 天: 12

总计 1,209