跳转到主内容

Acer Nitro 5 AN515-53-55G9 Speaker Replacement

你所需要的

  1. Acer Nitro 5 AN515-53-55G9 Speaker Replacement, Battery: 步骤 1 中的图像 1,3 Acer Nitro 5 AN515-53-55G9 Speaker Replacement, Battery: 步骤 1 中的图像 2,3 Acer Nitro 5 AN515-53-55G9 Speaker Replacement, Battery: 步骤 1 中的图像 3,3
    • Make sure laptop is off and unplugged before beginning replacement.

    • Flip the laptop upside down so that the bottom is facing up.

    • Identify the RAM tray on the bottom of the laptop.

  2. Acer Nitro 5 AN515-53-55G9 Speaker Replacement: 步骤 2 中的图像 1,3 Acer Nitro 5 AN515-53-55G9 Speaker Replacement: 步骤 2 中的图像 2,3 Acer Nitro 5 AN515-53-55G9 Speaker Replacement: 步骤 2 中的图像 3,3
    • Use the Phillips #0 screwdriver to remove the 9mm screw in the bottom left corner of the RAM tray covering.

    • Remove the RAM tray cover by prying up with a spudger.

  3. Acer Nitro 5 AN515-53-55G9 Speaker Replacement: 步骤 3 中的图像 1,3 Acer Nitro 5 AN515-53-55G9 Speaker Replacement: 步骤 3 中的图像 2,3 Acer Nitro 5 AN515-53-55G9 Speaker Replacement: 步骤 3 中的图像 3,3
    • Identify the Hard Drive tray to the left side of the laptop.

    • Remove screw with a #0 Philips screwdriver.

    • Lift up the Slot covering using a spunger.

  4. Acer Nitro 5 AN515-53-55G9 Speaker Replacement: 步骤 4 中的图像 1,1
    • Use the Phillips #0 screwdriver to remove the 9mm screws holding the back cover in place.

    • Remove the screws from the hard drive and remove it from the device.

  5. Acer Nitro 5 AN515-53-55G9 Speaker Replacement: 步骤 5 中的图像 1,3 Acer Nitro 5 AN515-53-55G9 Speaker Replacement: 步骤 5 中的图像 2,3 Acer Nitro 5 AN515-53-55G9 Speaker Replacement: 步骤 5 中的图像 3,3
    • Be sure you removed the hard drive. when you open the back shell and hard drive is built in this may cause damage to cable and other components.

    • Carefully remove the back shell from the device working your way around all the edges.

    • Do not forcefully try to separate the shell as you may cause harm to the shell.

  6. Acer Nitro 5 AN515-53-55G9 Speaker Replacement: 步骤 6 中的图像 1,2 Acer Nitro 5 AN515-53-55G9 Speaker Replacement: 步骤 6 中的图像 2,2
    • Removing the back shell of the computer and it will look like this.

    • The battery for the device is located at the bottom middle of the laptop at this orientation.

  7. Acer Nitro 5 AN515-53-55G9 Speaker Replacement: 步骤 7 中的图像 1,3 Acer Nitro 5 AN515-53-55G9 Speaker Replacement: 步骤 7 中的图像 2,3 Acer Nitro 5 AN515-53-55G9 Speaker Replacement: 步骤 7 中的图像 3,3
    • Locate the connector of the battery to the motherboard.

    • Using your fingers, slide out the connector.

  8. Acer Nitro 5 AN515-53-55G9 Speaker Replacement: 步骤 8 中的图像 1,1
    • Remove battery from device.

  9. Acer Nitro 5 AN515-53-55G9 Speaker Replacement, Speaker: 步骤 9 中的图像 1,3 Acer Nitro 5 AN515-53-55G9 Speaker Replacement, Speaker: 步骤 9 中的图像 2,3 Acer Nitro 5 AN515-53-55G9 Speaker Replacement, Speaker: 步骤 9 中的图像 3,3
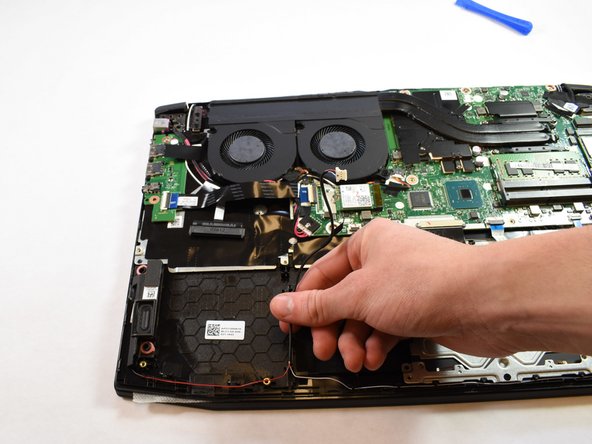
    • Once the battery is removed your device should look similar to this.

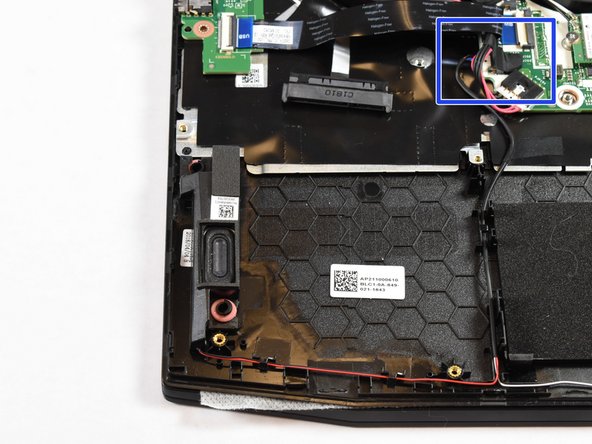
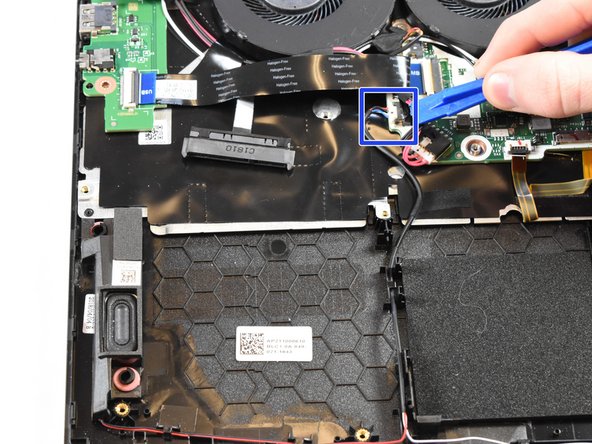
    • Locate the plug for the speakers located at the red circle.

  10. Acer Nitro 5 AN515-53-55G9 Speaker Replacement: 步骤 10 中的图像 1,2 Acer Nitro 5 AN515-53-55G9 Speaker Replacement: 步骤 10 中的图像 2,2
    • Unplug the cable from the motherboard as shown.

    • Carefully unroute the cables starting from the main plug.

    • Do not forcefully pull on the cable as it might break the cable.

  11. Acer Nitro 5 AN515-53-55G9 Speaker Replacement: 步骤 11 中的图像 1,2 Acer Nitro 5 AN515-53-55G9 Speaker Replacement: 步骤 11 中的图像 2,2
    • Pull up on the left speaker as shown here to remove the speaker from the device.

    • the rubber grommets from the speaker my pop off. These can easily be placed back on.

  12. Acer Nitro 5 AN515-53-55G9 Speaker Replacement: 步骤 12 中的图像 1,2 Acer Nitro 5 AN515-53-55G9 Speaker Replacement: 步骤 12 中的图像 2,2
    • Continue unrouting the cable from the device and following it to the right speaker.

    • Do not pull on the wire forcefully or it might break the cable.

  13. Acer Nitro 5 AN515-53-55G9 Speaker Replacement: 步骤 13 中的图像 1,2 Acer Nitro 5 AN515-53-55G9 Speaker Replacement: 步骤 13 中的图像 2,2
    • Locate the Right Speaker on the device.

    • Pull up on the speaker to remove from the device.

    • Rubber grommets from the speaker my pop off. These can easily be placed back on.

结论

To reassemble your device, follow these instructions in reverse order.

6等其他人完成本指南。

一条评论

Do you have an Android application?

DERDOURI TOUFIK - 回复

添加评论

浏览统计数据:

过去 24 小时: 0

过去 7 天: 9

过去 30 天: 56

总计 6,803