跳转到主内容

Acer E5-571-54FL Hard drive Replacement

你所需要的

  1. Acer E5-571-54FL Hard drive Replacement, Battery: 步骤 1 中的图像 1,1
    • Power down the laptop prior to beginning.

    • Turn the laptop over with the battery closest to your body.

  2. Acer E5-571-54FL Hard drive Replacement: 步骤 2 中的图像 1,2 Acer E5-571-54FL Hard drive Replacement: 步骤 2 中的图像 2,2
    • Insert the pointed end of a spudger into the battery release.

    • Slide the release gently all the way to the left.

    • You should hear a sound after the slide is all the way left. This lets you know the battery has disengaged.

  3. Acer E5-571-54FL Hard drive Replacement: 步骤 3 中的图像 1,2 Acer E5-571-54FL Hard drive Replacement: 步骤 3 中的图像 2,2
    • Place your hands on each end of the battery.

    • Pull the battery towards your body to remove it.

  4. Acer E5-571-54FL Hard drive Replacement, Keyboard: 步骤 4 中的图像 1,1
    • Using a #0 Phillips screwdriver, remove a total of eighteen identical 8mm Phillips screws and set them aside.

  5. Acer E5-571-54FL Hard drive Replacement: 步骤 5 中的图像 1,1
    • Rotate the laptop 180 degrees so that the battery compartment is now furthest away from your body.

  6. Acer E5-571-54FL Hard drive Replacement: 步骤 6 中的图像 1,1
    • Turn the laptop over so that you can easily open the screen to a vertical position.

  7. Acer E5-571-54FL Hard drive Replacement: 步骤 7 中的图像 1,1
    • Put your fingers under the top of the keyboard assembly directly below the Acer logo.

    • Carefully pull up on the center until you hear the tabs disengage from the bottom.

  8. Acer E5-571-54FL Hard drive Replacement: 步骤 8 中的图像 1,3 Acer E5-571-54FL Hard drive Replacement: 步骤 8 中的图像 2,3 Acer E5-571-54FL Hard drive Replacement: 步骤 8 中的图像 3,3
    • Work your way around the seam with the plastic opening tool carefully prying the base and top cover apart.

    • If you have difficulty with the plastic opening tool, use a metal spudger but be more cautious to not damage or mar your laptop case.

  9. Acer E5-571-54FL Hard drive Replacement: 步骤 9 中的图像 1,1
    • When the two halves are separated, carefully lift up the front of the keyboard and touchpad assembly.

    • You will see three ribbon cables attached to the motherboard.

  10. Acer E5-571-54FL Hard drive Replacement: 步骤 10 中的图像 1,3 Acer E5-571-54FL Hard drive Replacement: 步骤 10 中的图像 2,3 Acer E5-571-54FL Hard drive Replacement: 步骤 10 中的图像 3,3
    • Closest to the ribbon cable on the zero insertion force (ZIF) connector is a white locking tab.

    • Carefully lift up on the locking tab with the plastic opening tool to release the ribbon cable. (Picture 2)

    • Remove the ribbon cable from the connector.

  11. Acer E5-571-54FL Hard drive Replacement: 步骤 11 中的图像 1,3 Acer E5-571-54FL Hard drive Replacement: 步骤 11 中的图像 2,3 Acer E5-571-54FL Hard drive Replacement: 步骤 11 中的图像 3,3
    • Closest to the ribbon cable on the ZIF connector is a black locking tab.

    • Carefully lift up on the locking tab with the plastic opening tool to release the ribbon cable. (Picture 2)

    • Remove the ribbon cable from the connector.

  12. Acer E5-571-54FL Hard drive Replacement: 步骤 12 中的图像 1,3 Acer E5-571-54FL Hard drive Replacement: 步骤 12 中的图像 2,3 Acer E5-571-54FL Hard drive Replacement: 步骤 12 中的图像 3,3
    • On each side of the large connector there are two white tabs.

    • Carefully push away from you with the plastic opening tool on each white tab to release the cable. (Picture 2)

    • Remove the ribbon cable from the connector.

  13. Acer E5-571-54FL Hard drive Replacement: 步骤 13 中的图像 1,3 Acer E5-571-54FL Hard drive Replacement: 步骤 13 中的图像 2,3 Acer E5-571-54FL Hard drive Replacement: 步骤 13 中的图像 3,3
    • Once all three ribbon cables are disconnected, lift off the top cover with the keyboard and touchpad.

  14. Acer E5-571-54FL Hard drive Replacement, Hard drive: 步骤 14 中的图像 1,2 Acer E5-571-54FL Hard drive Replacement, Hard drive: 步骤 14 中的图像 2,2
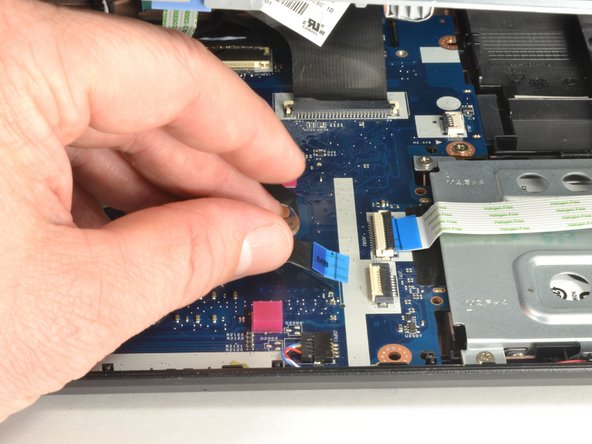
    • Locate the hard drive and its carriage at the lower right corner of the laptop.

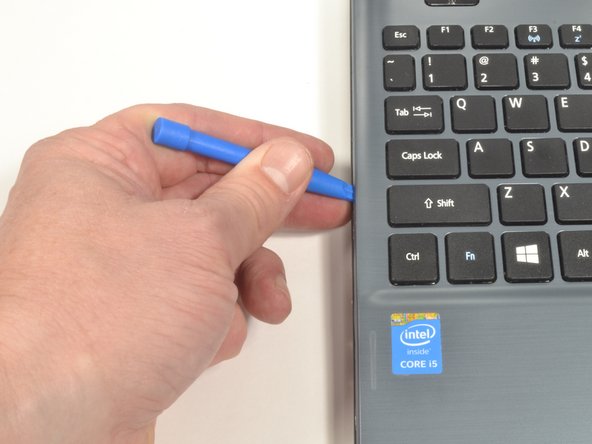
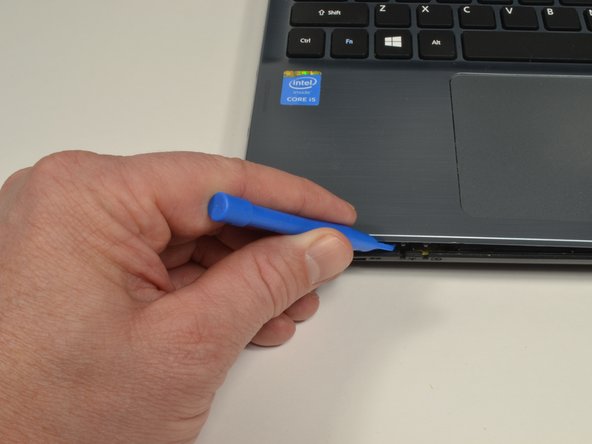
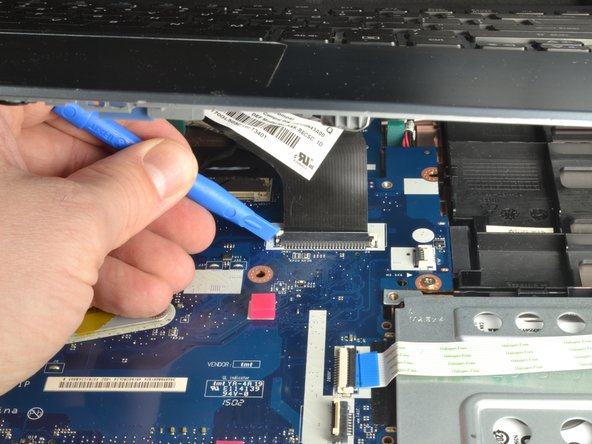
    • Release the USB port ribbon cable by using the plastic opening tool to carefully lift up the black locking tab of the ZIF connector.

    • Move the USB port ribbon cable to the side.

  15. Acer E5-571-54FL Hard drive Replacement: 步骤 15 中的图像 1,2 Acer E5-571-54FL Hard drive Replacement: 步骤 15 中的图像 2,2
    • Use a #0 Phillips screwdriver to remove the two 4mm screws securing the hard drive carriage in place.

  16. Acer E5-571-54FL Hard drive Replacement: 步骤 16 中的图像 1,1
    • Hold the right side of the laptop in place with your right hand.

    • Put the fingers of your left hand along the top edge of the hard drive carriage.

    • Push the hard drive carriage towards your right hand to disconnect it from the motherboard.

    • This procedure may require more force then other procedures.

  17. Acer E5-571-54FL Hard drive Replacement: 步骤 17 中的图像 1,2 Acer E5-571-54FL Hard drive Replacement: 步骤 17 中的图像 2,2
    • Lift up the hard drive carriage on the edge closest to your body to remove it.

    • If doing the motherboard replacement guide, skip the next step.

  18. Acer E5-571-54FL Hard drive Replacement: 步骤 18 中的图像 1,3 Acer E5-571-54FL Hard drive Replacement: 步骤 18 中的图像 2,3 Acer E5-571-54FL Hard drive Replacement: 步骤 18 中的图像 3,3
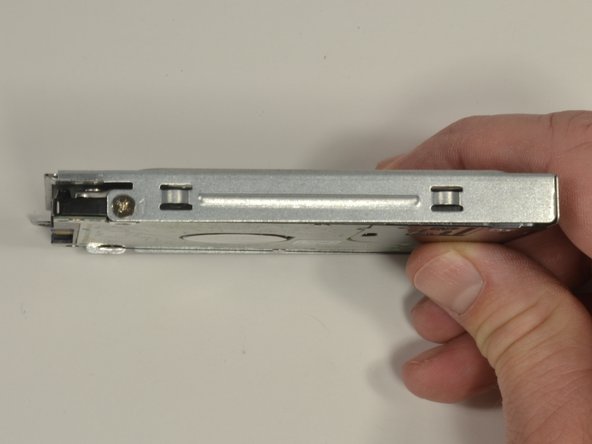
    • Locate the two 3 mm Phillips screws holding the hard drive into the carriage. There is one screw on each side of the carriage.

    • Hold the hard drive carriage with your non-dominant hand along one side. Ensure one of the Phillips screws is visible.

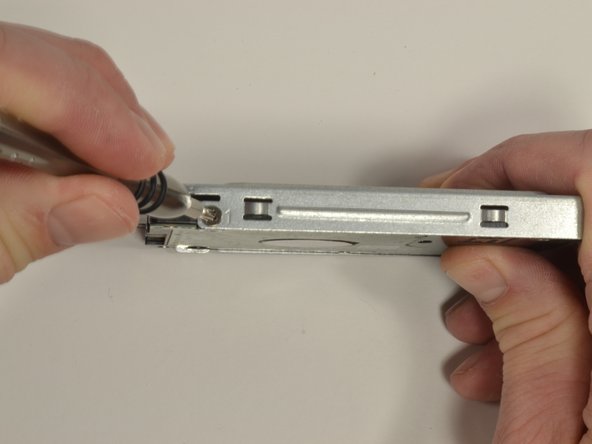
    • Using a #0 Phillips screwdriver, remove the 3 mm screw to release the side of the hard drive from the carriage.

    • Repeat the two previous bullet marks to remove the second 3 mm Phillips screw. This should also free the hard drive from the carriage.

结论

To reassemble your device, follow these instructions in reverse order.

Aaron Weissman

于10/23/17注册

1,004 声望

创作了7篇指南

团队

UMass Dartmouth, Team S3-G8, Bailey Fall 2017 UMass Dartmouth, Team S3-G8, Bailey Fall 2017 的会员

UMASSD-BAILEY-F17S3G8

3 名成员

创作了8篇指南

0条评论

添加评论

浏览统计数据:

过去 24 小时: 1

过去 7 天: 6

过去 30 天: 12

总计 377