跳转到主内容

Acer Chromebook cb3-532-c47c Display Assembly Replacement

你所需要的

  1. Acer Chromebook cb3-532-c47c Display Assembly Replacement, Back Panel: 步骤 1 中的图像 1,2 Acer Chromebook cb3-532-c47c Display Assembly Replacement, Back Panel: 步骤 1 中的图像 2,2
    • Power off the laptop before beginning the replacement.

    • Using the Phillips #1 screwdriver, remove eighteen 7 mm screws from the back panel of the device.

  2. Acer Chromebook cb3-532-c47c Display Assembly Replacement: 步骤 2 中的图像 1,2 Acer Chromebook cb3-532-c47c Display Assembly Replacement: 步骤 2 中的图像 2,2
    • Use a plastic opening tool around the edges of the laptop and remove the back panel from the device.

  3. Acer Chromebook cb3-532-c47c Display Assembly Replacement, Remove the battery cable: 步骤 3 中的图像 1,1
    • Push on the sides of the connector with a plastic spudger to separate the cable from the motherboard.

  4. Acer Chromebook cb3-532-c47c Display Assembly Replacement, Unplug the WiFi Antenna Connectors: 步骤 4 中的图像 1,2 Acer Chromebook cb3-532-c47c Display Assembly Replacement, Unplug the WiFi Antenna Connectors: 步骤 4 中的图像 2,2
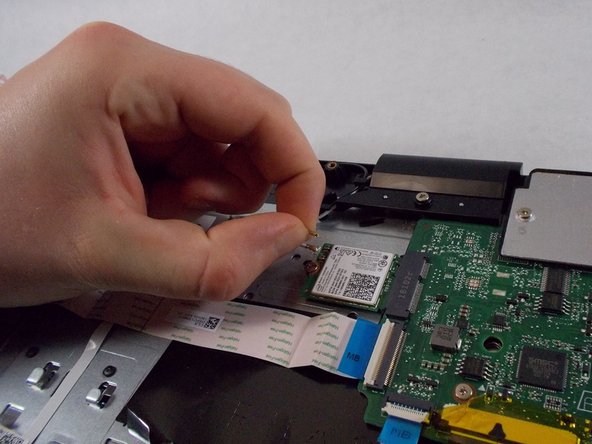
    • Firmly pull the end of the black wire attached to the Wi-Fi card upwards and remove it from the device.

    • Repeat with the white wire.

  5. Acer Chromebook cb3-532-c47c Display Assembly Replacement, Deroute the Black WiFi Wire: 步骤 5 中的图像 1,2 Acer Chromebook cb3-532-c47c Display Assembly Replacement, Deroute the Black WiFi Wire: 步骤 5 中的图像 2,2
    • Deroute the black wifi wire from its slot in the palm rest.

  6. Acer Chromebook cb3-532-c47c Display Assembly Replacement, Deroute the White WiFi Wire: 步骤 6 中的图像 1,2 Acer Chromebook cb3-532-c47c Display Assembly Replacement, Deroute the White WiFi Wire: 步骤 6 中的图像 2,2
    • Deroute the white wifi wire from the slot in the palm rest.

  7. Acer Chromebook cb3-532-c47c Display Assembly Replacement, Disconnect the Display Cable: 步骤 7 中的图像 1,3 Acer Chromebook cb3-532-c47c Display Assembly Replacement, Disconnect the Display Cable: 步骤 7 中的图像 2,3 Acer Chromebook cb3-532-c47c Display Assembly Replacement, Disconnect the Display Cable: 步骤 7 中的图像 3,3
    • Pull the end of the display cable attached to the motherboard straight up to remove.

    • Rotate the cable out away from the motherboard.

  8. Acer Chromebook cb3-532-c47c Display Assembly Replacement, Remove Right Hinge Screws: 步骤 8 中的图像 1,1
    • Remove the two screws from the right hinge.

  9. Acer Chromebook cb3-532-c47c Display Assembly Replacement: 步骤 9 中的图像 1,2 Acer Chromebook cb3-532-c47c Display Assembly Replacement: 步骤 9 中的图像 2,2
    • Insert a screwdriver or spudger under the hinge to get it started then rotate it open by hand as far as possible.

  10. Acer Chromebook cb3-532-c47c Display Assembly Replacement, Remove Left Hinge Screws: 步骤 10 中的图像 1,1
    • Remove the two screws from the left hinge.

  11. Acer Chromebook cb3-532-c47c Display Assembly Replacement: 步骤 11 中的图像 1,2 Acer Chromebook cb3-532-c47c Display Assembly Replacement: 步骤 11 中的图像 2,2
    • Insert a screwdriver or spudger under the hinge to get it started then rotate it open by hand as far as possible.

  12. Acer Chromebook cb3-532-c47c Display Assembly Replacement, Remove the display assembly: 步骤 12 中的图像 1,3 Acer Chromebook cb3-532-c47c Display Assembly Replacement, Remove the display assembly: 步骤 12 中的图像 2,3 Acer Chromebook cb3-532-c47c Display Assembly Replacement, Remove the display assembly: 步骤 12 中的图像 3,3
    • Lift the palm rest assembly from the front then slide it away from the hinges slightly to remove the assembly from the display.

结论

To reassemble your device, follow these instructions in reverse order.

另外一个人完成了本指南。

Jerry Wheeler

于03/21/22注册

58,524 声望

创作了69篇指南

团队

Oregonians Oregonians 的会员

Community

8 名成员

创作了176篇指南

0条评论

添加评论

浏览统计数据:

过去 24 小时: 0

过去 7 天: 2

过去 30 天: 6

总计 295