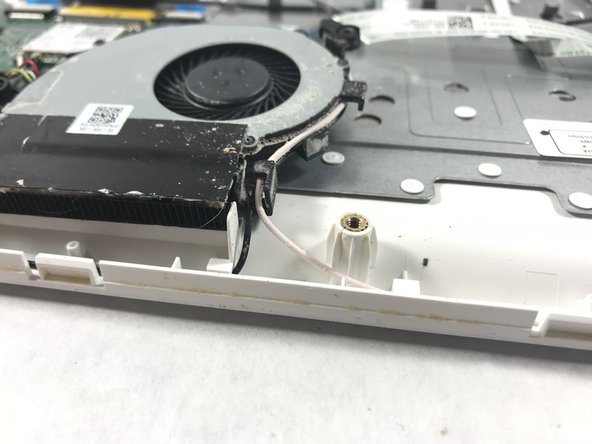
跳转到主内容

Acer Chromebook CB5-571-C5XU Fan Replacement

你所需要的

  1. Acer Chromebook CB5-571-C5XU Fan Replacement, Bottom Case: 步骤 1 中的图像 1,2 Acer Chromebook CB5-571-C5XU Fan Replacement, Bottom Case: 步骤 1 中的图像 2,2
    • Remove the following eighteen screws using a Phillips #0 screwdriver.

    • Make sure the Chromebook is unplugged and shut down, so no files are lost and there is no risk of electrocution.

  2. Acer Chromebook CB5-571-C5XU Fan Replacement: 步骤 2 中的图像 1,2 Acer Chromebook CB5-571-C5XU Fan Replacement: 步骤 2 中的图像 2,2
    • Using the flat side of the spudger, pry open the bottom case of the laptop.

    • Working from the front to the back, where it connects to the screen, proved to be the easiest way of popping the case off.

  3. Acer Chromebook CB5-571-C5XU Fan Replacement, Fan: 步骤 3 中的图像 1,2 Acer Chromebook CB5-571-C5XU Fan Replacement, Fan: 步骤 3 中的图像 2,2
    • Using a Phillips #0 screwdriver, unscrew the screw to the right of the fan.

    • Remember to have a small container to place the screw in, so it does not get lost.

  4. Acer Chromebook CB5-571-C5XU Fan Replacement: 步骤 4 中的图像 1,2 Acer Chromebook CB5-571-C5XU Fan Replacement: 步骤 4 中的图像 2,2
    • Using the Phillips #0 screwdriver, unscrew the four screws connecting the heatsink to the motherboard.

    • Remember to have a safe place to place the screws, so none of them get lost.

  5. Acer Chromebook CB5-571-C5XU Fan Replacement: 步骤 5 中的图像 1,3 Acer Chromebook CB5-571-C5XU Fan Replacement: 步骤 5 中的图像 2,3 Acer Chromebook CB5-571-C5XU Fan Replacement: 步骤 5 中的图像 3,3
    • Carefully unhook the black and white wires from the circumference of the fan.

    • It might help to use the pointed end of the spudger tool to unhook the wires.

    • Do not tug too hard on the wires, as they can easily disconnect and snap off from the motherboard.

  6. Acer Chromebook CB5-571-C5XU Fan Replacement: 步骤 6 中的图像 1,2 Acer Chromebook CB5-571-C5XU Fan Replacement: 步骤 6 中的图像 2,2
    • Using the spudger tool, carefully remove the wires connecting the fan to the motherboard.

  7. Acer Chromebook CB5-571-C5XU Fan Replacement: 步骤 7 中的图像 1,2 Acer Chromebook CB5-571-C5XU Fan Replacement: 步骤 7 中的图像 2,2
    • Using the flat side of the spudger, firmly pry the fan off of the components, as well as the heatsink from the motherboard.

结论

To reassemble your device, follow these instructions in reverse order.

另外一个人完成了本指南。

Erin Moffatt

于10/17/17注册

282 声望

创作了2篇指南

团队

UMass Dartmouth, Team S6-G1, Rockett Fall 2017 UMass Dartmouth, Team S6-G1, Rockett Fall 2017 的会员

UMASSD-ROCKETT-F17S6G1

3 名成员

创作了10篇指南

0条评论

添加评论

浏览统计数据:

过去 24 小时: 0

过去 7 天: 2

过去 30 天: 4

总计 274