跳转到主内容

Acer Aspire E1-470P-6659 Cooling Fan Replacement

你所需要的

  1. Acer Aspire E1-470P-6659 Cooling Fan Replacement, Battery: 步骤 1 中的图像 1,1
    • Turn off the laptop and disconnect all device cords.

  2. Acer Aspire E1-470P-6659 Cooling Fan Replacement: 步骤 2 中的图像 1,1
    • Flip the laptop over so the bottom is facing you.

  3. Acer Aspire E1-470P-6659 Cooling Fan Replacement: 步骤 3 中的图像 1,3 Acer Aspire E1-470P-6659 Cooling Fan Replacement: 步骤 3 中的图像 2,3 Acer Aspire E1-470P-6659 Cooling Fan Replacement: 步骤 3 中的图像 3,3
    • Use your finger or a spuger to pull the battery release switch.

  4. Acer Aspire E1-470P-6659 Cooling Fan Replacement: 步骤 4 中的图像 1,3 Acer Aspire E1-470P-6659 Cooling Fan Replacement: 步骤 4 中的图像 2,3 Acer Aspire E1-470P-6659 Cooling Fan Replacement: 步骤 4 中的图像 3,3
    • Remove the battery from the laptop.

  5. Acer Aspire E1-470P-6659 Cooling Fan Replacement, Hard Drive: 步骤 5 中的图像 1,2 Acer Aspire E1-470P-6659 Cooling Fan Replacement, Hard Drive: 步骤 5 中的图像 2,2
    • Remove nineteen screws from the back panel using a Phillips #0 Screwdriver .

  6. Acer Aspire E1-470P-6659 Cooling Fan Replacement: 步骤 6 中的图像 1,3 Acer Aspire E1-470P-6659 Cooling Fan Replacement: 步骤 6 中的图像 2,3 Acer Aspire E1-470P-6659 Cooling Fan Replacement: 步骤 6 中的图像 3,3
    • Run the plastic opening tool across from one corner to another along the edge.

    • Separate the keyboard panel gently.

    • Lift the keyboard slowly from the laptop but do not lift completely because there are ribbon cables attached.

  7. Acer Aspire E1-470P-6659 Cooling Fan Replacement: 步骤 7 中的图像 1,2 Acer Aspire E1-470P-6659 Cooling Fan Replacement: 步骤 7 中的图像 2,2
    • Disconnect the two keyboard assembly ribbon cables from motherboard.

    • To release small ribbon cable, use spudger or fingers to flip gray bar along edge over.

    • To release larger ribbon cable, use pry tool or spudger to slide white plastic clip forward.

  8. Acer Aspire E1-470P-6659 Cooling Fan Replacement: 步骤 8 中的图像 1,1
    • Pull up the release tab beside the hard drive.

    • Disconnect portion of ribbon cable that is covering the hard drive.

    • Handle the ribbon carefully. Do not break the metal contact.

    • While reconnecting the ribbon after replacing a new hard drive, face the blue side with a label up. Make sure the black line beside the sticker is not crooked, so that the ribbon is tight.

  9. Acer Aspire E1-470P-6659 Cooling Fan Replacement: 步骤 9 中的图像 1,1
    • Remove the hard drive screw using Phillips #0 Screwdriver.

  10. Acer Aspire E1-470P-6659 Cooling Fan Replacement: 步骤 10 中的图像 1,1
    • Pull the hard drive out gently. Be aware that it is connected to the adapter.

    • Gently remove adapter by pulling on both ends simultaneously to separate it from the hard drive.

  11. Acer Aspire E1-470P-6659 Cooling Fan Replacement, Motherboard: 步骤 11 中的图像 1,3 Acer Aspire E1-470P-6659 Cooling Fan Replacement, Motherboard: 步骤 11 中的图像 2,3 Acer Aspire E1-470P-6659 Cooling Fan Replacement, Motherboard: 步骤 11 中的图像 3,3
    • Remove additional screws that can be found on the motherboard.

    • Remove the green wifi card from motherboard.

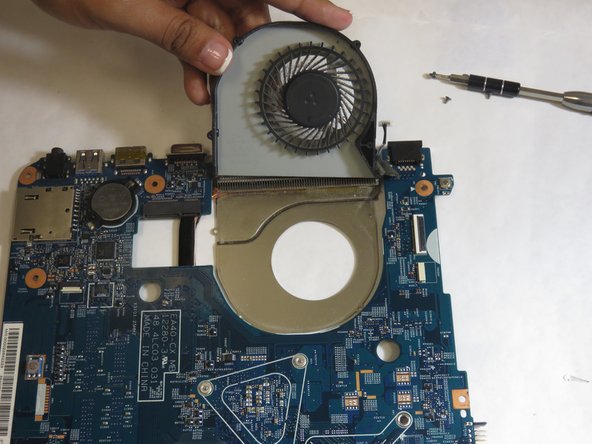
    • Use spudger to disconnect the fan and motherboard from laptop.

  12. Acer Aspire E1-470P-6659 Cooling Fan Replacement: 步骤 12 中的图像 1,2 Acer Aspire E1-470P-6659 Cooling Fan Replacement: 步骤 12 中的图像 2,2
    • Remove the cable attached to motherboard.

    • Gently lift and remove the motherboard from the laptop.

  13. Acer Aspire E1-470P-6659 Cooling Fan Replacement, Cooling Fan: 步骤 13 中的图像 1,2 Acer Aspire E1-470P-6659 Cooling Fan Replacement, Cooling Fan: 步骤 13 中的图像 2,2
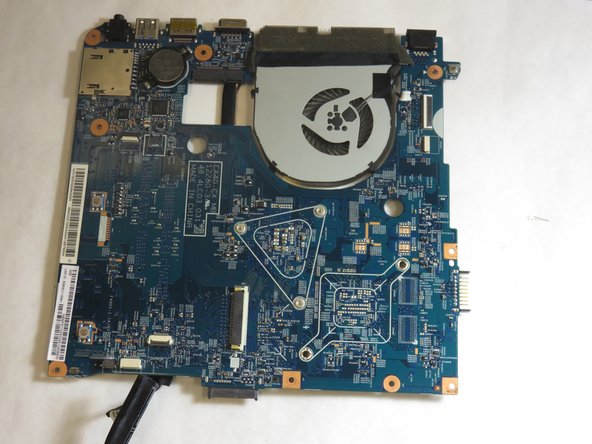
    • Flip the motherboard and fan piece over.

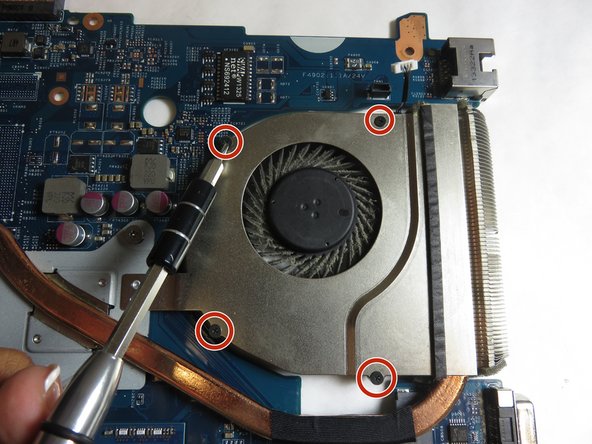
    • Remove the four screws using the Phillips #000 Screwdriver.

  14. Acer Aspire E1-470P-6659 Cooling Fan Replacement: 步骤 14 中的图像 1,3 Acer Aspire E1-470P-6659 Cooling Fan Replacement: 步骤 14 中的图像 2,3 Acer Aspire E1-470P-6659 Cooling Fan Replacement: 步骤 14 中的图像 3,3
    • Flip the motherboard over and slowly remove the tape holding the cooling fan down.

    • Use a spudger to remove the top of the fan from the base of the fan.

    • Remove the cooling fan component from both the tape and the motherboard.

结论

To reassemble your device, follow these instructions in reverse order.

Faith Lobaton

于10/22/18注册

497 声望

创作了3篇指南

团队

UC Davis, Team S4-G5, Lore Fall 2018 UC Davis, Team S4-G5, Lore Fall 2018 的会员

UCD-LORE-F18S4G5

3 名成员

创作了5篇指南

0条评论

添加评论

浏览统计数据:

过去 24 小时: 0

过去 7 天: 7

过去 30 天: 10

总计 386