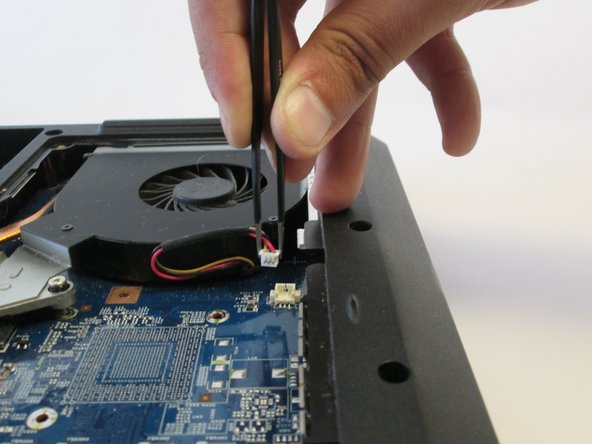
跳转到主内容

Acer Aspire 7736Z-4809 CPU Fan Replacement

你所需要的

  1. Acer Aspire 7736Z-4809 CPU Fan Replacement, Acer Aspire 7736Z-4809 Repair Preparation: 步骤 1 中的图像 1,1
    • Unplug and power off the laptop.

    • If the battery is still connected to the laptop, remove the battery.

  2. Acer Aspire 7736Z-4809 CPU Fan Replacement: 步骤 2 中的图像 1,1
    • Flip over the laptop so that the back panel of the laptop is facing up.

  3. Acer Aspire 7736Z-4809 CPU Fan Replacement, Back Panel: 步骤 3 中的图像 1,2 Acer Aspire 7736Z-4809 CPU Fan Replacement, Back Panel: 步骤 3 中的图像 2,2
    • Use the Phillips #1 screwdriver to remove the eight 6.5 mm Phillips #1 screws.

    • Only the four screws in the center are removable, the four along the edges are held in by rivets but can be loosened.

  4. Acer Aspire 7736Z-4809 CPU Fan Replacement: 步骤 4 中的图像 1,3 Acer Aspire 7736Z-4809 CPU Fan Replacement: 步骤 4 中的图像 2,3 Acer Aspire 7736Z-4809 CPU Fan Replacement: 步骤 4 中的图像 3,3
    • Remove the back panel of the laptop.

  5. Acer Aspire 7736Z-4809 CPU Fan Replacement: 步骤 5 中的图像 1,1
    • Connect a grounding cord to a metal interface on the laptop.

    • Ground the laptop to prevent static electricity from damaging the electrical components inside the laptop.

  6. Acer Aspire 7736Z-4809 CPU Fan Replacement, CPU Fan: 步骤 6 中的图像 1,3 Acer Aspire 7736Z-4809 CPU Fan Replacement, CPU Fan: 步骤 6 中的图像 2,3 Acer Aspire 7736Z-4809 CPU Fan Replacement, CPU Fan: 步骤 6 中的图像 3,3
    在这个步骤中使用的工具:
    Tweezers
    $4.99
    购买
    • Use tweezers to remove the fan cable from its slot.

    • The cables consist of red, black, and yellow wires.

  7. Acer Aspire 7736Z-4809 CPU Fan Replacement: 步骤 7 中的图像 1,2 Acer Aspire 7736Z-4809 CPU Fan Replacement: 步骤 7 中的图像 2,2
    • Use the Phillips #1 screwdriver to unscrew the four Phillips #1 screws that connect the cooling fan from the panel.

    • These screws are held in the unit via springs. You cannot remove them. They can only be loosened.

  8. Acer Aspire 7736Z-4809 CPU Fan Replacement: 步骤 8 中的图像 1,3 Acer Aspire 7736Z-4809 CPU Fan Replacement: 步骤 8 中的图像 2,3 Acer Aspire 7736Z-4809 CPU Fan Replacement: 步骤 8 中的图像 3,3
    • Carefully remove the cooling fan from the motherboard.

    • Slightly lift up the fan, gradually slide it towards you and then fully remove it from the case.

  9. Acer Aspire 7736Z-4809 CPU Fan Replacement: 步骤 9 中的图像 1,1
    • Install the modified or new cooling fan.

结论

To reassemble your device, follow these instructions in reverse order.

2等其他人完成本指南。

团队

UC Davis, Team 2-4, Oliver Fall 2016 UC Davis, Team 2-4, Oliver Fall 2016 的会员

UCD-OLIVER-F16S2G4

5 名成员

创作了10篇指南

一条评论

You’ll need some thermal compound when reinstalling for the heat syncs under the copper tube.

Minks - 回复

添加评论

浏览统计数据:

过去 24 小时: 0

过去 7 天: 0

过去 30 天: 8

总计 817