跳转到主内容

当前版本的文档还未经巡查,您可以查看最新的已查核版本

你所需要的

  1. 这个步骤还没有翻译 帮忙翻译一下

    : 步骤 1 中的图像 1,3 : 步骤 1 中的图像 2,3 : 步骤 1 中的图像 3,3
    • Move the battery catch to the "unlocked" position.

    • Pull back the second spring-loaded battery catch until the battery pops up.

    • Remove the battery.

  2. 这个步骤还没有翻译 帮忙翻译一下

    : 步骤 2 中的图像 1,3 : 步骤 2 中的图像 2,3 : 步骤 2 中的图像 3,3
    • Turn the notebook around to face you.

    • There are two Phillips #00 screws securing the cover panel to the rest of the notebook. Remove these screws.

  3. 这个步骤还没有翻译 帮忙翻译一下

    : 步骤 3 中的图像 1,3 : 步骤 3 中的图像 2,3 : 步骤 3 中的图像 3,3
    • Use a spudger to release the panel from the plastic retaining clips keeping it in place.

    • Do not apply too much force, or you may break the clips.

    • Remove the panel and set it aside.

  4. 这个步骤还没有翻译 帮忙翻译一下

    : 步骤 4 中的图像 1,3 : 步骤 4 中的图像 2,3 : 步骤 4 中的图像 3,3
    • Unscrew the Phillips #00 screw which retains the hard drive in place.

    • Gently slide the hard drive to the left in order to disengage the SATA connectors.

    • It may be quite stiff, in which case you can ease the hard drive out of the SATA connectors by inserting a spudger between the hard drive and the connector block.

    • Lift the drive out of the notebook.

  5. 这个步骤还没有翻译 帮忙翻译一下

    : 步骤 5 中的图像 1,3 : 步骤 5 中的图像 2,3 : 步骤 5 中的图像 3,3
    • There is a small metal bracket on either side of the hard drive, with two small silver-coloured Phillips #00 screws securing the bracket to the drive on each side.

    • Unscrew the 2 screws on each side.

  6. 这个步骤还没有翻译 帮忙翻译一下

    : 步骤 6 中的图像 1,2 : 步骤 6 中的图像 2,2
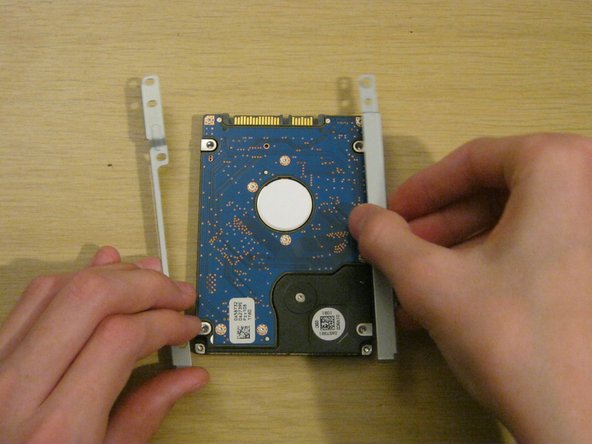
    • When installing a replacement hard drive (or SSD), take care to attach the brackets to the drive the same way round as they were on the old drive otherwise the SATA connector won't mate.

    • Replace the 4 screws securing the brackets.

    • Replace the drive in the laptop and slide it into position, ensuring that the SATA connector is fully mated.

    • Replace the retaining screw holding the drive in position. Take care to insert it into the correct hole otherwise it will be impossible to insert the cover screws.

终点

另外一个人完成了本指南。

Philip Le Riche

于02/18/14注册

30,089 声望

创作了47篇指南

团队

Restart Project Restart Project 的会员

Community

19 名成员

创作了519篇指南

0条评论

添加评论

浏览统计数据:

过去 24 小时: 0

过去 7 天: 2

过去 30 天: 22

总计 1,071