跳转到主内容

Acer Aspire 5734z-4836 Base Assembly Replacement

仅作为前提条件
本指南仅用作其他指南的先决条件。不能单独食用。

你所需要的

  1. Acer Aspire 5734z-4836 Base Assembly Replacement, Battery: 步骤 1 中的图像 1,1
    • Before removing the battery, power off your laptop and disconnect the AC adapter.

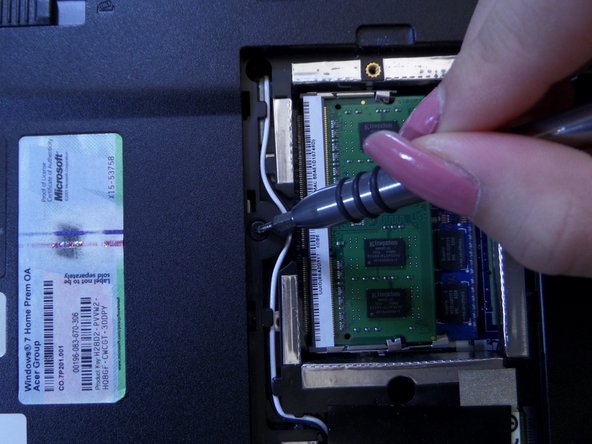
    • Flip your laptop on its back so the battery is facing up and the hinges are facing away from you.

  2. Acer Aspire 5734z-4836 Base Assembly Replacement: 步骤 2 中的图像 1,1
    • Slide the right latch down to unlock the battery.

  3. Acer Aspire 5734z-4836 Base Assembly Replacement: 步骤 3 中的图像 1,2 Acer Aspire 5734z-4836 Base Assembly Replacement: 步骤 3 中的图像 2,2
    • Slide and hold the left latch below the battery.

    • While holding this latch in place, pry the battery up from its bottom edge.

    • Lift the old battery out of its compartment.

  4. Acer Aspire 5734z-4836 Base Assembly Replacement, Keyboard: 步骤 4 中的图像 1,3 Acer Aspire 5734z-4836 Base Assembly Replacement, Keyboard: 步骤 4 中的图像 2,3 Acer Aspire 5734z-4836 Base Assembly Replacement, Keyboard: 步骤 4 中的图像 3,3
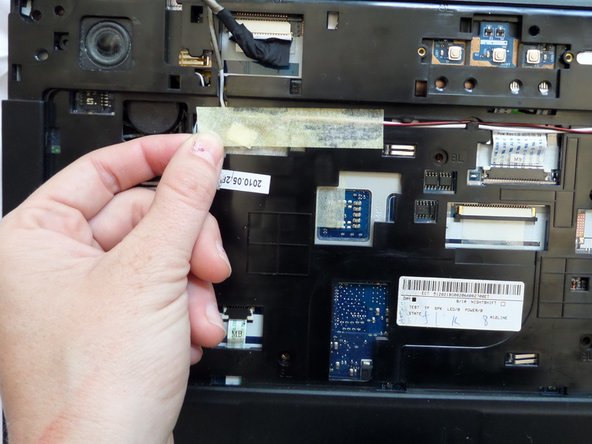
    • Pinch the edges of the plastic covering above the keyboard, and pull away from the laptop until the covering pops off.

    • By using a bit of force some clicks will be heard when removing the cover.

  5. Acer Aspire 5734z-4836 Base Assembly Replacement: 步骤 5 中的图像 1,2 Acer Aspire 5734z-4836 Base Assembly Replacement: 步骤 5 中的图像 2,2
    • Pull the keyboard off gently so not to damage the keyboard ribbon cable.

    • Multiple clicks may be heard as you pull the keyboard off.

  6. Acer Aspire 5734z-4836 Base Assembly Replacement: 步骤 6 中的图像 1,3 Acer Aspire 5734z-4836 Base Assembly Replacement: 步骤 6 中的图像 2,3 Acer Aspire 5734z-4836 Base Assembly Replacement: 步骤 6 中的图像 3,3
    • Using a spudger or your finger, unlock the ZIF connector holding the keyboard ribbon in place by lifting the black locking lever.

    • Pull the blue keyboard ribbon cable from the ZIF connector.

    • When reinstalling a new keyboard, insert the ribbon in the same way the old keyboard's ribbon was removed.

  7. Acer Aspire 5734z-4836 Base Assembly Replacement, Base Assembly: 步骤 7 中的图像 1,1
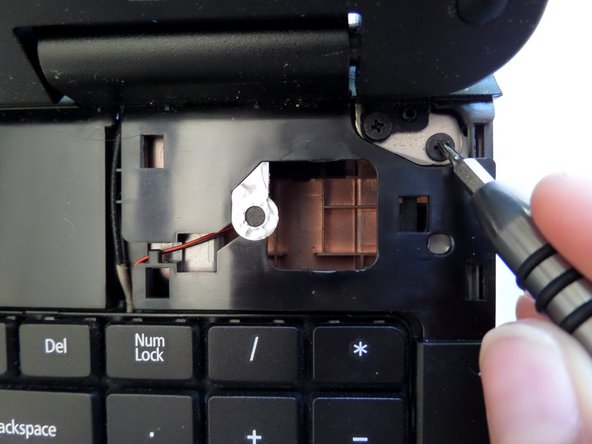
    • Begin with the laptop placed on its bottom and the empty keyboard space facing you.

  8. Acer Aspire 5734z-4836 Base Assembly Replacement: 步骤 8 中的图像 1,3 Acer Aspire 5734z-4836 Base Assembly Replacement: 步骤 8 中的图像 2,3 Acer Aspire 5734z-4836 Base Assembly Replacement: 步骤 8 中的图像 3,3
    • Disconnect the screen connector in the upper left of the laptop.

  9. Acer Aspire 5734z-4836 Base Assembly Replacement: 步骤 9 中的图像 1,3 Acer Aspire 5734z-4836 Base Assembly Replacement: 步骤 9 中的图像 2,3 Acer Aspire 5734z-4836 Base Assembly Replacement: 步骤 9 中的图像 3,3
    • Locate the tape on the upper left of the laptop.

    • Peel off the tape, covering the red-and-black wire connector and the white-and-black speaker wires.

  10. Acer Aspire 5734z-4836 Base Assembly Replacement: 步骤 10 中的图像 1,2 Acer Aspire 5734z-4836 Base Assembly Replacement: 步骤 10 中的图像 2,2
    • Gently disconnect the red-and-black wire connector and the white-and-black speaker wires from the upper-left.

  11. Acer Aspire 5734z-4836 Base Assembly Replacement: 步骤 11 中的图像 1,1
    • Remove the 5 screws in the middle of the laptop using a #00 Phillips Screwdriver.

    • In order to access the screw in the upper left corner, you may have to gently move the red and white wires.

  12. Acer Aspire 5734z-4836 Base Assembly Replacement: 步骤 12 中的图像 1,3 Acer Aspire 5734z-4836 Base Assembly Replacement: 步骤 12 中的图像 2,3 Acer Aspire 5734z-4836 Base Assembly Replacement: 步骤 12 中的图像 3,3
    • Disconnect the two blue and white ribbons by applying pressure downward and pushing them out of their sockets.

  13. Acer Aspire 5734z-4836 Base Assembly Replacement: 步骤 13 中的图像 1,2 Acer Aspire 5734z-4836 Base Assembly Replacement: 步骤 13 中的图像 2,2
    • Remove the four screws from the upper corners of the laptop using a Phillips #00 screwdriver.

    • The two metal and two plastic connectors will come free. Save them in a safe place.

  14. Acer Aspire 5734z-4836 Base Assembly Replacement: 步骤 14 中的图像 1,2 Acer Aspire 5734z-4836 Base Assembly Replacement: 步骤 14 中的图像 2,2
    • Pop off the black plastic hinge coverings.

  15. Acer Aspire 5734z-4836 Base Assembly Replacement: 步骤 15 中的图像 1,2 Acer Aspire 5734z-4836 Base Assembly Replacement: 步骤 15 中的图像 2,2
    • Peel away the sticky plastic coverings with tweezers.

  16. Acer Aspire 5734z-4836 Base Assembly Replacement: 步骤 16 中的图像 1,2 Acer Aspire 5734z-4836 Base Assembly Replacement: 步骤 16 中的图像 2,2
    • Remove the three screws with a #00 Philips Screwdriver.

  17. Acer Aspire 5734z-4836 Base Assembly Replacement: 步骤 17 中的图像 1,1
    • Remove the single screw next to the right hinge with a #00 Phillips Screwdriver.

  18. Acer Aspire 5734z-4836 Base Assembly Replacement: 步骤 18 中的图像 1,1
    • Flip the device so the bottom of the laptop is face-up.

  19. Acer Aspire 5734z-4836 Base Assembly Replacement: 步骤 19 中的图像 1,3 Acer Aspire 5734z-4836 Base Assembly Replacement: 步骤 19 中的图像 2,3 Acer Aspire 5734z-4836 Base Assembly Replacement: 步骤 19 中的图像 3,3
    • Remove the fifteen screws from the back of the laptop with a Phillips #00 Screwdriver.

  20. Acer Aspire 5734z-4836 Base Assembly Replacement: 步骤 20 中的图像 1,2 Acer Aspire 5734z-4836 Base Assembly Replacement: 步骤 20 中的图像 2,2
    • Pry mid-back panel off.

    • Use a plastic opening tool.

  21. Acer Aspire 5734z-4836 Base Assembly Replacement: 步骤 21 中的图像 1,1
    • Lift the hard-drive cover in the bottom right corner off the laptop.

  22. Acer Aspire 5734z-4836 Base Assembly Replacement: 步骤 22 中的图像 1,2 Acer Aspire 5734z-4836 Base Assembly Replacement: 步骤 22 中的图像 2,2
    • Slide down the hard-drive out of the laptop.

  23. Acer Aspire 5734z-4836 Base Assembly Replacement: 步骤 23 中的图像 1,2 Acer Aspire 5734z-4836 Base Assembly Replacement: 步骤 23 中的图像 2,2
    • Peel away the black plastic covering under the mid-back panel.

  24. Acer Aspire 5734z-4836 Base Assembly Replacement: 步骤 24 中的图像 1,2 Acer Aspire 5734z-4836 Base Assembly Replacement: 步骤 24 中的图像 2,2
    • Remove the two screws on the left and bottom of the circuit board with a #00 Phillips Screwdriver.

  25. Acer Aspire 5734z-4836 Base Assembly Replacement: 步骤 25 中的图像 1,2 Acer Aspire 5734z-4836 Base Assembly Replacement: 步骤 25 中的图像 2,2
    • Disconnect the black and white wires on the small circuit board by gently pulling them out of their sockets.

  26. Acer Aspire 5734z-4836 Base Assembly Replacement: 步骤 26 中的图像 1,2 Acer Aspire 5734z-4836 Base Assembly Replacement: 步骤 26 中的图像 2,2
    • Remove the four screws from the metal piece beneath the circuit with a Phillips #000 Screwdriver.

  27. Acer Aspire 5734z-4836 Base Assembly Replacement: 步骤 27 中的图像 1,1
    • Life the metal plate free and place it somewhere for safe-keeping.

  28. Acer Aspire 5734z-4836 Base Assembly Replacement: 步骤 28 中的图像 1,1
    • The small circuit board will pop up easily. Carefully remove it

  29. Acer Aspire 5734z-4836 Base Assembly Replacement: 步骤 29 中的图像 1,1
    • Gently extract the black and white wires. They will pull free from the base through the hole in the upper left corner.

  30. Acer Aspire 5734z-4836 Base Assembly Replacement: 步骤 30 中的图像 1,3 Acer Aspire 5734z-4836 Base Assembly Replacement: 步骤 30 中的图像 2,3 Acer Aspire 5734z-4836 Base Assembly Replacement: 步骤 30 中的图像 3,3
    • Flip to the front and gently lift the front of the laptop off of the base.

    • Some wires will be pulled up from the base so be careful not to pull it away too quickly.

结论

To reassemble your device, follow these instructions in reverse order.

团队

CSU Fullerton, Team 2-3, Bruce Fall 2016 CSU Fullerton, Team 2-3, Bruce Fall 2016 的会员

CSUF-BRUCE-F16S2G3

4 名成员

创作了6篇指南

0条评论

添加评论

浏览统计数据:

过去 24 小时: 0

过去 7 天: 0

过去 30 天: 0

总计 82