你所需要的
-
-
The hard drive is inside this compartment.
-
To remove the hard drive you have to remove the screws and pull them back to remove it.
-
-
-
To remove the components first we have to remove the lid.
-
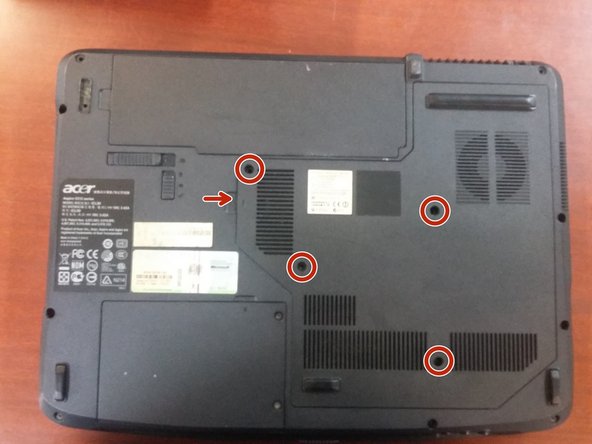
To remove the lid we have to unscrew the following screws that are marked in the first image
-
-
-
To remove the battery we have to remove the safe, and pull the other lever and it will go out alone.
-
-
-
To remove the drive we have to unscrew the screw is in the compartment where the motherboard.
-
In the image one screw is marked to be removed.
-
-
-
-
To be able to remove RAM, next to it there are two palanquillas (Image1)
-
In order to remove it, we have to press the two levers out simultaneously (Image2)
-
To take it out of you must be diagonal because if you can not break or do bad things.
-
-
-
To remove the fan, we have to unscrew it and disconnect it from the plate.
-
To remove the fan, we have to unscrew it and disconnect it from the plate. (In image 1 this is marked where the screws and the connector are)
-
Then to open it we have to remove the screws behind them (in Image 2 they are marked) After it is open, we can use a compressed air pot to clean it.
-
-
-
As he pulled the fan, he had to break the dissipator.
-
Per treure the dissipator tenim to download the cargols that are marked to the Imatge 1
-
-
-
Per treure the processador em to have molta cura, ja what if not the treus bé is pot trencar els pins.
-
Per to be able to tread the processador necessitarem a tornavís, i tindrem that descargolar aquest cargol. (imatge 1)
-
Quan ja estigui afluixat tenim that treure the processador cap a dalt perquè is not trenqui no pin
-
-
-
To remove the Wi-Fi card, the first thing we need to remove is the two cables and the two screws that are marked in Image 1
-
When we have already removed both wires and screws, the card will go out alone, we have to keep in mind and take it out diagonally so it does not break.
-
-
-
To remove the keyboard, we have to press four tabs that are marked in Image 1
-
in order to press the tabs, we will use a flat-level screwdriver or lever.
-


To Reassemble your device, follow these instructions in reverse order.
To Reassemble your device, follow these instructions in reverse order.
另外一个人完成了本指南。


