跳转到主内容

ASUS X552LAV-BBI5N08 CD Drive Replacement

你所需要的

  1. ASUS X552LAV-BBI5N08 CD Drive Replacement, Battery: 步骤 1 中的图像 1,1
    • Battery is not showed in pictures.

    • Flip the laptop face down.

  2. ASUS X552LAV-BBI5N08 CD Drive Replacement: 步骤 2 中的图像 1,3 ASUS X552LAV-BBI5N08 CD Drive Replacement: 步骤 2 中的图像 2,3 ASUS X552LAV-BBI5N08 CD Drive Replacement: 步骤 2 中的图像 3,3
    • Slide the right button to the left.

    • Hold the left button to the right.

    • While you hold the left button in position, slide the battery out by pushing it away from you.

  3. ASUS X552LAV-BBI5N08 CD Drive Replacement, CD Drive: 步骤 3 中的图像 1,1
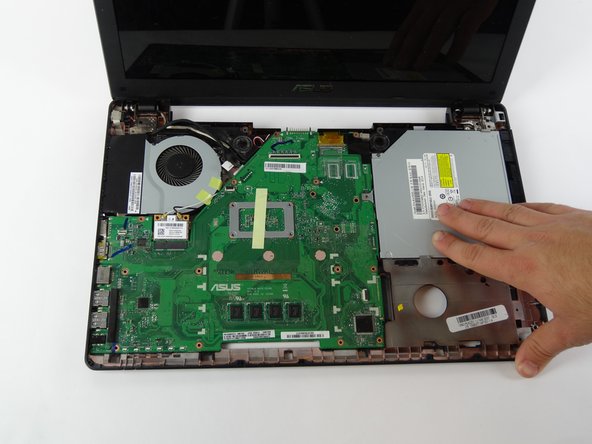
    • Locate the bottom panel. It is at the opposite end of the battery.

    • Remove the two 12mm screws at the bottom panel with a Tri-wing Y1 screwdriver.

  4. ASUS X552LAV-BBI5N08 CD Drive Replacement: 步骤 4 中的图像 1,3 ASUS X552LAV-BBI5N08 CD Drive Replacement: 步骤 4 中的图像 2,3 ASUS X552LAV-BBI5N08 CD Drive Replacement: 步骤 4 中的图像 3,3
    • Remove bottom panel by lifting it up.

    • Locate the hard drive.

    • It is located in the bottom left corner.

  5. ASUS X552LAV-BBI5N08 CD Drive Replacement: 步骤 5 中的图像 1,3 ASUS X552LAV-BBI5N08 CD Drive Replacement: 步骤 5 中的图像 2,3 ASUS X552LAV-BBI5N08 CD Drive Replacement: 步骤 5 中的图像 3,3
    • Remove the four 5.5mm screws located on the hard drive case using a Tri-wing Y1 screwdriver.

    • Slide the hard drive out to the left.

  6. ASUS X552LAV-BBI5N08 CD Drive Replacement: 步骤 6 中的图像 1,3 ASUS X552LAV-BBI5N08 CD Drive Replacement: 步骤 6 中的图像 2,3 ASUS X552LAV-BBI5N08 CD Drive Replacement: 步骤 6 中的图像 3,3
    • Use Tri-wing Y1 screwdriver to remove seven 4mm screws from battery area.

    • Use opening tool to split keyboard from base of the laptop.

    • Make sure to start from one end and go around the edges.

  7. ASUS X552LAV-BBI5N08 CD Drive Replacement: 步骤 7 中的图像 1,3 ASUS X552LAV-BBI5N08 CD Drive Replacement: 步骤 7 中的图像 2,3 ASUS X552LAV-BBI5N08 CD Drive Replacement: 步骤 7 中的图像 3,3
    • Flip laptop to sit on its bottom.

    • Lift keyboard up by the front edge

  8. ASUS X552LAV-BBI5N08 CD Drive Replacement: 步骤 8 中的图像 1,3 ASUS X552LAV-BBI5N08 CD Drive Replacement: 步骤 8 中的图像 2,3 ASUS X552LAV-BBI5N08 CD Drive Replacement: 步骤 8 中的图像 3,3
    • Flip up the small locking flap for the two ZIF connectors.

    • Unplug the connectors that are keeping the keyboard connected.

  9. ASUS X552LAV-BBI5N08 CD Drive Replacement: 步骤 9 中的图像 1,3 ASUS X552LAV-BBI5N08 CD Drive Replacement: 步骤 9 中的图像 2,3 ASUS X552LAV-BBI5N08 CD Drive Replacement: 步骤 9 中的图像 3,3
    • Flip up the locking flap for the ZIF connector.

    • Unplug the connector that is keeping the keyboard connected.

  10. ASUS X552LAV-BBI5N08 CD Drive Replacement: 步骤 10 中的图像 1,3 ASUS X552LAV-BBI5N08 CD Drive Replacement: 步骤 10 中的图像 2,3 ASUS X552LAV-BBI5N08 CD Drive Replacement: 步骤 10 中的图像 3,3
    • Remove keyboard from laptop.

    • Remove two 4mm screws around CD drive

    • Slide the CD drive out to the right to remove it.

结论

To reassemble your device, follow these instructions in reverse order.

Jason Vo

于02/15/18注册

857 声望

创作了5篇指南

团队

USF Tampa, Team S17-G1, Boczar Spring 2018 USF Tampa, Team S17-G1, Boczar Spring 2018 的会员

USFT-BOCZAR-S18S17G1

4 名成员

创作了5篇指南

0条评论

添加评论

浏览统计数据:

过去 24 小时: 0

过去 7 天: 0

过去 30 天: 3

总计 233