跳转到主内容

ASUS X502CA Hard Drive Replacement

你所需要的

  1. ASUS X502CA Hard Drive Replacement, Palm Rest with Keyboard and Touch Pad: 步骤 1 中的图像 1,1
    • Use the Phillips #00 screwdriver to remove the seven 90mm screws.

    • Use the Phillips #00 screwdriver to remove the four 50mm screws.

  2. ASUS X502CA Hard Drive Replacement: 步骤 2 中的图像 1,1
    • Next, use the plastic opening tool to carefully pop off the keyboard cover panel.

    • Be cautious when pulling off the cover because there are cables you will have to disconnect before completely removing the panel.

  3. ASUS X502CA Hard Drive Replacement: 步骤 3 中的图像 1,2 ASUS X502CA Hard Drive Replacement: 步骤 3 中的图像 2,2
    • Lift palm rest and unplug keyboard cable and touchpad cable using tweezers. After these two cables have been unplugged you can remove the keyboard cover panel.

  4. ASUS X502CA Hard Drive Replacement: 步骤 4 中的图像 1,2 ASUS X502CA Hard Drive Replacement: 步骤 4 中的图像 2,2
    • Lift Palm Rest away.

    • Replace with new palm rest.

  5. ASUS X502CA Hard Drive Replacement, Hard Drive: 步骤 5 中的图像 1,2 ASUS X502CA Hard Drive Replacement, Hard Drive: 步骤 5 中的图像 2,2
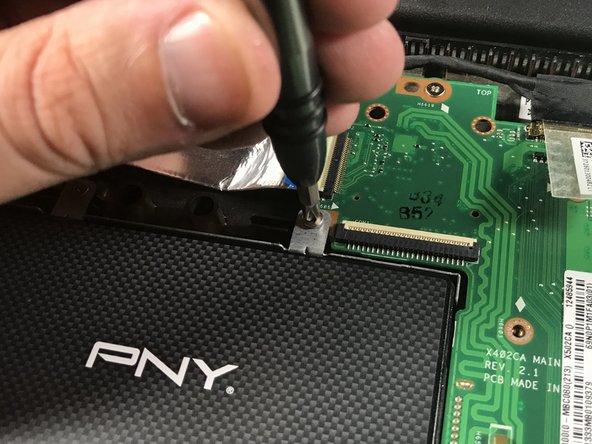
    • Remove the four 5mm screws that attach the hard drive bracket using the Phillips #0 screwdriver.

  6. ASUS X502CA Hard Drive Replacement: 步骤 6 中的图像 1,2 ASUS X502CA Hard Drive Replacement: 步骤 6 中的图像 2,2
    • Lift the hard drive and attached bracket up and out.

  7. ASUS X502CA Hard Drive Replacement: 步骤 7 中的图像 1,3 ASUS X502CA Hard Drive Replacement: 步骤 7 中的图像 2,3 ASUS X502CA Hard Drive Replacement: 步骤 7 中的图像 3,3
    • Remove the four 5mm Phillips #0 screws attaching the bracket to the hard drive.

    • There are 2 screws on each side.

结论

To reassemble your device, follow these instructions in reverse order.

另外一个人完成了本指南。

团队

UMass Dartmouth, Team S5-G6, Gulbrandsen Fall 2018 UMass Dartmouth, Team S5-G6, Gulbrandsen Fall 2018 的会员

UMASSD-GULBRANDSEN-F18S5G6

3 名成员

创作了5篇指南

0条评论

添加评论

浏览统计数据:

过去 24 小时: 0

过去 7 天: 4

过去 30 天: 4

总计 410