跳转到主内容

ASUS Vivobook Q301LA-BSI5T17 Display Replacement

你所需要的

  1. ASUS Vivobook Q301LA-BSI5T17 Display Replacement, Battery: 步骤 1 中的图像 1,1
    • Unscrew the (10) screws on the bottom of the computer chassis using the JIS #0 screwdriver.

  2. ASUS Vivobook Q301LA-BSI5T17 Display Replacement: 步骤 2 中的图像 1,2 ASUS Vivobook Q301LA-BSI5T17 Display Replacement: 步骤 2 中的图像 2,2
    • Slightly lift the lower case and push it toward the rear of the computer to free the mounting tabs.

  3. ASUS Vivobook Q301LA-BSI5T17 Display Replacement: 步骤 3 中的图像 1,3 ASUS Vivobook Q301LA-BSI5T17 Display Replacement: 步骤 3 中的图像 2,3 ASUS Vivobook Q301LA-BSI5T17 Display Replacement: 步骤 3 中的图像 3,3
    • Remove the (6) six screws attaching the battery to the frame using the JIS #0 screwdriver.

    • Use the black plastic spudger to remove the battery from the device.

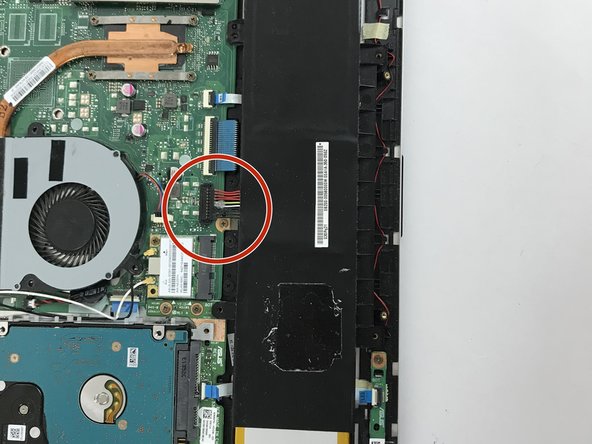
  4. ASUS Vivobook Q301LA-BSI5T17 Display Replacement: 步骤 4 中的图像 1,3 ASUS Vivobook Q301LA-BSI5T17 Display Replacement: 步骤 4 中的图像 2,3 ASUS Vivobook Q301LA-BSI5T17 Display Replacement: 步骤 4 中的图像 3,3
    • Gently take the battery out of the laptop, making sure that all wires connecting to it are disconnected.

  5. ASUS Vivobook Q301LA-BSI5T17 Display Replacement, Display: 步骤 5 中的图像 1,1
    • Remove the screws connecting the display to the laptop. Furthermore, detach the wires connecting the screen to the motherboard.

结论

To reassemble your device, follow these instructions in reverse order.

团队

USF Tampa, Team S5-G1, Walkup Fall 2017 USF Tampa, Team S5-G1, Walkup Fall 2017 的会员

USFT-WALKUP-F17S5G1

4 名成员

创作了6篇指南

0条评论

添加评论

浏览统计数据:

过去 24 小时: 1

过去 7 天: 6

过去 30 天: 10

总计 680