跳转到主内容

ASUS U57A-BBL4 Optical Drive Replacement

你所需要的

  1. ASUS U57A-BBL4 Optical Drive Replacement, Battery: 步骤 1 中的图像 1,1
    • Make sure the laptop is completely shut down to avoid data complications.

    • Hold the left lock switch towards the left to the unlock option.

  2. ASUS U57A-BBL4 Optical Drive Replacement: 步骤 2 中的图像 1,1
    • Toggle the right lock switch to the unlock option.

  3. ASUS U57A-BBL4 Optical Drive Replacement: 步骤 3 中的图像 1,1
    • Gently slide the battery out while still holding the left unlock switch.

  4. ASUS U57A-BBL4 Optical Drive Replacement, Front Panel Assembly: 步骤 4 中的图像 1,2 ASUS U57A-BBL4 Optical Drive Replacement, Front Panel Assembly: 步骤 4 中的图像 2,2
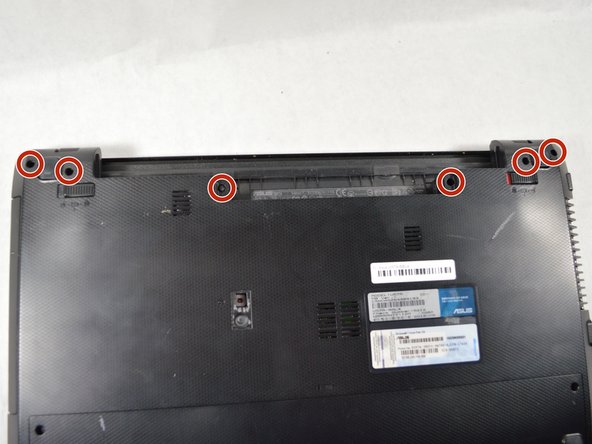
    • Remove the two 2 mm Phillips head screws on each side on the bottom using PH00 screw driver.

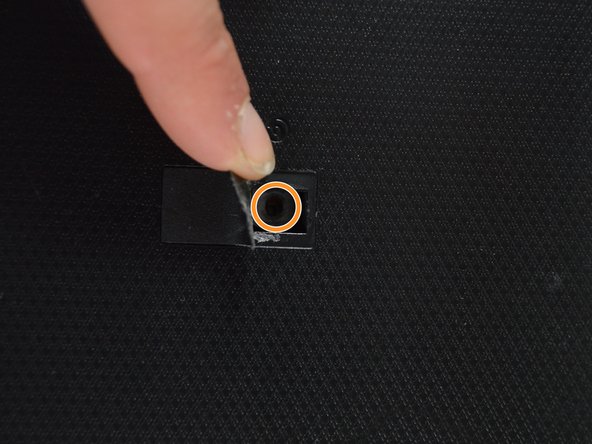
    • Remove the one 2 mm screw underneath the black cover in the middle using the same screw driver.

  5. ASUS U57A-BBL4 Optical Drive Replacement: 步骤 5 中的图像 1,1
    • Remove the RAM by lifting up with your fingers and sliding it out towards you.

  6. ASUS U57A-BBL4 Optical Drive Replacement: 步骤 6 中的图像 1,1
    • Remove the three 2 mm Phillips head screws on the hard drive using PH00 screw driver.

    • Remove the remaining seven 1.8 mm Phillips head screws using the same screw driver.

  7. ASUS U57A-BBL4 Optical Drive Replacement: 步骤 7 中的图像 1,2 ASUS U57A-BBL4 Optical Drive Replacement: 步骤 7 中的图像 2,2
    • Remove the hard drive by sliding it to the left and lifting up.

  8. ASUS U57A-BBL4 Optical Drive Replacement: 步骤 8 中的图像 1,2 ASUS U57A-BBL4 Optical Drive Replacement: 步骤 8 中的图像 2,2
    • Remove the six 2 mm Phillips head screws on the top edge of the laptop using PH00 screw driver.

    • Flip the laptop right-side up and open the screen.

  9. ASUS U57A-BBL4 Optical Drive Replacement: 步骤 9 中的图像 1,3 ASUS U57A-BBL4 Optical Drive Replacement: 步骤 9 中的图像 2,3 ASUS U57A-BBL4 Optical Drive Replacement: 步骤 9 中的图像 3,3
    • Starting in a corner of the keyboard, pry the keyboard from the laptop using a plastic opening tool.

    • Remove the ribbon cable on the bottom of the keyboard by lifting up on the tape and pulling up.

    • The front panel is now loose from the laptop.

  10. ASUS U57A-BBL4 Optical Drive Replacement, Optical Drive: 步骤 10 中的图像 1,1
    • Slide the optical drive out. It should easily come out.

结论

To reassemble your device, follow these instructions in reverse order.

团队

UMass Dartmouth, Team S2-G4, Julie Fall 2017 UMass Dartmouth, Team S2-G4, Julie Fall 2017 的会员

UMASSD-JULIE-F17S2G4

3 名成员

创作了6篇指南

一条评论

On my Asus U57A you only have to remove the one 2mm screw under the plastic cover on the bottom and the optical drive slides right out.  This seems like a considerable amount of overkill to me.

Steve Britten - 回复

添加评论

浏览统计数据:

过去 24 小时: 0

过去 7 天: 0

过去 30 天: 0

总计 315