跳转到主内容

ASUS N550JK-DS71T Laptop Screen Replacement

你所需要的

  1. ASUS N550JK-DS71T Laptop Screen Replacement, Back Case: 步骤 1 中的图像 1,2 ASUS N550JK-DS71T Laptop Screen Replacement, Back Case: 步骤 1 中的图像 2,2
    • Turn the laptop off and unplug all cables.

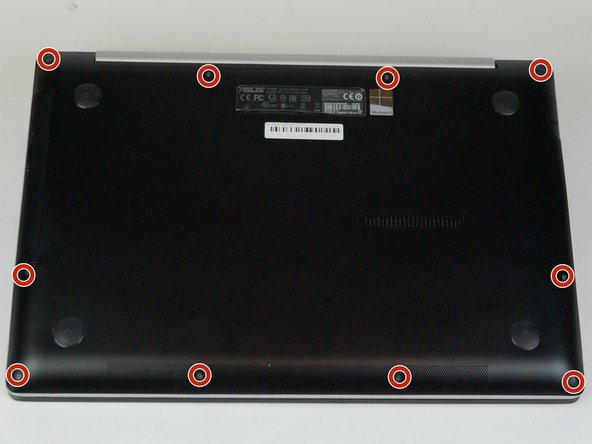
    • Flip over so the bottom is facing you.

    • Remove the ten 3mm Torx T5 screws from the bottom cover.

  2. ASUS N550JK-DS71T Laptop Screen Replacement: 步骤 2 中的图像 1,2 ASUS N550JK-DS71T Laptop Screen Replacement: 步骤 2 中的图像 2,2
    • Use a spudger to wedge between the laptop and bottom cover—lift upwards to pry open.

    • Run the spudger along the perimeter of the bottom cover to remove.

  3. ASUS N550JK-DS71T Laptop Screen Replacement, Battery: 步骤 3 中的图像 1,2 ASUS N550JK-DS71T Laptop Screen Replacement, Battery: 步骤 3 中的图像 2,2
    • Remove the three 4mm JIS #0 screws from the battery.

  4. ASUS N550JK-DS71T Laptop Screen Replacement: 步骤 4 中的图像 1,2 ASUS N550JK-DS71T Laptop Screen Replacement: 步骤 4 中的图像 2,2
    • Using both hands, lift the battery vertically out of the device.

  5. ASUS N550JK-DS71T Laptop Screen Replacement, Screen: 步骤 5 中的图像 1,2 ASUS N550JK-DS71T Laptop Screen Replacement, Screen: 步骤 5 中的图像 2,2
    • Remove the eight black 4mm Phillips #1 screws holding display to laptop base.

  6. ASUS N550JK-DS71T Laptop Screen Replacement: 步骤 6 中的图像 1,1
    • Lift the tab on the thick black wire to disconnect the display connector.

  7. ASUS N550JK-DS71T Laptop Screen Replacement: 步骤 7 中的图像 1,2 ASUS N550JK-DS71T Laptop Screen Replacement: 步骤 7 中的图像 2,2
    • Remove the thin black and white wire connectors from the Wi-Fi card.

    • The white wire should be above the black wire.

  8. ASUS N550JK-DS71T Laptop Screen Replacement: 步骤 8 中的图像 1,2 ASUS N550JK-DS71T Laptop Screen Replacement: 步骤 8 中的图像 2,2
    • Open then close the laptop to separate the metal hinges between display and base.

    • Open the laptop again then gently remove the base of the laptop from the display.

  9. ASUS N550JK-DS71T Laptop Screen Replacement: 步骤 9 中的图像 1,1
    • After removing the display from the board, slide the grey hinge cap to remove.

  10. ASUS N550JK-DS71T Laptop Screen Replacement: 步骤 10 中的图像 1,2 ASUS N550JK-DS71T Laptop Screen Replacement: 步骤 10 中的图像 2,2
    • Remove the two 4mm black Phillips #0 screws from the bottom of the display.

    • Slide the screen to the bottom of the display to disengage the mounting clips.

  11. ASUS N550JK-DS71T Laptop Screen Replacement: 步骤 11 中的图像 1,1
    • Lift the screen from the display to remove.

  12. ASUS N550JK-DS71T Laptop Screen Replacement, Remove screen from glass bezel: 步骤 12 中的图像 1,2 ASUS N550JK-DS71T Laptop Screen Replacement, Remove screen from glass bezel: 步骤 12 中的图像 2,2
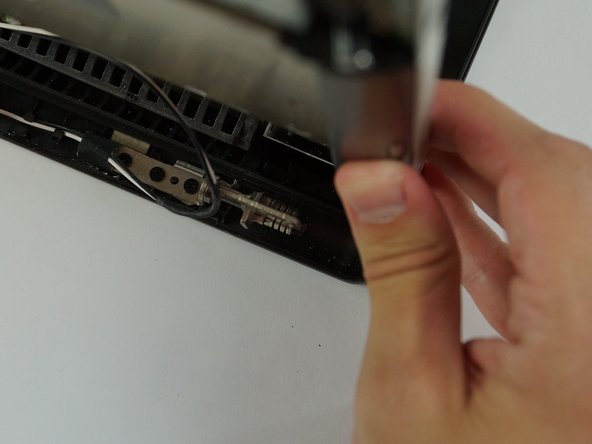
    • Using a spudger or soft pry tool, work your way around the edge of the screen to separate the screen from the bezel adhesive strips. Take your time, and be careful not to break the bezel.

  13. ASUS N550JK-DS71T Laptop Screen Replacement, Clean Glass Bezel: 步骤 13 中的图像 1,1
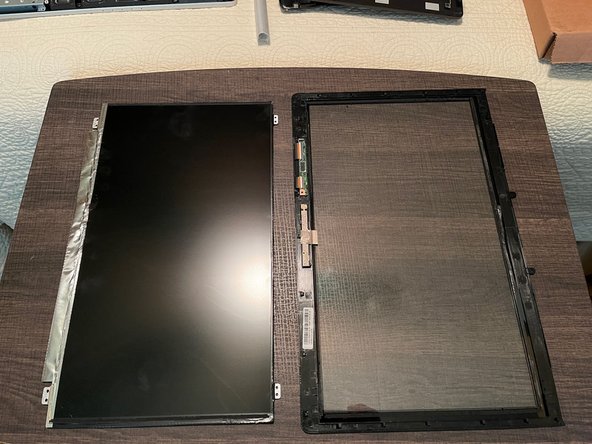
    • Before installing new screen, ensure that the adhesive strips are laying flat around the edges, and clean the surface of the screen of debris from prying the old screen off. These will show up on the new screen if you sandwich them in between the glass and the screen.

结论

To reassemble your device, follow these instructions in reverse order.

8等其他人完成本指南。

Steven Hahn

于01/29/18注册

884 声望

创作了6篇指南

团队

USF Tampa, Team S5-G1, Passmore Spring 2018 USF Tampa, Team S5-G1, Passmore Spring 2018 的会员

USFT-PASSMORE-S18S5G1

4 名成员

创作了6篇指南

2条评论

What is the screen model? I need it to buy a separate controller to use the laptop screen as an external monitor

Michele Pinchiarul - 回复

Thanks a lot, I’ve just replaced the flaky screen cable on my N550JK that was causing the screen to turn off frequently while using the laptop. Only cost 12€ to get a new one and my laptop is now fixed thanks to your guide! :)

Benoit V - 回复

添加评论

浏览统计数据:

过去 24 小时: 2

过去 7 天: 10

过去 30 天: 71

总计 9,739