跳转到主内容

ASUS N550JK-DS71T Laptop Hard Drive Replacement

你所需要的

  1. ASUS N550JK-DS71T Laptop Hard Drive Replacement, Back Case: 步骤 1 中的图像 1,2 ASUS N550JK-DS71T Laptop Hard Drive Replacement, Back Case: 步骤 1 中的图像 2,2
    • Turn the laptop off and unplug all cables.

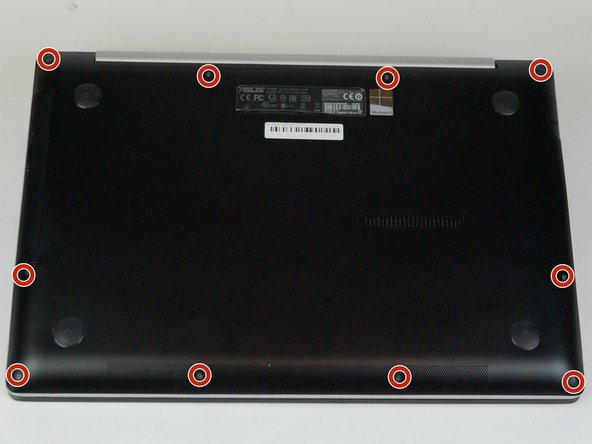
    • Flip over so the bottom is facing you.

    • Remove the ten 3mm Torx T5 screws from the bottom cover.

  2. ASUS N550JK-DS71T Laptop Hard Drive Replacement: 步骤 2 中的图像 1,2 ASUS N550JK-DS71T Laptop Hard Drive Replacement: 步骤 2 中的图像 2,2
    • Use a spudger to wedge between the laptop and bottom cover—lift upwards to pry open.

    • Run the spudger along the perimeter of the bottom cover to remove.

  3. ASUS N550JK-DS71T Laptop Hard Drive Replacement, Hard Drive: 步骤 3 中的图像 1,2 ASUS N550JK-DS71T Laptop Hard Drive Replacement, Hard Drive: 步骤 3 中的图像 2,2
    • Remove two 4mm black Phillips #1 screws from CD/DVD bracket.

    • Remove the single 4mm silver Phillips #1 screw from the bottom of the CD/DVD bracket.

    • Remove the CD/DVD bracket.

  4. ASUS N550JK-DS71T Laptop Hard Drive Replacement: 步骤 4 中的图像 1,1
    • Remove the four 4mm silver Phillips #1 screws that are holding the hard drive in place.

  5. ASUS N550JK-DS71T Laptop Hard Drive Replacement: 步骤 5 中的图像 1,2 ASUS N550JK-DS71T Laptop Hard Drive Replacement: 步骤 5 中的图像 2,2
    • Lift up and remove the hard drive from the motherboard.

结论

To reassemble your device, follow these instructions in reverse order.

3等其他人完成本指南。

Steven Hahn

于01/29/18注册

875 声望

创作了6篇指南

团队

USF Tampa, Team S5-G1, Passmore Spring 2018 USF Tampa, Team S5-G1, Passmore Spring 2018 的会员

USFT-PASSMORE-S18S5G1

4 名成员

创作了6篇指南

0条评论

添加评论

浏览统计数据:

过去 24 小时: 1

过去 7 天: 2

过去 30 天: 13

总计 2,530