跳转到主内容

ASUS Eee PC 1018P Hard Drive Replacement

你所需要的

  1. ASUS Eee PC 1018P Hard Drive Replacement, Battery: 步骤 1 中的图像 1,1
    • Lay the laptop flat on a hard surface with the bottom facing up and the battery pack on the side closest to you.

  2. ASUS Eee PC 1018P Hard Drive Replacement: 步骤 2 中的图像 1,2 ASUS Eee PC 1018P Hard Drive Replacement: 步骤 2 中的图像 2,2
    • Use both index fingers to push both spring tabs inwards towards the center of the laptop.

  3. ASUS Eee PC 1018P Hard Drive Replacement: 步骤 3 中的图像 1,3 ASUS Eee PC 1018P Hard Drive Replacement: 步骤 3 中的图像 2,3 ASUS Eee PC 1018P Hard Drive Replacement: 步骤 3 中的图像 3,3
    • With the spring tabs pressed inward, use your fingernails to lift of the edge of the battery, pivoting it up and towards you.

    • Pull the battery pack up and away from you to completely free it from its recess in the case.

  4. ASUS Eee PC 1018P Hard Drive Replacement, Keyboard: 步骤 4 中的图像 1,1
    • Remove the screws securing the bottom case to the keyboard.

    • Remove the six 3.68 mm screws and the single 4.45 mm screw that had been concealed by the battery.

    • Use a pair of tweezers to remove the two rubber covers located at the upper left and right corners.

    • With the rubber covers gone, two 4.52 mm screws should now be visible. Remove these screws.

  5. ASUS Eee PC 1018P Hard Drive Replacement: 步骤 5 中的图像 1,2 ASUS Eee PC 1018P Hard Drive Replacement: 步骤 5 中的图像 2,2
    • Pry the cover free from the chasis by inserting the plastic opening tool between the keyboard and the lower body of the Asus Eee PC 1018P.

    • Prying a keyboard from a laptop requires a lot of force, but the keyboard also has fragile connectors underneath. Use caution so as to avoid breaking these connectors.

  6. ASUS Eee PC 1018P Hard Drive Replacement: 步骤 6 中的图像 1,1
    • Lift the outside edge of the keyboard upward and inward towards the screen. (See warning below.)

    • Take care not to lift the keyboard too high from the motherboard, as this may sever the ribbon cables that are still attached.

  7. ASUS Eee PC 1018P Hard Drive Replacement: 步骤 7 中的图像 1,3 ASUS Eee PC 1018P Hard Drive Replacement: 步骤 7 中的图像 2,3 ASUS Eee PC 1018P Hard Drive Replacement: 步骤 7 中的图像 3,3
    • Remove the black ribbon cable from the motherboard.

    • Use the tip of the plastic opening tool to push the black tabs on both sides of the white connector forward toward the display.

    • Pushing forward on one side will push the other side back toward the touch pad. Repeat the previous step until both black tabs will not move any farther.

    • Carefully pull the black ribbon cable horizontally toward the display until it slides free from the white motherboard connector. If it does not move when pulling on it, repeat previous steps until it does.

  8. ASUS Eee PC 1018P Hard Drive Replacement: 步骤 8 中的图像 1,3 ASUS Eee PC 1018P Hard Drive Replacement: 步骤 8 中的图像 2,3 ASUS Eee PC 1018P Hard Drive Replacement: 步骤 8 中的图像 3,3
    • Remove the white ribbon cable from the motherboard.

    • Insert the plastic opening tool under the small lip of the white ribbon connector, and pry upwards to pop the motherboard connector up.

    • Carefully remove the white ribbon cable by pulling it horizontally towards the touch pad.

  9. ASUS Eee PC 1018P Hard Drive Replacement: 步骤 9 中的图像 1,1
    • The keyboard is now fully disconnected and can now be removed from the main body of the Asus Eee PC 1018P.

  10. ASUS Eee PC 1018P Hard Drive Replacement, Hard Drive: 步骤 10 中的图像 1,1
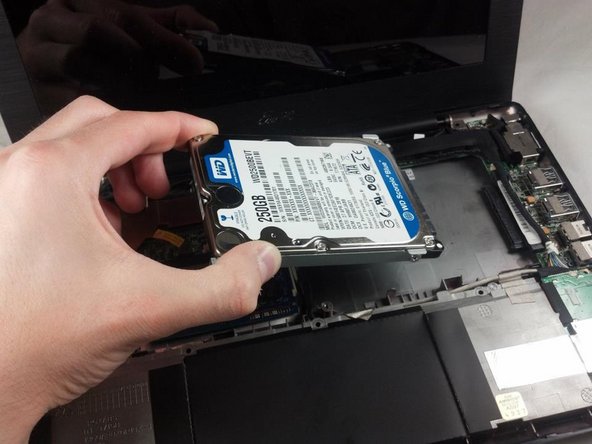
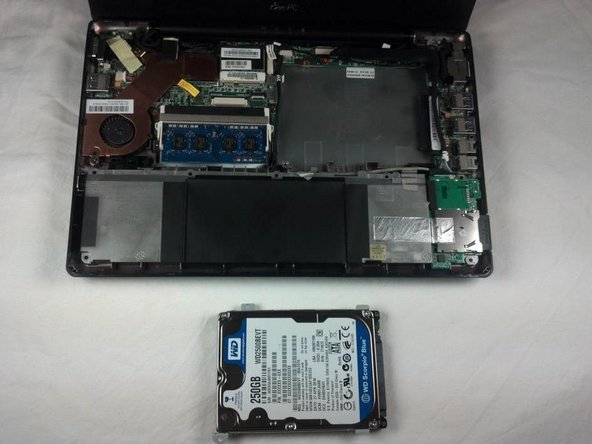
    • Use a Phillips #0 screwdriver to remove the two 4.52 mm screws securing the hard drive case to the laptop.

  11. ASUS Eee PC 1018P Hard Drive Replacement: 步骤 11 中的图像 1,1
    • Carefully peel off the tape that secures the black cables to the hard drive.

    • Do not discard the tape.

  12. ASUS Eee PC 1018P Hard Drive Replacement: 步骤 12 中的图像 1,3 ASUS Eee PC 1018P Hard Drive Replacement: 步骤 12 中的图像 2,3 ASUS Eee PC 1018P Hard Drive Replacement: 步骤 12 中的图像 3,3
    • Lift the left side of the hard drive slightly. Gently pull the hard drive to the left in order to free it from the pin connection on the right side.

    • Continue pulling the hard drive out from the socket until it's free from the rest of the laptop.

    • Removing the hard drive at too great or too small an angle can cause damage to both the hard drive and the connector to the motherboard.

  13. ASUS Eee PC 1018P Hard Drive Replacement: 步骤 13 中的图像 1,1
    • Use a Phillips #0 screwdriver to remove the four 3.68 mm screws securing the hard drive case to the hard drive. There are two on each side of the hard drive case.

  14. ASUS Eee PC 1018P Hard Drive Replacement: 步骤 14 中的图像 1,1
    • The hard drive is now fully removed and ready to be replaced.

结论

To reassemble your device, follow these instructions in reverse order.

12等其他人完成本指南。

Daniel Rodman

于01/20/12注册

309 声望

创作了2篇指南

团队

Cal Poly, Team 8-13, Maness Winter 2012 Cal Poly, Team 8-13, Maness Winter 2012 的会员

CPSU-MANESS-W12S8G13

4 名成员

创作了11篇指南

3条评论

It helps when you start to pry open the cover at the SD card slot instead of some random point as there is some space to go between. Don't insert your tool too deeply though or you you might damage the frame that sits further in.

Andre - 回复

Short, clear, accurate. Thank you! awesome student :)

Alex - 回复

Any advice on replacing with a SSD drive?

SATA II 3GBs

Would a 6gbs drive be a waste? or even work?

same question for SATA III

terrymcp63 - 回复

添加评论

浏览统计数据:

过去 24 小时: 0

过去 7 天: 7

过去 30 天: 21

总计 9,060