跳转到主内容

ASUS Chromebook C424MA-DH48F Daughterboard Replacement

你所需要的

  1. ASUS Chromebook C424MA-DH48F Daughterboard Replacement, Lower Case: 步骤 1 中的图像 1,2 ASUS Chromebook C424MA-DH48F Daughterboard Replacement, Lower Case: 步骤 1 中的图像 2,2
    • Use a Phillips #0 screwdriver to remove the eleven 6.9 mm screws that secure the lower case.

    • Make sure all the screws on this side get taken out because there could be a label or warranty sticker covering up a screw that might be missed.

    • Insert an opening pick into the gap between the lower case and chassis.

    • Slide the pick around the entire perimeter of the laptop until the lower case fully releases.

    • Remove the lower case.

  2. ASUS Chromebook C424MA-DH48F Daughterboard Replacement, ASUS Chromebook C424MA-DH48F Battery Disconnection: 步骤 2 中的图像 1,3 ASUS Chromebook C424MA-DH48F Daughterboard Replacement, ASUS Chromebook C424MA-DH48F Battery Disconnection: 步骤 2 中的图像 2,3 ASUS Chromebook C424MA-DH48F Daughterboard Replacement, ASUS Chromebook C424MA-DH48F Battery Disconnection: 步骤 2 中的图像 3,3
    • Use an opening tool to pop up the silver locking bar securing the battery connector.

    • Push the battery connector directly out of its motherboard port.

  3. ASUS Chromebook C424MA-DH48F Daughterboard Replacement, Daughterboard: 步骤 3 中的图像 1,2 ASUS Chromebook C424MA-DH48F Daughterboard Replacement, Daughterboard: 步骤 3 中的图像 2,2
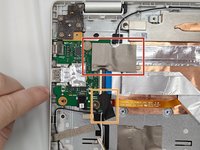
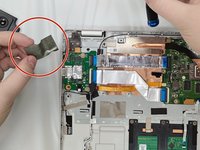
    • Remove the thermal tape covering the large ribbon cable connector from the daughterboard.

    • Remove the black electrical tape from the small I/O connector on the bottom right corner of the daughterboard.

  4. ASUS Chromebook C424MA-DH48F Daughterboard Replacement: 步骤 4 中的图像 1,2 ASUS Chromebook C424MA-DH48F Daughterboard Replacement: 步骤 4 中的图像 2,2
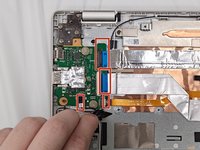
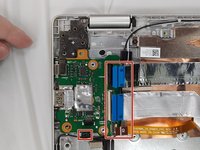
    • Disconnect the four connectors.

    • The cables are thin and delicate, take care when handling to not tear them.

  5. ASUS Chromebook C424MA-DH48F Daughterboard Replacement: 步骤 5 中的图像 1,1
    • Use a Phillips screwdriver remove the two 1.9 mm screws that secure the board.

  6. ASUS Chromebook C424MA-DH48F Daughterboard Replacement: 步骤 6 中的图像 1,1
    • Remove the three 3.3 mm screws from the top left hinge bracket.

  7. ASUS Chromebook C424MA-DH48F Daughterboard Replacement: 步骤 7 中的图像 1,2 ASUS Chromebook C424MA-DH48F Daughterboard Replacement: 步骤 7 中的图像 2,2
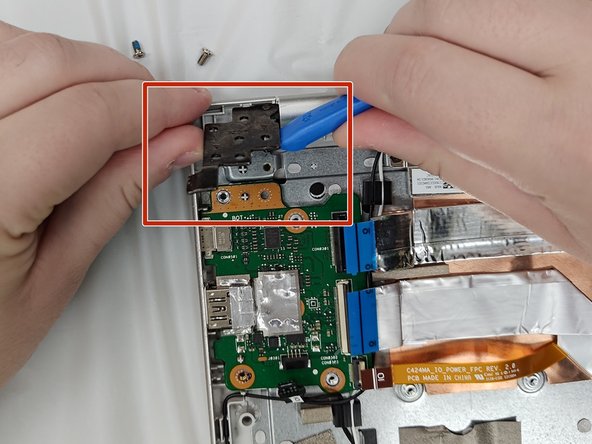
    • Use an opening tool lift the left hinge bracket out of the way of the daughterboard.

  8. ASUS Chromebook C424MA-DH48F Daughterboard Replacement: 步骤 8 中的图像 1,1
    • Remove the daughterboard by pulling straight up then back towards the motherboard.

结论

To reassemble your device, follow the above steps in reverse order.

Take your e-waste to an R2 or e-Stewards certified recycler.

Mo3

于09/16/24注册

133 声望

撰写一个指南

0条评论

添加评论

浏览统计数据:

过去 24 小时: 0

过去 7 天: 3

过去 30 天: 11

总计 47