跳转到主内容

ASUS Chromebook C300MA-DH01 Motherboard Replacement

你所需要的

  1. ASUS Chromebook C300MA-DH01 Motherboard Replacement, Motherboard: 步骤 1 中的图像 1,1
    • Flip the Chromebook over so the bottom of the device is facing up.

  2. ASUS Chromebook C300MA-DH01 Motherboard Replacement: 步骤 2 中的图像 1,2 ASUS Chromebook C300MA-DH01 Motherboard Replacement: 步骤 2 中的图像 2,2
    • Using the JIS J0 Screwdriver, remove the following screws from the bottom:

    • (5) Five 6mm screws

    • (6) Six 8mm screws

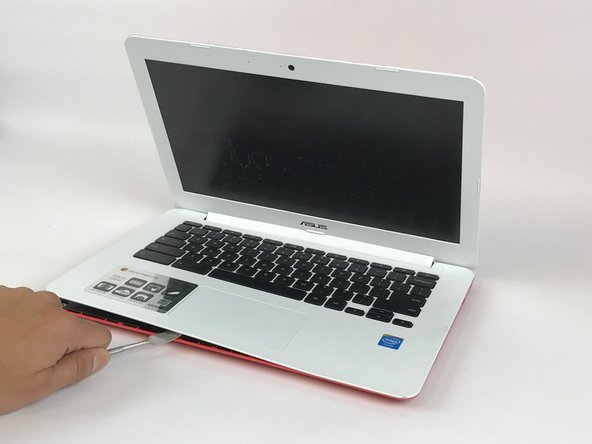
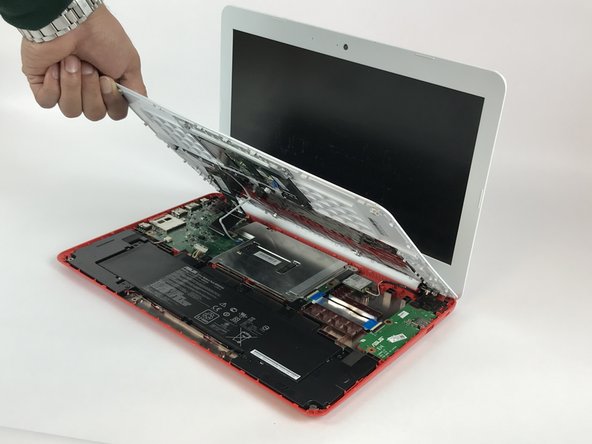
  3. ASUS Chromebook C300MA-DH01 Motherboard Replacement: 步骤 3 中的图像 1,3 ASUS Chromebook C300MA-DH01 Motherboard Replacement: 步骤 3 中的图像 2,3 ASUS Chromebook C300MA-DH01 Motherboard Replacement: 步骤 3 中的图像 3,3
    • Gently wedge the spudger in between the bottom of the device and the keyboard, and carefully pry the cover open. Then, carefully lift up on keyboard.

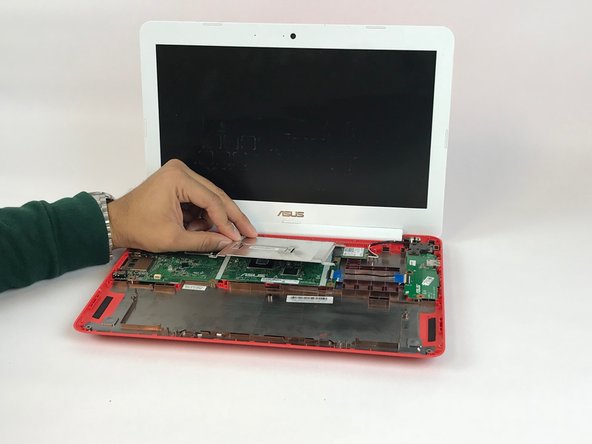
  4. ASUS Chromebook C300MA-DH01 Motherboard Replacement: 步骤 4 中的图像 1,3 ASUS Chromebook C300MA-DH01 Motherboard Replacement: 步骤 4 中的图像 2,3 ASUS Chromebook C300MA-DH01 Motherboard Replacement: 步骤 4 中的图像 3,3
    • Gently detach connecting cables.

    • Carefully flip up the large black tab.

    • Carefully flip up the small white tab.

    • Remove its corresponding black cable.

    • Remove its corresponding white cable.

    • The keyboard will be fully detached at this point. Set it aside for now.

  5. ASUS Chromebook C300MA-DH01 Motherboard Replacement: 步骤 5 中的图像 1,1
    • Using the JIS J0 Screwdriver, unscrew and remove the (6) six 6mm screws from the device.

  6. ASUS Chromebook C300MA-DH01 Motherboard Replacement: 步骤 6 中的图像 1,1
    • Using the plastic opening tool, gently push the connector tab away from the battery to detach the cable.

    • The battery will be fully detached at this point. Carefully lift it out of the device.

  7. ASUS Chromebook C300MA-DH01 Motherboard Replacement: 步骤 7 中的图像 1,1
    • Using the plastic opening tool, disconnect the audio connection by pushing the audio tab toward the speakers.

    • With the audio cable detached, carefully lift the speakers out of the device.

  8. ASUS Chromebook C300MA-DH01 Motherboard Replacement: 步骤 8 中的图像 1,1
    • Remove the LCD cable from the motherboard.

    • Peel back the tape and then gently pull back on the connector cable.

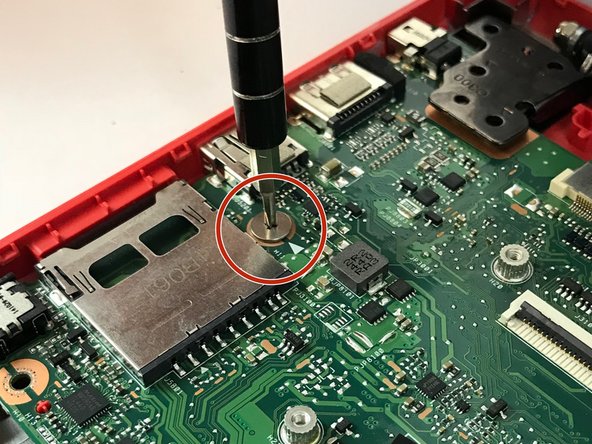
  9. ASUS Chromebook C300MA-DH01 Motherboard Replacement: 步骤 9 中的图像 1,1
    • Using the JIS J0 screwdriver, unscrew the 3mm screw.

    • Remove the Wi-Fi card from the motherboard.

  10. ASUS Chromebook C300MA-DH01 Motherboard Replacement: 步骤 10 中的图像 1,1
    • Using the plastic opening tool, lift up on data cable for the daughterboard to remove it from the device.

  11. ASUS Chromebook C300MA-DH01 Motherboard Replacement: 步骤 11 中的图像 1,2 ASUS Chromebook C300MA-DH01 Motherboard Replacement: 步骤 11 中的图像 2,2
    • Using the JIS J0 Screwdriver unscrew and remove the (2) two 3 mm screws from the heat shield.

    • Gently lift up on the heat shield to remove it.

  12. ASUS Chromebook C300MA-DH01 Motherboard Replacement: 步骤 12 中的图像 1,1
    • Using the JIS J0 Screwdriver, unscrew and remove the (3) three 6mm screws from the left hinge.

  13. ASUS Chromebook C300MA-DH01 Motherboard Replacement: 步骤 13 中的图像 1,2 ASUS Chromebook C300MA-DH01 Motherboard Replacement: 步骤 13 中的图像 2,2
    • Using the JIS J0 Screwdriver, unscrew and removing the following:

    • (1) One 3mm screw from the right side of the motherboard.

    • (1) One 4mm silver screw from the left side of the motherboard.

    • The motherboard can now be carefully removed from the device.

结论

To reassemble your device, follow these instructions in reverse order.

Gina Altimari

于09/28/17注册

401 声望

创作了4篇指南

团队

USF Tampa, Team S2-G5, Passmore Fall 2017 USF Tampa, Team S2-G5, Passmore Fall 2017 的会员

USFT-PASSMORE-F17S2G5

3 名成员

创作了10篇指南

0条评论

添加评论

浏览统计数据:

过去 24 小时: 0

过去 7 天: 0

过去 30 天: 0

总计 201