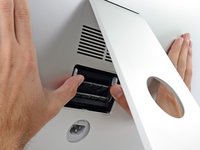
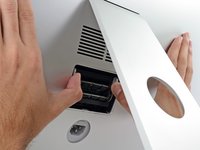
跳转到主内容

此翻译可能不反映源指南的最新更新。 帮助更新翻译查看源指南

27英寸 5K iMac内存更换

你所需要的

  1. 27英寸 5K iMac内存更换, 内存: 步骤 1 中的图像 1,2 27英寸 5K iMac内存更换, 内存: 步骤 1 中的图像 2,2
    • 在保持显示器稳定的同时,使用一个东西来压住位于电源端口上方的内存门释放按钮。

    • 你可能不得不用力地按压它,直到它的底部从iMac的后面弹出大约0.25英寸(0.635厘米)。

  2. 27英寸 5K iMac内存更换: 步骤 2 中的图像 1,3 27英寸 5K iMac内存更换: 步骤 2 中的图像 2,3 27英寸 5K iMac内存更换: 步骤 2 中的图像 3,3
    • 从iMac后面拉出内存门。

  3. 27英寸 5K iMac内存更换: 步骤 3 中的图像 1,3 27英寸 5K iMac内存更换: 步骤 3 中的图像 2,3 27英寸 5K iMac内存更换: 步骤 3 中的图像 3,3
    • RAM托盘被锁定在固定的位置,有两个灰色的标签。

    • 用你的拇指或食指来解锁托盘,把标签向外推,远离内存。

    • 把内存托盘拉出来,然后把它拉到一个接近水平的位置。

  4. 27英寸 5K iMac内存更换: 步骤 4 中的图像 1,3 27英寸 5K iMac内存更换: 步骤 4 中的图像 2,3 27英寸 5K iMac内存更换: 步骤 4 中的图像 3,3
    • 用两只手抓住一条内存,然后直接从内存托盘中取出。

    • 内存模块是有方向的的,因此它们只能安装在正确的方向上。请注意,在移除和重新安装内存时,金手指较短部分的方向。

    • 要安装一个新模块,请将模块插入到托盘中所需的槽内,并将其紧紧地按在适当的位置。把托盘往后推,直到它锁好。

    • 重新插入内存门回到它原来的位置。

终点

114等其他人完成本指南。

由衷感谢以下译者:

en zh

75%

Hong正在帮助我们修复这个世界! 您也想加入吗?
开始翻译 ›

Sam Goldheart

于10/18/12注册

465,777 声望

创作了538篇指南

团队

iFixit iFixit 的会员

Staff

135 名成员

创作了16,817篇指南

22条评论

At the end: "To reassemble your device, follow these instructions in reverse and use our adhesive strip replacement guide to reattach the display glass."

This does not make sense for a memory replacement guide.

xiepengpeng - 回复

I made a few changes to the guide to make it more readable. Thanks for the tip!

Miroslav Djuric -

I am thinking about getting me an iMac 5K but not really interested in overpaying for my RAM - can I access all 4 slots in the newest iMac 5K so I could buy the entry level with 8GB and then upgrade it to 32GB myself?

sdjensen - 回复

Yes, but make sure they are the same frequency so there won't be any issues. (1867)

vsomme -

Is it possible for 4GB x 2 model to add 8GB x 2 and having 24GB RAM

christmas - 回复

添加评论

浏览统计数据:

过去 24 小时: 20

过去 7 天: 153

过去 30 天: 582

总计 223,281