简介
使用本指南可替换 MacBook Pro 上的整个显示器部件,以修复破裂或故障的屏幕。
``为了安全起见,请在开始使用 MacBook Pro 的电池之前将其电量消耗在25%以下。''
你所需要的
-
-
开机,并打开终端。
-
将以下命令复制粘贴到(或完全键入)终端窗口中:
-
sudo nvram AutoBoot=%00
-
按[回车]。如果出现钥匙提示,请输入管理员密码(开机密码)并再次按[回车]。注意:您的回车键也可能标有「⏎」或 return。
-
sudo nvram AutoBoot=%03
-
-
-
在相反的一侧重复上一个步骤,在底壳下方滑动你的三角撬片,然后在一侧向上滑动以弹出第二个夹子。
Recommend being very careful on this step and the following step when using any opening tool to always keep the “pointy end” up when prying, especially about 40mm up the side, to avoid completely destroying the speaker diaphragms.
-
-
-
将底壳牢固地拉向MacBook的正面(远离铰链区域),以分离固定下壳体的最后一个夹子。
-
首先在一个角落拉,然后在另一个角落拉。
-
-
-
-
使用一个撬棒的尖端翻转小的黑色锁定标签,以确保电缆在其接口。
Be very careful here. It is easy to break the whole connector off the battery board, which is what I did. Luckily the connector is part of the replacement battery, so you just need to remove the connector from the cable. The pictures here should provide more detail so you can see better what is going on.
thanks a lot !!!!! great help :)
-
-
-
将电池板数据线从插座中滑出,断开。
-
沿着电缆的方向平行于主板滑动。
As simple as this step might seem, the golden leads will disapper the moment you remove it as it has some adhesive under the black strip that covers it. Ensure you peel it back enough to display the golden leads after swapping the batteries out.
Your battery may come with this ribbon cable. In that case, disconnect the other end.
-
-
-
将电池板数据线折叠到一边,不要挡道。
-
-
-
轻轻地断开电池接口,用小撬棒轻轻地拔出电池。
-
将接口抬得足够高,使其与插座保持分离。如果在维修过程中意外接触,可能会损坏MacBook Pro。
To completely avoid accidental contacts I recommend to wrap this connector in a piece of paper and hold it in place with tape.
Do not put tape directly on the contact underside, as that may leave some glue that would affect the contact conductivity.
I put a piece of tape on the underside of the connector (sticky side up) to insure against accidental battery contact. If you put tape on the logic board side of the connection, some insulating padding material might accidentally stick to the tape when the tape is removed during reassembly.
-
-
-
卸下将塑料盖固定在显示屏铰链顶部的四颗1.9毫米T3 Torx螺丝。
-
卸下两个塑料铰链盖。
-
-
-
卸下将铝盖固定在主显示屏电缆顶部的两颗2.9毫米T3 Torx梅花螺丝。
-
取下盖子。
I had to use a T4 instead of a T3 to remove these ones
-
-
-
拧下将铝盖固定在显示屏电缆柔性接口顶部的两颗1.7毫米T3 Torx梅花螺丝。
-
取下盖子。
t4 works better for these screws
T4 screw is correct
stripped the freaking screw - now I'm screwed
-
-
-
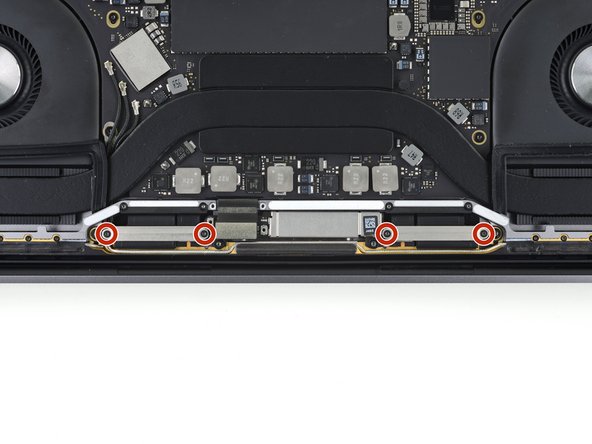
卸下将两个铝盖固定在两块显示板电缆顶部的四颗1.5毫米T3 Torx螺丝。
-
用镊子卸下两个铝盖。
-
-
-
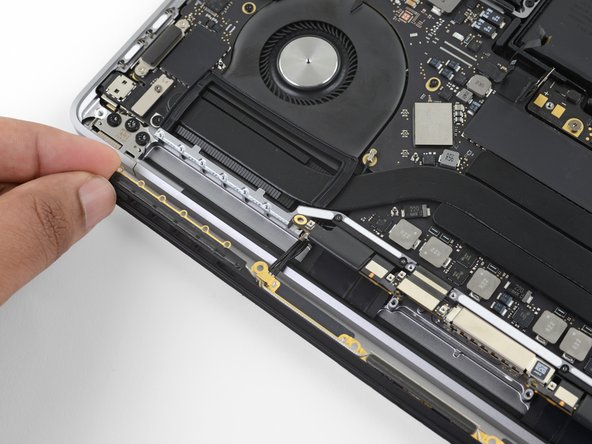
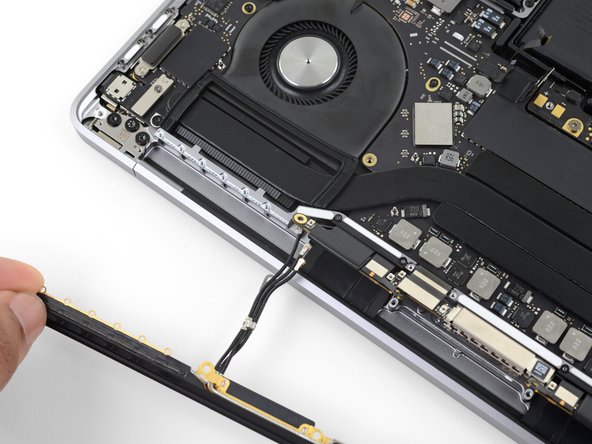
小心地卸下天线组件,同时将天线电缆束从热管下方引出。
When refitting the antenna assembly be aware there’s a locating lug in the centre of the cavity that it needs to fit over. I slid it back in without noticing this on my first attempt and it leaves the screw holes about 1mm out of alignment and causes the assembly to slightly catch you when open/close the lid.
Yes, totally thanks David, I had to disassemble and reassemble the Macbook because of this small metal "sheet". The screen was doing a small noise when I was opening it (a "poc")
-
-
-
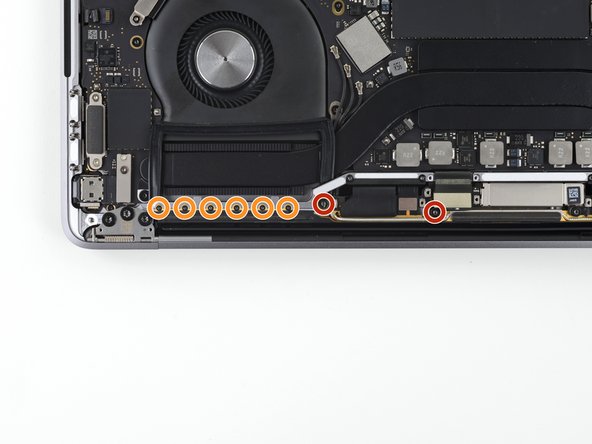
拧下固定两个显示屏电缆盖的四颗 3.9毫米 T3 Torx 螺丝。
T4 works better there !
I guess it depends on your tools. Maybe a worn T4 would fit, mine wouldn't. T3 it is.
-
-
-
完全打开屏幕,并将MacBook Pro站在一侧。
-
徒手稳固MacBook Pro,同时从下部显示屏铰链上卸下三颗T8 Torx螺丝。
-
从上部显示屏支架上卸下剩余的三颗T8 Torx螺丝。
-
-
-
将MacBook Pro的两半推在一起,以便可以将铰链支架从机箱上的凹槽中提起。
-
将MacBook Pro的主体向远离你身体推出,同时将屏幕拉向自己以将其分开。
-
卸下显示屏/屏幕部件,注意不要将其挂在任何电缆上。
-


28等其他人完成本指南。


25条评论
I followed all the steps and my new screen is working properly (•̀ᴗ•́)و. I realized however that my Touch Bar isn’t lighting up anymore… Did I forget to connect something?
Where did you buy a replacement screen for your Mac? I can seem to find any for the A1989 Model that seems legit and I’m not sure how much I trust eBay listings.
Did you ever find an answer to this because I have had the same thing happen and I cannot for the life of me figure out why it has happened, what did you do to fix the problem or did you just give up and go to apple?
jack -
Unfortunately, my Touch Bar is still not working. I did some research back in 2020 and couldn’t find anything that would help fix this issue. And since my laptop is connected to an external screen and keyboard most of the time, it never really bothered me. But I should take it to Apple to see if it can be fixed and how much it’ll cost…
Guy -
I mean you may as well because what if it is just some simple calibration issue or some silly little thing that their diagnostic software can fix in less than a minute? If they try to charge too much money then you can always just deny, I believe that I will end up doing that soon to get a quote on just how much it will cost me to get both the display and Touch Bar repaired and see if it is worth it or not.
jack -
Ok so I would like to inform you that I did a little bit of digging into my MacBook Pro with its Touch Bar connectors and I have made the discovery that 1 one of those little chips near the connector I think they are resistors or diodes, idk but I found that one of them have literally exploded and killed another one next to it. I have no idea why or how but maybe you wanna check your MacBook Pro for that as well to see if its a common occurrence
jack -
I think you didn't read the VERY IMPORTANT comment by Marcelo on step 30. The long rectangle next to the pointy part of the "left" hinge (the one visible in the photo) is the connector for the touch bar and is EASILY DAMAGED, especially since you need a lot of force to get the hinge in.
I got around this by sliding the "left" hinge SIDEWAYS into its slot and then forcing the "right" hinge back.
Does anyone know where I can find a new official Apple Display 13” for model A1989? Can’t seem to find any except for eBay.
Yeah, I found mine on eBay. This vendor seemed trustworthy (www.ebay.com/usr/wallachee?_trksid=p2060353.m1438.l2754) and it turned out to be true. The screen I got is working perfectly…
Guy -
I also had an issue with Touch Bar not working after the screen replacement, everything else works fine though.
Has anyone been able to figure out what causes the “TouchBar not working anymore” issue?
Like I asked the other guy, did you ever manage to find a fix for it? Because I am too having this issue
jack -
me too got the a1989 13” macbook pro. replaced the screen and touchbar screen is there but unresponsive to touch
I have the same issue but mine is due to me damaging a little chip near the connector. Maybe check your board over and make sure you didn't damage any chips in the process like I did
jack -
Can the MBP 13 intel Touch Bar work without the screen ? Like an Apple II
What happened if I left the screen connector unplugged ?
It does work, I did this with my own Mac and you can remove the screen and keep the functionality of the touch-bar. What you will loose is keyboard backlight so make sure that the brightness in software is at 100% for the touch-bar to be full brightness cos that won't change when you take the screen off
jack -
For people who had problem with the touch bar. Basically, the connector was damaged in the process of changing the screen.
Fan will not stop running after screen replacement. Tried resetting smc. No luck. Please advise. Thank you. MJ
I got the fan to stop but the Touch Bar no longer works.
please advise.
Pefekte Anleitung, Neues Display (auch die Touchbar) funktionieren wie Neu 😅😇 Danke 🤓
I swaped the screen following the 'purple gate' now my mbp is not booting anymore 😣 i checked twice every connections, all seems good... Any advice?
Is this step necessary? I can’t perform this step as I am attempting to repair water damage and need to remove logic board & most likely replace the battery.
Macrepair SF - 回复
@mac_medic You definitely don’t want the power coming on while the board is wet. In your case, I think powering on the machine to disable Auto Boot would do more damage than it prevents. I agree, skip this step and be prepared to disconnect the battery quickly if the laptop automatically powers on. Good luck!
Jeff Suovanen -
Thats right! You don't want power running while working on your logic board.
Dan -
This did not work when running High Sierra.
Kyle B - 回复
Tried this on a 2018 MBP 13” Touchbar (there’s no iFixit guide for this model yet). Need to replace a broken screen.
Luckily I managed to connect to an external screen (Cmd-Down Brightness to switch displays) and enter above command. Seems to work, but there’s another problem with this model - it powers up as soon as any key is pressed……. ffs <gnashes teeth>
Cool_Breeze - 回复
I unscrew the battery first and wrap electrical tape over the logic board battery connector before attempting any repairs to the board. Haven’t had any problems yet and I’ve worked on about 10 of these models already. Also when you open the bottom case use a suction cup at the bottom and pull up then run a plastic spudger along the edges to disconnect the clips. Also only use a plastic spudger on the board. Saw a youtube video from a repair shop and he did not disconnect the power and used all metal tools during the entire process of removing the board. His last step was to disconnect the battery terminal.
Brian - 回复
Is this step necessary if my mac can turn on? Battery fully dead(
Nursat b - 回复
BEFORE YOU START: The included torx head stripped off before I was done (and you might need an additional T4) so stop now and go buy a good one. Also they fail to warn you above to get some blue threadlocker ahead of time.
Jason Sherron - 回复
This command did not work for me and I read that sometime in later 2020 Apple stopped this command from working…any ideas on a work around?
Patrick Machacek - 回复
Not able to do that with damaged screen
richardjgreen - 回复
If you have a damaged screen you can still use a converter from thunderbolt (USB 3) to HDMI and plug your Macbook Pro to your TV as monitor display. Just make sure to chose the right Source (HDMI IN) in your TV. I did it and to make it work I unplug and plug again in my Macbook and so I could disable the Auto boot
Roberto Sanchez Bustos -
Hi. This does not work on 2018 13” MacBook Pro with Touch Bar. I did exactly this to disable auto boot. But when I check by using nvram -p it says: auto-boot true. Am I doing something incorrectly? I did everything step by step. Copied and pasted the sudo command, pressed enter and then entered my password. I have Big Sur 11.1 installed. Is there any other way since I need to replace the screen. Thank you. Adrian
Adrian Vizik - 回复
Hi everyone. This is also a little pointless if you can’t see anything on the screen, and you don’t have a display adapter to USB C to display it. I agree with Brian about removing the back and disconnecting the battery cable before you even think about opening the lid of the MacBook. Applying the insulation tape is also a handy little tip that just makes sure there is no way to discharge from either the board or battery.
Roberto Enrieu - 回复
running `nvram -p | grep 'AutoBoot'` in terminal verifies that it was accepted
result: `AutoBoot %00`
Marek Polák - 回复
Running Big Sur 11.6.7 on a 2019 16" MBP, it's "auto-boot". So it's:
nvram -p | grep 'auto-boot'to display the current state, the default istrue- and then to change it,sudo nvram auto-boot=falsewhich turns it off.Ed Mechem -
This step is completely unnecessary if you follow the guide to disconnect the battery properly. Just put some tape between the battery and logic board connection to prevent it from accidentally touching and therefore powering on the laptop.
Grant Ormsby - 回复
It took me a few tries to make this command work, as I was able to copy and paste the command into Terminal, but could not type in my laptop’s password. I finally typed my password into a text document, copied it (command C), and then pasted it into Terminal and it worked.
tommy404 - 回复
I didn’t do this. Mine never auto-booted before I replaced the battery. Now it does.
hatuxka - 回复
BEFORE YOU DO ANYTHING - CHECK THE BATTERY!
I-fixit sent me a bad battery, which I didn’t realize until it was already install. They sent me a new one, but I wasted hours uninstalling and reinstalled.
Get a volt meter and measure the voltage on the output of the battery pack. If it reads 0 V, SEND IT BACK. It should read over 2 V.
bcardanha - 回复
I've just received my replacement battery and it reads 0,042V between the two main connectors. Do you think it's dead?
peter sussex -
When I did this from Terminal.app within Recovery Mode, the “sudo” was not recognized but I could invoke it without the sudo part. It seems to have been accepted when looking at “nvram -p”
johann beda - 回复
When in Recovery Mode, you already have superuser powers. So you don't need to prefix commands with the sudo command to invoke them with root privileges; you already have them. Do a
pwd(print working directory) after opening Terminal in Recovery Mode, and you'll see that you're in the root user's directory.Ed Mechem -
I received the battery kit for my 2018 MacBook Pro and as per the above comment from bcardanha - Oct 12, 2021, I checked the voltage on the pads marked + and - . It was zero volts so I panicked a bit.
I sent a message on the iFixiT Facebook page and I got no reply. I finally found the customer service email for Ifixit Europe and sent them an email voicing my concern as I was not keen to work for couple of hours just to discover that the battery is faulty. I had an almost instant reply on the email (kudos to them) and they adviced me to go ahead and install the new battery as the voltage measured when battery is not connected is not relevant.
I took a leap of faith and after two hours… the new battery showed 50% charge and everything seems to be working just fine. I am happy it worked.
Mircea Comanici - 回复
After removing the old battery and installing the new battery I powered up the MBP before screwing the bottom on. I discovered the my keyboard would not function. It took a few hours of investigation and frustration that I discovered the track pad power ribbon had become partially dislodged from the trackpad. I was able to see that this through the little machined slot where the battery sat. I had to remove the trackpad to reinsert the power ribbon back into the connector in the trackpad. after reassembling and reinstalling the battery etc the keyboard worked. Just food for thought if your run into the keyboard issue.
Ed Mease - 回复
This should be the default. IMO I tell you to power on - not the lid.
G Sena - 回复
Est ce que cela fonctionne sur un macbook pro 2017 sans touchbar ?
maël muzelet - 回复
Bonjour Maël, oui, ce tutoriel concerne "les MacBook Pro 2016 (et plus récents) et les MacBook Retina 12" 2017 (et plus récents)"
Claire Miesch -
Excellent instructions. I was able to follow and install the new screen. I recommend that you get a good set of tools before you begin. I started with an inexpensive repair kit bought online. The Penta and torx bits failed. I bought an IFIXIT kit with quality bits and I was able to do everything I needed.
Tom Markham - 回复
If you're not running an admin account the sudo command won't work (which honestly, you should not be running admin). Rather than logging in to your admin amount via the OS, in the terminal type "login [admin username]," then the password and you'll be able to do the sudo command as described above. Once you're complete, type "logout [admin username]" and you'll be good to go. Obviously replace [admin username] with whatever the account name for your admin user is.
arichard2401 - 回复
For those unable to complete this step because the screen is too damaged I recommend leaving your macbook on until the battery dies.
Nicholas R Licato - 回复
Just replaced my 2018 15" MBP battery. Running Sonoma.
I found no way to disable AutoBoot (The status can be checked in the Power section of system report).
Anyway, i left my battery completely drain before opening the MBP, and had no issues during the process.
Cédric Bontems - 回复
After sending this command in terminal when I checked what happens if I now open the lid, instead the screen lit slightly up (still black) then a battery symbol showing the charging state showed up.
Now, after replacement of the battery, this is all I get to see.
No reset of NVRAM nor PRAM helped.
Currently the new battery charges (58% atm) and it feels like it‘s mocking me.
webrockers - 回复
I suspected the keyboard or TouchID sensor wouldn’t work, so I went on and checked every connector.
I missed connecting the left TouchID sensor from step 31.
webrockers -