视频概述
-
-
首先让我们摸清Air的配置:
-
13.3英寸LED背光IPS视网膜显示屏,分辨率2560 X 1600(像素密度227PPI)
-
1.6GHz双核英特尔酷睿i5处理器(可睿频加速至3.6GHz),集成英特尔UHD Graphics 617显卡
-
苹果T2定制安全芯片/协处理器
-
8GB的2133MHz LPDDR3 SDRAM
-
128GB基于PCI-E的SSD
-
802.11ac Wi-Fi以及蓝牙4.2
-
两个雷电3(USB-C)接口,同时支持充电、DisplayPort、雷电以及USB3.1 Gen 2
-
-
-
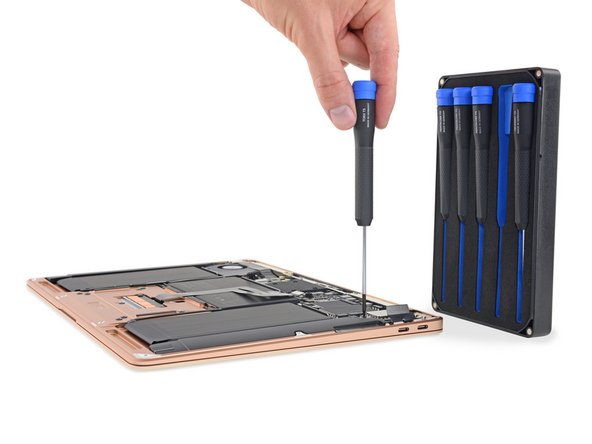
在正式进入内部冒险之前,先花点时间探寻这台Air的外观。
-
机身底部下方我们找到了些镭射“花纹”和一些P型梅花螺丝。
-
翻起屏幕,我们看到了熟悉的第三代蝶式结构键盘,让我们想起了MacBook Pro.
-
Air同无Touch Bar的13英寸MacBook Pro极为相似,除去厚度与Touch ID,其他几乎没有差别。
-
···虽然冠以“Air”的称号,但当12英寸的MacBook加入对比,却显得并没有那么轻薄。
-
-
Louis Rossmann expresses concern that the fan on the redesigned MacBook Air would not be particularly effective at cooling. Looking at the photos in this teardown, I would concur. Can anyone explain how the fan actually cools the computer, and how effective is it? Rossmann posted a video of this on YouTube in response to a dead CPU caused by overheating.
Hi Anthony,
The first string of comments at the bottom of this teardown goes into the cooling setup in more detail.
-
-
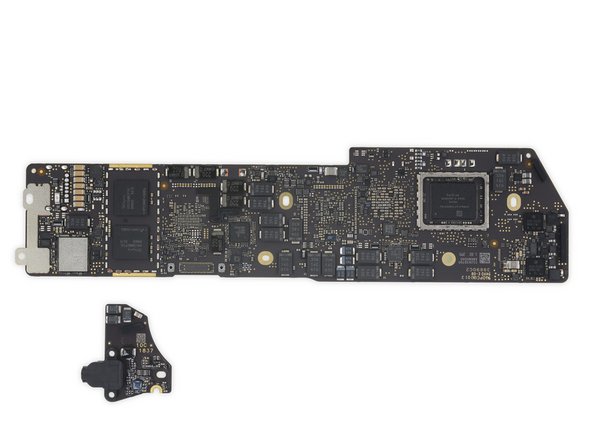
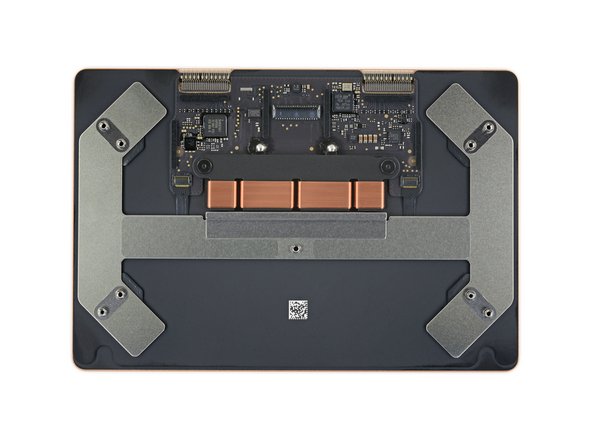
仅取出6颗TR型梅花螺丝断开一些排线,我们同主板之间的隔阂便被消除—完美!没有什么是我们Marlin螺丝刀组件不能解决的。
-
接着我们拿出了子板,其上带有一个高度濒危的耳机接口以及一些用于连接扬声器和Touch ID的排线。
-
这块子板带有一颗:Cirrus Logic CS42L83A音频编解码器。
-
-
-
The Apple T2 Chip is already almost as large as the Intel i5 Chip. Imagine what will happen in a few years when ARM is replacing x86-64 on MacBook.
Who knows? Apple may announce for macOS 10.16 an ARM version of the OS that can run on existing T2 devices.
Haha
where can I buy this board, I want to upgrade my ram and also my storage. Actually I have 8gb of Ram and 128gb of storage
-
-
我们把主板翻了个面并找到了更多的芯片:
-
两颗SK海力士(SKhynix)H9CCNNNCPTAL LPDDR3 RAM(共计8GB)
-
村田制作所(Murata)339S00446 1ZE SS8915047(可能是Wi-Fi模组)
-
Intersil 95828A HRTZ X829PMJ
-
恩智浦(NXP)80V18 安全NFC模块
-
旺宏电子(Macronix)MX25U3235F串行多I/O闪存
-
德州仪器(Texas Instruments)CD32-15C00电源控制器
-
德州仪器(Texas Instruments)TPS51980A同步降压转换器
I believe that TI’s CD3215C00 is a USB 3.1 redriver.
-
-
-
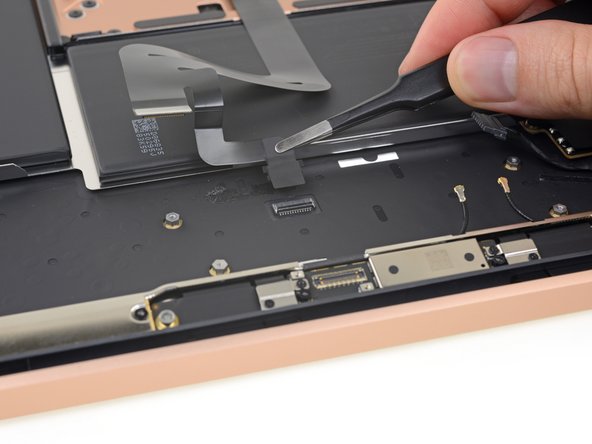
耳机接口的对面,我们找到了一个超级模块化设计的雷电接口!
-
对于我们来说,这台MacBook开了一个良好的开端—所有的接口都在各自的模块上并且易于更换。
-
最后我们遇见了在这台“空气”中负责调节空气的组件···
How does this fan cool the CPU? They seem separate.
It doesn’t https://youtu.be/iiCBYAP_Sgg
I think the fan creates a slight vacuum/negative space in the chassis, pulling fresh air from vents across the board and expelling it out the back.
I heard you can’t swap out the SSD in the 2018’s?? I wanted to put a 256GB in, can I do it? I was told no.
You heard correctly! The flash storage is integrated into the logic board and and paired to the T2 chip so it cannot be swapped out, unfortunately. You can see it in step 6.
if you will put a fan, at least put in the cpu, not as a chasis fan, that’s stupid.
I want to replace the Ports for my MacBook Pro (13-inch, 2018, Four Thunderbolt 3 Ports). Can you tell me the tools and the parts I need, and how much they will cost?
Bouna
-
-
-
继续!维修友好型的设计(或者说更加友好)我们找到了扬声器之下的易拉胶!
-
我们并不喜欢粘合剂—可重复使用的螺丝更加友好—但,这种iPhone式的易拉胶比盲目地使用溶胶剂并疯狂撬电池来的好。
-
另外,只有易拉胶的存在,说明了有人想要提升整机的可维修性和拆解可能性。
-
-
Are you certain that the split in that trackpad cable over the center battery wouldn’t allow a bit of “service loop”, just enough to disengage the cable connector from the socket on the trackpad with a spudger without needing to remove the logic board? Seems a rather conspicuous cable design to not provide some benefit. If anything, I’d bet that flexing that cable split does yield some length, yet also leaves permanent (no warranty for you!) evidence it was done.
No guarantees, but it didn’t look like it could be done safely. The end of the cable is also pretty firmly glued to the trackpad near its socket, so getting it off would be tricky, and there’s not really any slack to speak of. The photograph that has been circulating from Apple’s internal service manual for replacing the battery also appears to show the logic board removed.
These are so much shittier to work on than the older macbook airs
Toastslave - 回复
-
-
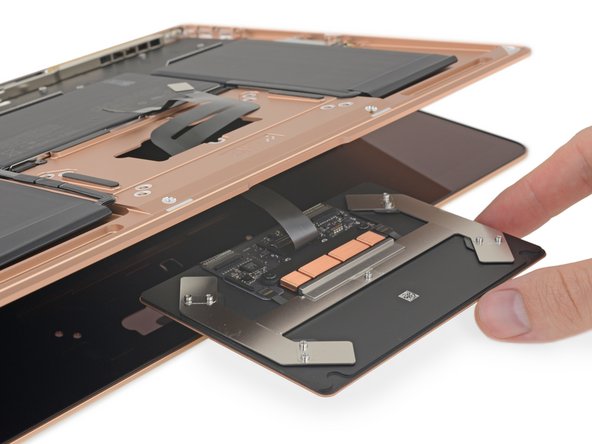
感谢来自MacRumors的帮助,让我们感觉到拆解这台设备的电池可能没某台视网膜显示屏的设备那么难。
-
果然,我们找到了四颗螺丝和六条友好的易拉胶用于固定为Air提供
AirPower电源的电池。 -
一个坚固的框架,就像是旧版本的Air,用于支撑电芯并且让更换变得简单。
-
这里是参数:49.9Wh能量,如果你进行多家对比,你会发现这比戴尔(DELL)新的XPS 13(52Wh)小一点,但比微软(Microsoft)Surface Laptop 2(45.2Wh)和惠普(HP)即将推出的Spectre X360(43.7Wh)更大。
Are the battery cells terraced / wedge shaped or the same Z-height throughout? I can’t quite make that out from the photos…
The batteries are not terraced and reside in the same plane. All three cells are laid flat on top of the metal tray.
-
-
How do you get the heat sync bar off?
I have run into an issue, I’m replacing the display and managed to get one screw from the three metal plates covering the connectors, they look to be all the same size, but I can’t get the others. Those are all I need to remove and then I can pop the new one on…..any idea which torx screwdriver is used here? I thought it was T3.


61条评论
Am I losing my eyesight, or is that fan not directly connected to any type of heat dissipating hardware? Looks like it’s either just providing a general low-pressure-air-flow throughout the internals - OR - it pushes air back through that antenna/heatsink-bracket-type-thing and coming out the other end of it?
Could you confirm or explain this in more detail?
I think it is just an exhaust fan, that removes hot air from a laptop case outside (from the right side of the case, under the screen) and creates a negative pressure inside, which helps a laptop to “suck“ some cool air from the outside through the intake on the left side of case, under the screen. The shape of the radiator ribs also suggests some airflow from left/right side of the case to the opposite side.
Serge B. -
The only thing that fan is doing is moving a (tiny) bit of air indirectly across the logic board and the heatsink. Or at least that is what I think it does. As there is no direct heat conduction from logic board to case, the fan isn’t there to cool the case, that’s for sure.
Yeah it is just a case ventilation fan, it doesn’t blow any heatsinks directly. Although with the very low TDP of the processor, a case fan with radiator type heat sink should do the job.
Tom Chai -
Yes, as the 12” Macbook with a ~5W TDP chip manages without a fan, I’m sure a slower general airflow together with that heatsink works well for the 7W chip in the 2018 MBA.
And when looking closer - the vents on either side of the antenna bracket, that the fan exhausts through on one side - air is drawn in on the other side and then guided by the vanes in the ventilation holes, allowing it to flow easily from right to left (when viewing bottom/inside of the MBA) over the heatsink cooling fins. There doesn’t appear to be any other openings in the chassi, so Apple has probably designed the airflow pretty efficiently in this fashion.
Pretty cool! Only Mac laptop I’ve seen with a fan but without heat-pipes/sinks by the fan.
This thermal design reminds me of the old Titanium Powerbooks, especially the heatsink. That had two fans I believe, one pulling in from the side and one blowing out the back. I think this pulls air from one side of the monitor hinge vents and exhausts out the other.
Why don’t they use the aluminum body directly as a huge heatsink?
You’ll notice that they’ve sealed the mid-area under the display bezel, with only an opening on the side furthest from the fan, nothing above the CPU, and an outlet the fan blows air out of.
I’m guessing they did this to cool both the low power, yet still warm T2, as well as draw air over the CPU.
It’s not blowing directly on a heatsink connected via heatpipe to the CPU, no, but I’m guessing they weighed up the pro’s and con’s of heatpipes, and decided that sucking air through a tightly controlled path is preferable to the bulk added by heatpipes.
It’s no different than the trashcan mac pro, is it? That just sucks air up over the heatsinks if I remember correctly.
What matters is that airflow is limited to a strict path, that’s in the left side of the laptop, over the T2 and SSD’s heatspreader, over the CPU’s radiator, through the fan, and out the right side.
It’s really bad to know that neither storage nor RAM is upgradable. If I go for 128 GB SSD and 8 GB RAM then I can never upgrade them, disappointed :(
Amit Gupta - 回复
That is the main reason why you should avoid those Apple new laptops. The other one is that each of the Apple laptops has design flaws (and this has happened for many years) : check Louis Rossmann videos on youtube, this is eye opening.
Oli Wek -
When will the new iPad pro teardown be revealed plz. Deadly waiting for it
They’re still heating up the glue.
These MacBook logic boards are gonna end up in iPhones soon if they continue shrinking
lol that was a nice one :)
“These MacBook logic boards are gonna end up in iPhones soon if they continue shrinking”
I think you have that backwards.
fastasleep - 回复
I’m still confused about how the display data cables interact with the hinge. In the 2016 MBP teardown, I thought iFixit said they get rolled up or something. While the pictures in this teardown helped shed some light on this mechanism, I’d really like to see some detailed shots of how exactly that all works. Maybe in classic iFixit style where the position of just a few things within the frame changes seemingly magically between two pics. Thoughts/comments?
Hey iEvan! This is a teardown, which is an entertaining (and abbreviated) peek inside the device, not a step-by-step disassembly guide, hence the “magical” changes. If you want to see how MacBook Air display cables and hinges interact, check out our MacBook Air display replacement guide, in concept the process hasn’t changed.
If I am reading this correctly, there is absolutely nothing about Battery being better positioned to be easily replaceable. Merely that Apple guidelines now allow Battery to be replaced without changing the top case.
That is Apple stopping all those who had Apple Care to get a new top case with their battery replacement or people getting ( used to ) getting around their Keyboard problem with battery replacement.
Thanks for a great review. I’m really enjoyed your works. Thumbs up..
akmaljohar - 回复
I think this review just swayed me from Surface Laptop 2 to the new Air. I can live with two cores vs having to throw away the laptop at the first hurdle. Plus the resale value of all surface devices is, well, pretty much non-exitent. And for a good reason.
Where is the hardware microphone disconnect?
Why there is a NFC chip on board? Does MacBook Air even support NFC?
Or it’s some kind of secure enclave?
Secure Enclave would be on the Apple T2; good question about that NFC if that’s its sole function
VaughnSC -
NFC chips tend to pop up on devices without NFC from time to time, the Droid Razr had one, I’ve seen them from time to time on other phones, and now this.
I’m half guessing they’re added on in production, and nearing the end NFC gets cut from the hardware for whatever reason and it gets left there.
I’m sure some schematics, or in time, Louis rossmann will work it out (when it dying ends up killing boards)
I’d say secure enclave, but that’s the T2’s job. Maybe the T2 (coughA10cough) depended on the NFC chip it expected on iPhones, so they through it on just to keep the thing happy? I wonder if the iMac Pro has one…
Still, I’d expect NFC to be a more Macbook thing, maybe a reader under the trackpad for pairing that got scrapped?
What about the hinges? Did you guys take a good look at them? Are they the same as the MBP, or did Apple use a different design? Wondering what their durability is going to be over the long term.
can this retina display be installed on old macbook air models? like early 2015 model
macklemore - 回复
comes with mojave oder high sierra? Dragon Dictate discontinued :-(
It comes with MacOS Mojave installed.
So is there absolutely no way to replace the SSD in this machine?
There is no way to replace the flash storage in any current Mac (MacBook Pro, mini, iMac, iMac Pro, and the Air) with a T2 chip acting as the storage controller/encryptor.
jbgurman -
Thank you for doing this guys.
Thank you very much for doing this. I had been turning away business on this MBA 2018.
Could I add external micro SSD to USB c I mean is there any space inside the laptop to put external SSD and connect it to USB c by mini USB hub? Will be a maybe good idea to add more storage
Aren’t there three identical SanDisk chips on the logic board? The two labeled ones on one side, and one unlabeled one on the other… doesn’t this mean that this MBA contains 192 GB of NAND?
@getalmeardolis The “043G” on the package indicates a 43 GB chip. Three chips x 43 GB = 129 GB. (There’s probably some rounding to account for the extra GB.) But yeah, three identical chips!
Does it uses the same flex cables that were used in MacBook Pro 2016 onwards?
and is there a chance that MacBook Air(2018) will suffer the notorious flex gate problem?
The display cable arrangement is a bit different from the MacBook Pro, but it uses similar thin (and non-replaceable) ribbon cables. If I had to guess, I’d say it will develop similar problems over time—but that is emphatically just a guess and it’s too early to say anything for sure.
I have currently my new MacBook air 13” retina being repaired by the Apple store Parly II (France), they have to replace the logic board and the touch id. The problem was that it didn’t restart after one night in power safe mode (no display but still heating). After replacing the logic board they called me to inform that the touch id they ordered to replace is not recognized by the logic board, so they have to order once again a new one.
I noticed that it frequently (weekly) had display bugs (white screen with vertical lines and square pixels when moving mouse cursor) while waking up from safe mode, and sometime for no reason while browsing the web in safari.
The technical guy from Genius bar told me that it’s the first time they have to repair a MacBook Air retina 2018, so I’m very unlucky … I guess
components prices :
(661-09714) Logic Board i5, 1.6GHz, 16GB, 256GB : 342€
(661-11677) Touch ID board : 18€
(S1490LL/A) Hardware repair Labor : 79€
Total : 439€ (under guarantee)
(probably not including VAT)
I went to the Apple store Parly 2 to get my MacBook back (repaired) but I refused it at the genius bar because during repair they have damaged the alloy top case, there are now 2 dents (near the touch id and another one near Esc key) that have probably caused by a screwing too hard, the dents are vertically localized just above 2 of the screws which maintain the amovible lower case.
They ordered a new “Top Case with Keyboard, Space Grey, FRA” (price 225€ under warranty + 79€ repair labor).
So now I will have a MacBook Air 13 with almost all part replaced (except battery and screen) !!!
I asked them to replace the whole MacBook but they refused because their policy doesn’t allow it for Mac products (laptops/desktops).
In my opinion, the recycled alloy used in the MacBook air 13 retina manufacturing is not as much resistant as the previous models.
The repair process didn’t take into account the tenderness of this alloy, a dynamometric screwdrivers but they should be used for this models to prevent damages.
Apple CEO’S: Let’s build and design a fanless laptop!
Apple Manafacturers: Okay!
*Slips fan into main design*
Wish the guide was a bit more detailed with the nuances of removing the ZIF connectors, etc with the flip up tabs. Didn’t realize until it was too late and may have damaged something.
Hi Brian,
I’m sorry to hear that! As stated in the warning op top, this teardown is an educational first look at the device, and is not meant to be used as a guide. Our repair guides will show up here, and contain accurate details (such as tools needed, how to unlock ZIF connectors, etc.) as well as step by step instructions on how to complete the repair.
Hi,
I spilled hot chocolate on my macbook air and I want to change the keyboard and the trackpad. There is no way to only change the keyboard without demantling everything?
That is correct. The keyboard is part of the top case and is not easily replaceable. The trackpad, on the other hand, can be removed pretty easily.
Hi, thanks for all the tips in this breakdown. Question for you, I have a sticky down arrow key on my keyboard, can I somehow pop it off and clean underneath it ?? I see in step for you use a tool to pop off the apple key, so wondering/hoping this can be done on the down arrow key !
While cleaning my then-new MBA Model A1932, some specks of something came between the screen and the machine, making tiny punctures that killed the screen. I now am able to buy a screen replacement assembly for about $300 (it was over $500 before). I understand this isn’t the easiest machine to take apart, but if it’s only replacing the screen assembly, is it manageable? My dealer wanted $1000 for a total replacement, which is about the same price as buying a new one. Am I pulling a job I can do, as a seasoned Macbook Pro upgrader, or is this just too exotic?
Hi Bob,
It depends on the screen you’re buying. If it is a complete top assembly, I think it is pretty doable. Take a look at our guide and see how comfortable you would be with the procedure.
What about MBP having pull tabs?
Ciao Fedo! Purtroppo è integrata alla scheda madre quindi non è possibile sostituirla. Bisogna cambiare l'intera scheda madre.