跳转到主内容

2011-Present Ford Explorer Driver Side Front Pillar Trim Replacement

你所需要的

  1. 2011-Present Ford Explorer Driver Side Front Pillar Trim Replacement, Driver's Side Front Pillar Trim: 步骤 1 中的图像 1,3 2011-Present Ford Explorer Driver Side Front Pillar Trim Replacement, Driver's Side Front Pillar Trim: 步骤 1 中的图像 2,3 2011-Present Ford Explorer Driver Side Front Pillar Trim Replacement, Driver's Side Front Pillar Trim: 步骤 1 中的图像 3,3
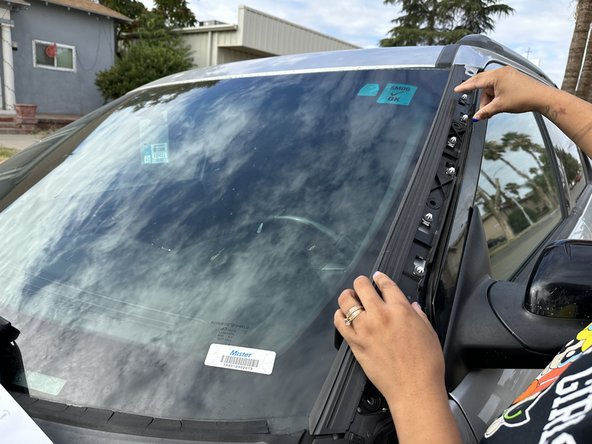
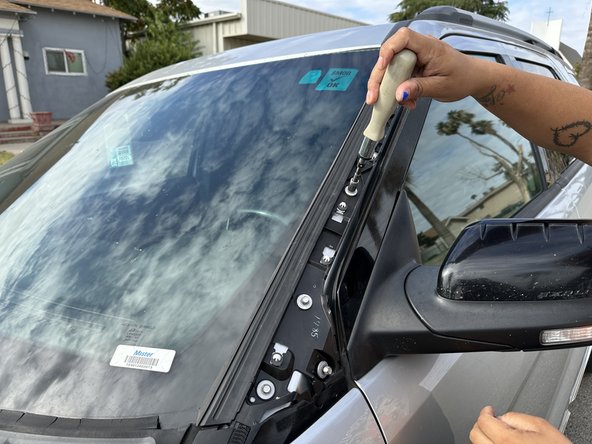
    • Gently apply even force to separate the exterior pillar trim from the interior pillar trim.

    • The external pillar trim could break off but don't worry—a replacement part will be installed in its place.

  2. 2011-Present Ford Explorer Driver Side Front Pillar Trim Replacement: 步骤 2 中的图像 1,3 2011-Present Ford Explorer Driver Side Front Pillar Trim Replacement: 步骤 2 中的图像 2,3 2011-Present Ford Explorer Driver Side Front Pillar Trim Replacement: 步骤 2 中的图像 3,3
    • Use a ratchet socket and an 8 mm socket attachment to remove the six bolts from the interior pillar trim.

    • If there is a small tab attached at the upper corner, detach it by gently lifting and separating it from the trim.

    • Bolts should be unscrewed and then carefully placed in a location to prevent loss or misplacing.

  3. 2011-Present Ford Explorer Driver Side Front Pillar Trim Replacement: 步骤 3 中的图像 1,2 2011-Present Ford Explorer Driver Side Front Pillar Trim Replacement: 步骤 3 中的图像 2,2
    • Remove the damaged interior pillar trim and clean surrounding areas.

    • Use a rag and glass cleaner to clean the pillar trim area.

    • Avoid contact with skin, eyes and clothing. Wash thoroughly after handling.

    • Remove any remaining residue from the window and metal. Use as much window cleaner as necessary.

  4. 2011-Present Ford Explorer Driver Side Front Pillar Trim Replacement: 步骤 4 中的图像 1,3 2011-Present Ford Explorer Driver Side Front Pillar Trim Replacement: 步骤 4 中的图像 2,3 2011-Present Ford Explorer Driver Side Front Pillar Trim Replacement: 步骤 4 中的图像 3,3
    • Align the new interior pillar trim part precisely with the corresponding holes on the vehicle.

    • Ensure they are aligned precisely and apply pressure.

  5. 2011-Present Ford Explorer Driver Side Front Pillar Trim Replacement: 步骤 5 中的图像 1,3 2011-Present Ford Explorer Driver Side Front Pillar Trim Replacement: 步骤 5 中的图像 2,3 2011-Present Ford Explorer Driver Side Front Pillar Trim Replacement: 步骤 5 中的图像 3,3
    • While maintaining downward pressure on the interior pillar trim, secure the six bolts into place.

    • Alternate one bolt at a time, bottom to top.

  6. 2011-Present Ford Explorer Driver Side Front Pillar Trim Replacement: 步骤 6 中的图像 1,3 2011-Present Ford Explorer Driver Side Front Pillar Trim Replacement: 步骤 6 中的图像 2,3 2011-Present Ford Explorer Driver Side Front Pillar Trim Replacement: 步骤 6 中的图像 3,3
    • Align the small white head connections with the yellow points on the exterior trim, and then firmly snap the push tabs into place to secure the trim.

    • To guarantee a safe connection, gently press down after the white push tabs are aligned.

    • Remove the yellow markup sticker after inserting the tabs.

结论

To reassemble your device, follow these instructions in reverse order.

另外一个人完成了本指南。

0条评论

添加评论

浏览统计数据:

过去 24 小时: 0

过去 7 天: 10

过去 30 天: 66

总计 626