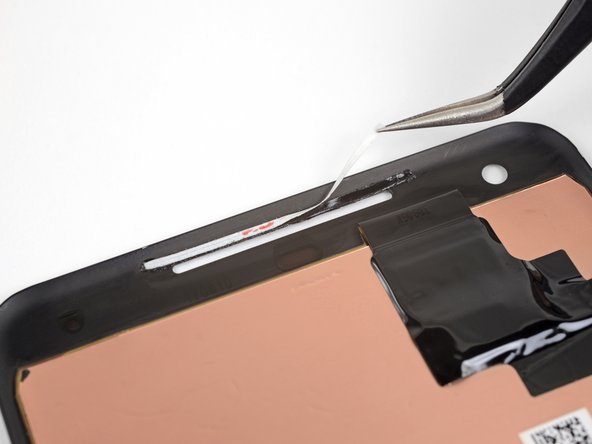
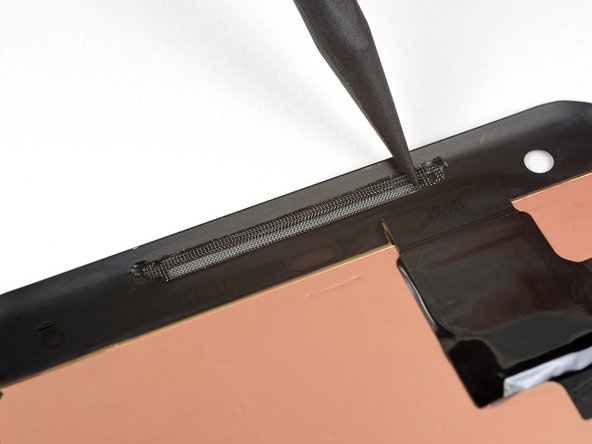
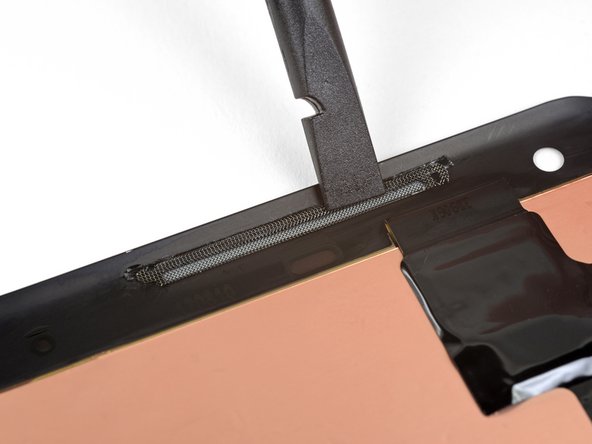
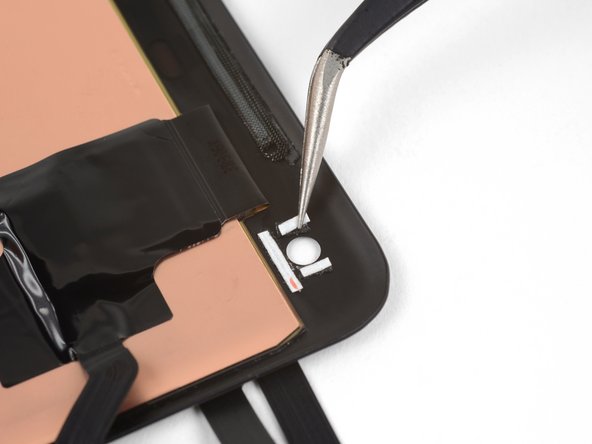
跳转到主内容

此翻译可能不反映源指南的最新更新。 帮助更新翻译查看源指南

谷歌Pixel 2 XL的屏幕更换指南

你所需要的

  1. 注意:步骤 1-12 源自标记为进行中的 指南

    谷歌Pixel 2 XL的屏幕更换指南, 拆解过程: 步骤 1 中的图像 1,2 谷歌Pixel 2 XL的屏幕更换指南, 拆解过程: 步骤 1 中的图像 2,2
    • 如果你的屏幕已经碎裂了,在屏幕上贴上胶纸避免屏幕碎裂带来的伤害,并且可以创造一个平整的表面来让吸盘吸附。

    • 请在吸盘操作前把SIM卡槽取出避免掰弯边框。

    • 吸盘一定要在平整光滑的表面操作。

  2. 谷歌Pixel 2 XL的屏幕更换指南: 步骤 2 中的图像 1,3 谷歌Pixel 2 XL的屏幕更换指南: 步骤 2 中的图像 2,3 谷歌Pixel 2 XL的屏幕更换指南: 步骤 2 中的图像 3,3
    • 用适当的力道拉开屏幕后盖之间的缝隙,在缝隙里面插上翘片。

    • 这一步非常需要耐心,如果有什么特殊情况的话,可以尝试摇晃屏幕粘胶,或者用风枪,电吹风加热打开。

  3. 谷歌Pixel 2 XL的屏幕更换指南: 步骤 3 中的图像 1,2 谷歌Pixel 2 XL的屏幕更换指南: 步骤 3 中的图像 2,2
    • 接下的步骤要格外小心这些部位:

    • 在手机底部的翘片进深不要超过6mm,如果翘片碰到OLED的折叠部分的话,很可能会损坏屏幕。

    • 不要直接划过左面缝隙,这里有显示连接线。

    • 只能浅浅地在左上角插进翘片,不然会损伤前置摄像头。

  4. 谷歌Pixel 2 XL的屏幕更换指南: 步骤 4 中的图像 1,2 谷歌Pixel 2 XL的屏幕更换指南: 步骤 4 中的图像 2,2
    • 用翘片划过左面分离屏幕和后盖。

  5. 谷歌Pixel 2 XL的屏幕更换指南: 步骤 5 中的图像 1,3 谷歌Pixel 2 XL的屏幕更换指南: 步骤 5 中的图像 2,3 谷歌Pixel 2 XL的屏幕更换指南: 步骤 5 中的图像 3,3
    • 下面的步骤建议用翘片的 平端而不是尖端插进去,因为这样可以避免插得太深。

    • 一直吧翘片划到机器的底部。

  6. 谷歌Pixel 2 XL的屏幕更换指南: 步骤 6 中的图像 1,3 谷歌Pixel 2 XL的屏幕更换指南: 步骤 6 中的图像 2,3 谷歌Pixel 2 XL的屏幕更换指南: 步骤 6 中的图像 3,3
    • 将翘片的扁平边缘插入手机的右上角,然后将其滑动到手机的边角和顶部。

  7. 谷歌Pixel 2 XL的屏幕更换指南: 步骤 7 中的图像 1,2 谷歌Pixel 2 XL的屏幕更换指南: 步骤 7 中的图像 2,2
    • 从右侧轻轻翻开显示屏,就像翻阅一本书。

    • 如果显示屏不容易抬起,用翘片分离剩余的粘合剂。

    • 不要试图完全分离显示屏,因为脆弱的屏幕排线仍然连接在主板上

    • 小心地将显示屏平放在靠近手机其余部分的桌子上,靠近手机,以免拉紧显示器和主板的连接线。

  8. 谷歌Pixel 2 XL的屏幕更换指南: 步骤 8 中的图像 1,2 谷歌Pixel 2 XL的屏幕更换指南: 步骤 8 中的图像 2,2
    • 使用工具的一角撬起线缆连接器盖。

    • 撬开时要小心,避免损坏下面的线缆,或者丢失盖子。

    • 取下连接盖

  9. 这个步骤还没有翻译 帮忙翻译一下

    谷歌Pixel 2 XL的屏幕更换指南: 步骤 9 中的图像 1,2 谷歌Pixel 2 XL的屏幕更换指南: 步骤 9 中的图像 2,2
    • Use the point of a spudger to lift the digitizer cable connector up and out of its socket on the motherboard.

    • To re-attach press connectors like this one, carefully align and press down on one side until it clicks into place, then repeat on the other side. Do not press down on the middle. If the connector is misaligned, the pins can bend, causing permanent damage.

    • If any part of your screen doesn't respond to touch after your repair, re-seat this connector, making sure it clicks fully into place and that there's no dust or other obstruction in the socket.

  10. 这个步骤还没有翻译 帮忙翻译一下

    谷歌Pixel 2 XL的屏幕更换指南: 步骤 10 中的图像 1,1
    • Use tweezers to remove any tape from the display connector cover.

  11. 这个步骤还没有翻译 帮忙翻译一下

    谷歌Pixel 2 XL的屏幕更换指南: 步骤 11 中的图像 1,2 谷歌Pixel 2 XL的屏幕更换指南: 步骤 11 中的图像 2,2
    • Insert the point of a spudger into the small hole on the edge of the display connector cover.

    • Use the spudger to pry the cover out of its recess.

    • Remove the connector cover.

    • Make sure to keep this component so you can reinstall it during reassembly.

  12. 这个步骤还没有翻译 帮忙翻译一下

    谷歌Pixel 2 XL的屏幕更换指南: 步骤 12 中的图像 1,2 谷歌Pixel 2 XL的屏幕更换指南: 步骤 12 中的图像 2,2
  13. 谷歌Pixel 2 XL的屏幕更换指南, 屏幕: 步骤 13 中的图像 1,3 谷歌Pixel 2 XL的屏幕更换指南, 屏幕: 步骤 13 中的图像 2,3 谷歌Pixel 2 XL的屏幕更换指南, 屏幕: 步骤 13 中的图像 3,3
    • 你要更换的屏幕可能不带有预装的听筒防尘网或者前置摄像头垫圈。如果你觉得这困扰了你,用镊子小心地将它们从你的旧屏幕上取下,然后将它们安装在新屏幕总成上。

    • 确保在贴上屏幕胶条前安装防尘网和垫圈。

    • 切下一段1mm宽,约3cm(1.25英寸)长的双面胶。

    • 将屏幕胶条放在你的新屏幕上听筒模组插槽上部边缘,以保证其围绕在插槽周围并触及上部边缘。

    • 屏幕胶条需要离边缘越近越好,但不能重叠,否则将可能影响其粘合性。

    • 轻轻地用手指或撬棒按压屏幕胶条到其所需位置。

    • 揭下屏幕胶条上白色的离型纸。

  14. 谷歌Pixel 2 XL的屏幕更换指南: 步骤 14 中的图像 1,3 谷歌Pixel 2 XL的屏幕更换指南: 步骤 14 中的图像 2,3 谷歌Pixel 2 XL的屏幕更换指南: 步骤 14 中的图像 3,3
    • 轻轻地将扬声器罩放置在槽内,保证较短的一半嵌在听筒槽内,同时较长的一半被放在双面胶上。暂时先不要把防尘罩贴在双面胶上。

    • 用撬棒的间断轻轻地调整防尘罩的位置,对其边缘,并使防尘罩位于扬声器槽正中。

  15. 谷歌Pixel 2 XL的屏幕更换指南: 步骤 15 中的图像 1,2 谷歌Pixel 2 XL的屏幕更换指南: 步骤 15 中的图像 2,2
    • 用撬棒较平的一段把扬声器罩的上半部分压在双面胶上。

    • 在安装另一个靠下的扬声器罩时,重复前三个步骤。

    • 安装靠下的扬声器罩时,将双面胶贴在扬声器下方的边缘,然后将扬声器罩以颠倒的方向放置,较平的一面在下方。

  16. 谷歌Pixel 2 XL的屏幕更换指南: 步骤 16 中的图像 1,3 谷歌Pixel 2 XL的屏幕更换指南: 步骤 16 中的图像 2,3 谷歌Pixel 2 XL的屏幕更换指南: 步骤 16 中的图像 3,3
    • 如果你在重复使用之前从旧屏幕上拆下来的摄像头垫圈,上面可能还残留拆卸时留下的旧的双面胶。如果是这样的话,并且残留的双面胶还有粘性,请直接跳至最后一步。

    • 剪下一条一毫米宽,六毫米长的双面胶。

    • 将胶条放置在前置摄像头安装孔的下方,与屏幕上边缘平行。

    • 剪下两条一毫米宽,三毫米长的双面胶。

    • 将胶条放置在前置摄像头安装孔的左右两侧,与屏幕上边缘垂直。

    • 用撬棍或者手指轻轻地把胶条压在屏幕正确的位置上。

    • 确保三个胶条尽量靠进摄像头安装孔,但是不要盖在孔上。

  17. 谷歌Pixel 2 XL的屏幕更换指南: 步骤 17 中的图像 1,1
    • 用镊子把三个胶条背面的白色离型纸剥除。

  18. 谷歌Pixel 2 XL的屏幕更换指南: 步骤 18 中的图像 1,1
    • 小心地把前置摄像头垫圈放在胶条上面。

    • 确保垫圈的中心与摄像头安装孔的中心是对其的。如果垫圈对安装孔有任何遮挡,摄像头的功能会受到影响。

    • 用撬棒或者手指把垫圈压紧在双面胶上。

结论

将新的更换部件与原始部件进行比较 - 在安装之前,您可能需要转移剩余部件或从新部件上移除粘合剂背衬。

要重新组装您的设备,请按相反顺序执行上述步骤。

将您的电子垃圾带到R2或e-Stewards认证的回收商

修理没有按计划进行? 查看我们的Answers社区以获取故障排除帮助。

83等其他人完成本指南。

由衷感谢以下译者:

en zh

90%

这些译者帮助我们修补全世界! 您也想加入吗?
开始翻译 ›

Adam O'Camb

于04/11/15注册

196,293 声望

创作了416篇指南

37条评论

Be very careful on the bottom connection, if done incorrectly, 2 small components controlling bottom speaker are easily damaged, this will result in a motherboard replacement or replacing someones phone. Take it from me and a few others on the site…go at this slow and careful. Besides that risk, the phone is pretty simple to repair.

Tom Gray - 回复

Hi Tom, what component are you talking about? I'm about to dive into this and it might be wise for me to doublecheck this prior to repairing it!

Jasperstaal -

can you separate outer glass screen layer from lcd?

Tyler W - 回复

.Every layer of the full lamination screen is essential to the display, the surface layer is not just for protection.So I think if you removed it, the screen would be damaged .

roanoke -

Showing where to place the new tape would be helpful.

Office Administrator - 回复

添加评论

浏览统计数据:

过去 24 小时: 5

过去 7 天: 43

过去 30 天: 240

总计 131,843