简介
在大约500次的充电循环后,iPhone的电池容量将会下降至80%左右,这一过程对于大多数的用户来说大约为18 - 24个月。在这之后,你的iPhone也许需要更频繁的充电,且iOS可能会提示你手机的性能受到了影响(换句话说,你的手机运行变慢了)。使用本指南来更换新的电池,使你的手机像刚买时一样流畅。
如果你的电池产生了鼓包现象,请参阅此指南: 请谨慎操作.
注意:在维修之后你的iPhone可能会显示警告以示电池非原装,但即使使用原装电池也无法避免该警告。如果你的iPhone在更换电池后功能正常,你可以放心的无视它。
为了在完成本指南所述步骤后让你的手机达到最佳性能,需要校准你的新电池:完全充电至100%,并保持充电至少两个小时。然后使用至电量耗尽。最后,再完全充电至100%
你所需要的
视频概述
-
-
将蓝色手柄向后拉,以解锁反向钳的夹臂。
-
将反向钳从 iPhone 的左侧或右侧边缘滑进。
-
将吸盘放置在 iPhone 底部边缘附近,一个在正面,一个在背面。
-
将吸盘挤压在一起,以在所需区域产生吸力。
-
-
-
加热 iOpener并将其穿过反向钳的臂部。
-
将iOpener折叠,使其位于iPhone的底部边缘
-
等待一分钟,让粘合剂有机会打开,形成一个打开的缝隙。
-
在屏幕和塑料边框之间的缝隙中插入翘片,而不是直接插入屏幕本身。
-
跳过接下来的三个步骤。
-
-
-
用坚定而持续的压力拉起吸盘,使前面板和后壳之间产生一个轻微的间隙。
-
在屏幕和塑料边框之间的间隙插入翘片,而不是直接插入屏幕。
It seems like I need a third hand to do this. To hold the phone; hold the suction cup; and push the pick in the space.
-
-
-
卸下固定主板连接器支架的五颗螺钉,如下所示:
-
三个1.0毫米Y000螺钉
-
一个1.3毫米Y000螺丝
-
一个3.7毫米十字螺丝
FYI: I used a tiny piece of scotch tape to hold those 1mm screws in place while aligning the magnetic screwdriver. Otherwise they are so tiny the magnetic bit pulls them right out the hole.
-
-
-
-
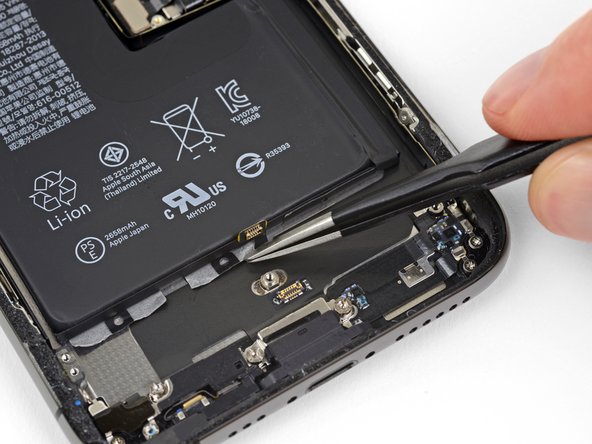
用撬棒或指甲分离前面板的传感器总成连接器。
In my phone the connector made poor contact with the socket resulting in no sound audible through the phone receiver/headset. There was an overhang of insulation close to the socket which I believe may have prevented a good connection. So if you have these kinds of audio problems you might see if this is the problem.
-
-
-
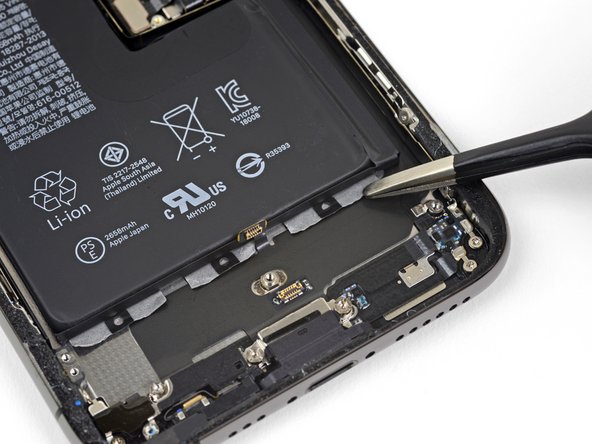
使用撬棒或者指甲来将数字转换器排线链接头从插座上翘起。
Reassembly: reconnecting the press connectors upon reassembly was so hard, even for the ones not seated in a recessed location !! It took me two days to get them reconnected. What helped me was to shine bright lights on all sides of the iPhone and then hold the iPhone vertically like a book and press it in that way. They are now all in, but the touchscreen functionality has disappeared :( so I will need to reconnect that one.
-
-
-
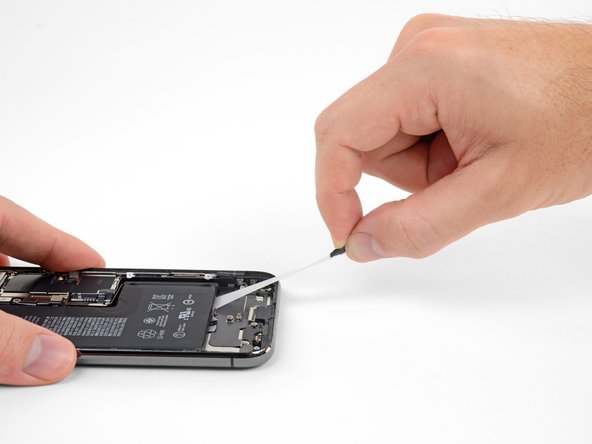
小心的抬起排线,直到粘合剂断开。
Will replacing camera and sensors fix damaged face I'd
No, FaceID will be disabled because the original sensors are paired with the logic board.
-
-
-
卸下固定 Taptic Engine 和主扬声器下方两个支架的五颗螺丝:
-
一颗 1.0 mm Y000 螺丝
-
两颗 1.3 mm 菲利普斯十字螺丝
-
一颗 1.7 mm 菲利普斯十字螺丝
-
一颗 1.8 mm 菲利普斯十字螺丝
Bonjour,
Plus pratique avec une Y000. Dans mon cas c’était impossible en Y00.
Bonne journée. :)
got stuck on the 1.8 mm screw and had to abort. The Phillips head provided “PH000” didn’t quite fit and stripped the screw.
I ended up skipping this step through 32. It’s not necessary to take the speaker and taptic thing off. I just used the thin black spudger flat edge and pried under the battery on the L-shaped edge and dislodged the adhesive and then did the same on the top edge. You will end up bending the old battery but that’s ok—just don’t poke it. keep poking the flat edge of the spudger in there kind of like a knife to break the adhesive. once you get at least two spots of the adhesive pulled, the rest comes up quite easily when you lift the whole battery.
I agree with R.J. The bracket screws are minute. They are much easier to remove than to put back. Avoid taking them out if you can.
-
-
-
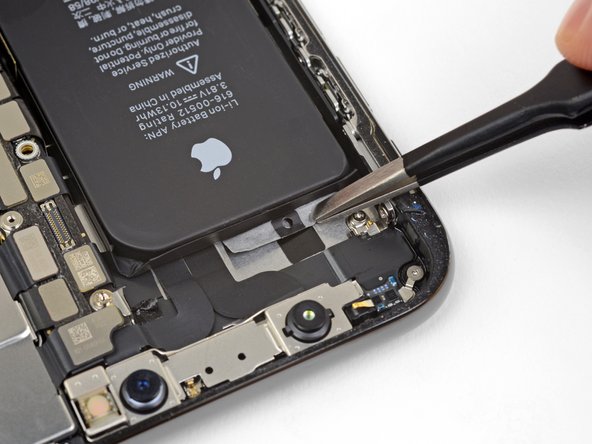
移除扬声器。
I thought my speaker gasket was also missing, however looking back into the part box I found it tucked under the flap at the other (unopened) side of the box. Glad I took a second (and closer) look. IFIXIT needs to do a better job securing very small parts as it is very easy for these types of parts to get jostled during shipping and then could fall out or stuck in the box unnoticed. I've purchased iFixit products for more than 10 years and am super satisfied their quality in parts and provided instructions. Hopefully they'll make some adjustments to their shipping containers as I'd love to continue using them.
My speaker gasket was stuck to the inside of the box also. Unfortunately it has the back peal removed and has stuck itself to the cardboard box. I tried to remove it but it was firmly attached. Bummer. This is my first iFixIt. Please package it more carefully as the other person said.
I can't find mine in the part box. Is it possible it was excluded?
It might have fallen out. Search in the crevasses of the box. If you still cannot find it contact iFixit.
Update to last comment, I looked again at the listing for the battery with and without the "fix it kit". I ordered without, and apparently, the speaker gasket is part of the kit. Will need to order separately and take the phone apart again and replace the seal and battery adhesive again to install the gasket.
-
-
-
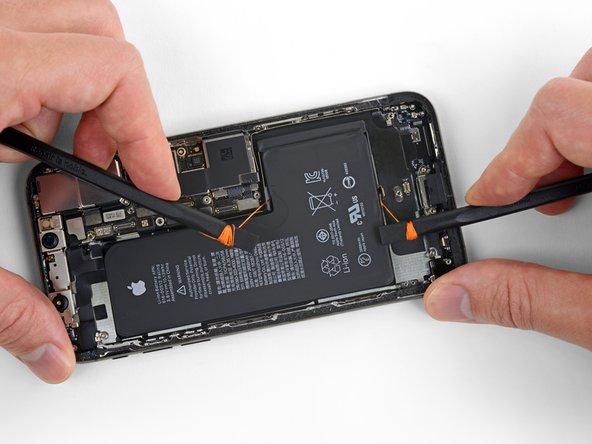
重复上述步骤,从电池底部边缘分离剩余的两个粘合胶带。
The tabs are stuck on with the same glue that is holding the battery down. It is fairly strong but will come off with some patience and consistent progress.
Despite the photo, I do NOT suggest using the tweezers for this but the black plastic spudger that comes with the kit. I say this after having the tweezers lose grip and slide across the bottom black ribbon attached to the case. If you must use the tweezers because of the strength of the glue, use a downward force into the case bottom, not an outward force. That way, you will not have the same happen to you…
Here is hoping the slight scratch did not damage anything vital…
-
-
-
为了增加你成功的机会:
-
请不要一直按着电池,将你的iPhone牢牢地抓在手上。
-
拉动胶带时请保持胶带的平整与清洁。
-
慢慢地拉出胶带,给胶带伸展和分离的时间。每条胶带需要大约15-30秒的伸展时间
-
拉动胶带时将手与桌面保持一个较低的角度,这样可以防止胶带被电池底部边缘卡住。
-
如果电池下方的胶带发生了且无法立刻移除,请继续进行对下一块胶带的处理,然后继续下面的额外步骤。
Pour cette étape, vous pouvez saisir les bandes adhésives avec une pince à bouts ronds (pour éviter de percer la batterie) et l’enrouler petit à petit.
-
-
-
如果胶带脱落,而电池仍然粘在后盖上。此时你需要准备一台 iOpener 或热风机,对iPhone 的后盖直接进行加热。
-
将 iPhone 翻转过来,在电池上方穿过一根结实的绳子(比如一段牙线或是吉他弦)。
-
以锯切运动将绳子从一侧拉到另一侧以分离粘合剂。这可能需要一些时间,因为粘合剂变形缓慢,但一定要保持耐心,它最终一定会被分开。请勿变形或损坏电池。
-
将绳子从电池的顶部或底部边缘开始,向iPhone中间拉。但请勿将电池线穿过电池的中间三分之一,否则可能会损坏排线或位于下方的无线充电线圈。
I didn't have any of the alcholol, so came in straight here. Can't over stress the need for patience, but once I put the phone on my microwaved sock of rice (that's how we roll) and started to gently saw away with the floss - it all came good.
-
-
-
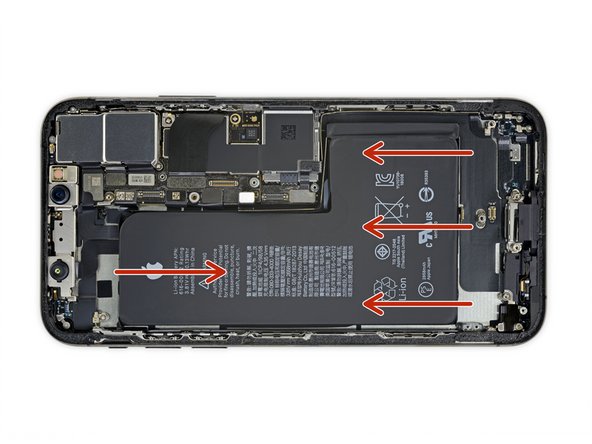
从电池的底部边缘抓住电池并将其从iPhone中取出。
-
将电池粘于后盖,断开与主板的连接,并继续组装你的设备。
For those that plan to proceed with the hack that eliminates the “battery is not genuine” message and no battery health information (requires extra tools that most don’t have), be careful not to bend the original battery’s flex cable too much. I found out the hard way that the flex cable doesn’t really “flex” much and ended up snapping in half when trying to hook it up to a programmer. So much for trying to do the hack :(
Willy Parr - 回复
How do I force restart and calibrate the battery at the same time?
-


将你新更换的部件与原先的部件对比—— 你可能需要在安装开始前转移剩余的部件或去除新部件上的包装。
想要重新组装设备,仅需按照上述步骤相反的顺序执行
将你更换下来的废旧部件妥善处理:R2 or e-Stewards 认证的回收商。
在维修过程中遇到问题?访问我们的论坛 以获取帮助。
将你新更换的部件与原先的部件对比—— 你可能需要在安装开始前转移剩余的部件或去除新部件上的包装。
想要重新组装设备,仅需按照上述步骤相反的顺序执行
将你更换下来的废旧部件妥善处理:R2 or e-Stewards 认证的回收商。
在维修过程中遇到问题?访问我们的论坛 以获取帮助。
110等其他人完成本指南。


17条评论
i don’t know what happened but now my iphone xs will only boot into recovery mode and there is nothing showing up on the display. i have double triple quadruple checked and dont know what my issue is. any feedback on the matter would be greatly appreciated.
My iPhone has been turned off completely for the past few weeks, I have tried to hard restart it but nothing seems to work. It has a black screen and isn’t responding to anything. Nothing has ever been wrong with the phone it just shut down one day and hasn’t restarted since. Do you have a suggestion to get my phone working again?
Anyone have an issue where the phone won’t charge after replacing the battery/
Yes, I cant figure out why. I wonder if because its not the original battery, it wont let the new one charge? Idk.
Nick Lo -
It is possible the you went to deep with the plectrum, knocking of a capacitor from the logic board. I think it’s best you take it to a really good repair shop where the owner has expert solder skills to replace it.
Good luck
I ended up skipping steps 20-32. The kit didn’t come with the right screwdriver top and I realized it’s not necessary to take the speaker and taptic thing off.
I just used the thin black spudger flat edge and pried under the battery on the L-shaped edge and dislodged the adhesive and then did the same on the top edge. You will end up bending the old battery but that’s ok—just don’t poke it. keep poking the flat edge of the spudger in there kind of like a knife to break the adhesive. once you get at least two spots of the adhesive pulled, the rest comes up quite easily when you lift the whole battery.
Hey, after changing the battery the volume and silent buttons stopped working. There is no apparent reason as why they would, what could it be and can it be fixed before I close the phone ??
you've likely damaged the volume flex cable that lies under the battery, it is very thin and easily damaged. unfortunately pull tabs rarely work as intended. alcohol is the best method for loosening adhesive.
I skipped removing the taptic engine and speaker because I knew I was going to break the adhesive strips when pulling as they break very easily. Just dripped some alcohol, waited 10 minutes and with a bit of force the battery came right off without even bending. Makes the process much quicker although that’s not the intended way of removal.
Ive got a metal protection plate of some sort in-between the screen and the battery around the inside perimeter of the phone. it is blocking access to most of the bottom screws. and does look like it pulls out. might be fixed at the bottom or sides.
anyone found one of these plates in their attempts? might have been placed by a repairer at some point
that is the display frame you have damaged it and you will need to replace the display because the display has its own frame and that frame holds it in place.
My phone's touch screen and camera were unresponsive after reassembly. I prised it all apart and checked all the connections 3 times unfortunately ruining the glue around the edge and then after Googling found a Forced Restart cleared the problem. Press and release volume up button then the volume down button then hold and keep holding the on off button on the right until the apple appeared. And hey presto it all worked!!! I'm well chuffed as I'm a 64 year old 'girl' with no experience of this sort of thing but am pretty competant with practical things - I thought 'how difficult can it be?' Not too difficult, except for removing the adhesive from behind the battery (should have read the detailed instructions properly) which I eventually did with some Isopropyl alcohol following the further instructions.
My top tip! I found putting all the screws on a bit of 'blue tac' kept them safe and in order.
Very tricky indeed but thankfully I managed to replace battery and screen and it worked 😊
Paul Tighe - 回复
After the change of battery the lower speaker has stopped to work. The battery it's ok and works fine but i have only speaker working right now.
I have tried to connect and disconnect it, with and without the battery connected but nothing. I don't thing that the speaker is dameged, but maybe the connector? What i can verify?
After replacing battery, I am getting ghost typing and activity on the touchscreen without touching it. And the phone is hot. What did I do wrong? Replaced a battery in my iPhone 6s prior to trying battery replacement on the XS, thought I would have equal success, not! Also noted the warning about the genuineness of the new battery, don't mind that but I also lost the health of the battery status; was that supposed to happen?
Friendly Suggestion: would have purchased the full fix kit had I know I would need to replace the adhesive gasket during reassembly. Having purchased many kits before, I have all the tools. When looking at the photo, it didn't seem to include anything other than the battery, so I just ordered the battery. Missed the tiny adhesive gasket! Might want to highlight items like that so when people order, they don't make a similar mistake.
Der Original Akku ist codiert. Egal, ob man einen zweiten Apple Original Akku oder einen neuen Fremdakku einbaut erscheint bereits in den Einstellungen eine "Wichtige Batterienachricht" mit einem roten Punkt. "Unbekanntes Bauteil" und die "Informationen zum Batteriezustand" sind nicht verfügbar. Diese Nachricht verbleibt immer und nervt auf Dauer immens.
Der Akku muss angelernt werden und dieses können von jetzt an nur authorisierte Apple Servicebetriebe und diesen ist es durch Apple verboten die notwendige Info weiterzugeben.
Dies ist nicht zu verwechseln mit der bereits bekannten Rekalibrierung seit iOS 14.5.
Seit dieser neuen Codierung kostet der Akkutausch bei Apple auch nicht mehr 75 € sondern aktuell 99 € (Stand Novmber 2023 in Deutschland).
Damit sind künftig alle nicht authorisierten Servicebetriebe raus - denn wer will schon dauernd diese Mitteilung auf dem Bildschirm haben?
Überlegt vorher, ob unter diesen Bedingungen ein eigener Akkutausch noch sinnvoll ist .....
Manfred Wachtel - 回复
Lieben Dank @manfredwachtel ! Mehr Infos dazu haben wir auch in unserem Blog zusammengefasst: https://de.ifixit.com/News/78890/teileko...
Sandra Hiller -