简介
这项修复并不是很难,它很简单,唯一棘手的部分如何是取下后盖而不造成破坏。
在更换三星盖乐世S7显示屏的同时尝试保护旧屏幕,让你还可以卖掉旧屏幕。
你所需要的
-
-
加热手机的背面以融化粘住背部面板的粘合剂。我使用的是电子加热板, 设置在60摄氏度。你也可以使用热风枪, 但是小心不要烫到自己。 热风枪加热很快, 注意控制加热时间以免损伤手机。
-
-
-
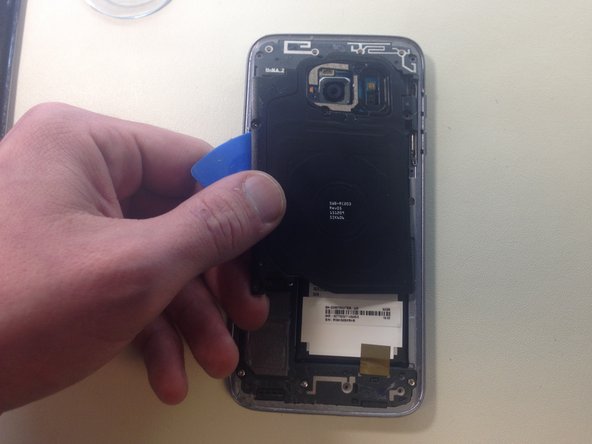
在后部面板的下半部分使用一个吸盘,以开始提升面板的底部边缘,注意不要施加太大的力
-
一旦你把背板抬起足够高,请在缝隙中插入一个吉他拨片(塑料卡片就可以)。在手机的整个边缘滑动,以撕开胶粘剂
-
移除背部面板
-
-
-
使用Phillips #00螺丝刀,来拆卸固定塑料盖板、扬声器和NFC天线的11个螺丝
-
使用吉他拨片来撕开一些光胶粘剂,去掉顶部的两个塑料盘和NFC天线
-
注意:如果粘性太大,试着用更多的热量(加热)
-
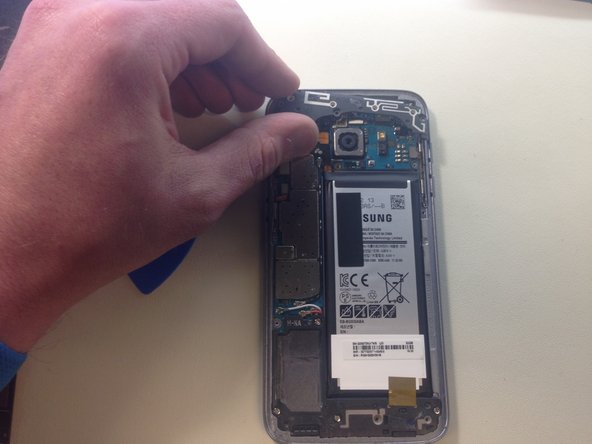
移除扬声器组装。你可能得用一小块胶带,把总成固定在电池上
-
-
-
-
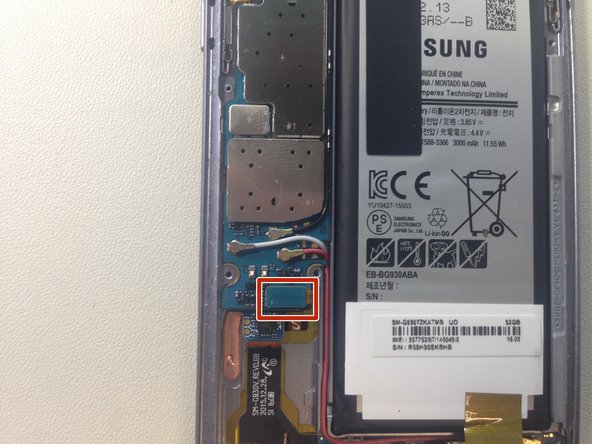
使用塑料撬棒的尖端,断开逻辑板上的白色和红色天线电缆
-
使用SIM卡弹出工具,弹出SIM卡/ SD卡托盘(此步骤的图像2)。这个托盘附在逻辑板的后面。在进行此操作之前取出逻辑板可能会损坏它
-
-
-
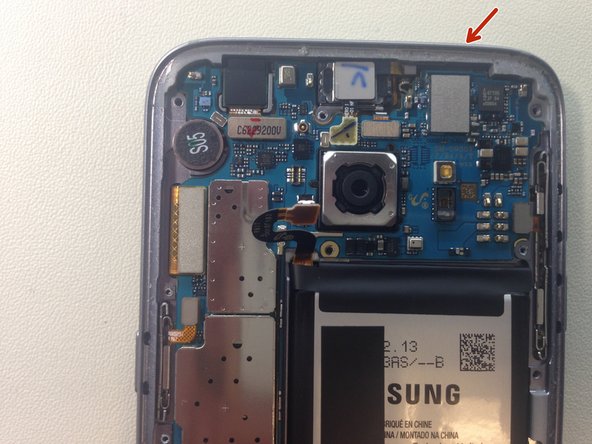
将逻辑板从手机顶部朝电池方向轻轻抬起。还不能完全取出逻辑板
-
注意:当你抬起逻辑板时,前摄像头可能会掉出手机。如果掉出来的话,把它放防静电垫子上
-
使用撬棒的平头,从逻辑板的后面断开USB附板连接器
-
取出逻辑板,将其放置在防静电表面上
-
-
-
将卡片放在边框和显示屏之间滑动,慢慢地向下
Is it still water resistant after repair
depends on ur adhesive
-


要重新组装您的设备,请按照相反的顺序执行这些操作。
要重新组装您的设备,请按照相反的顺序执行这些操作。
50等其他人完成本指南。


36条评论
Can just the glass be replaced do is it fused together somehow?
it could if you get the lcd out with broken glass out one piece then using heat plate separate the glass very thin so it be hard to save lcd
Brian -
The Eternal question: is it still waterproof after screen replacement?
no it wont because you will break the seal that originally came from samsung
Brian -
Is it still water resistant
no it wont be water resistance any more
Brian -
Appreciate the effort, but this guide is severely lacking. There is little to no guidance about it.
sorry this my first guide and i did it so other repair people get idea because ifixit at the time had no guides at all so that is why i did a quick one as i was repairing the phone
Brian -
Samsung Galaxy does not use an LCD its an OLED
thank you for sharing your info oled but if you on ebay or anywhere they sell as lcd but thank you again for correcting me but you should correct the other people too 1 million sellers that referred as lcd
Brian -
I accidently cut the ribbon cable to the digitizer. ...ouch. Do you sell the digitizer assembly for the Galaxy S7 edge as well as the sealant for the back of the phone like you do above for the regular Galaxy S7 for 169.95 as well as the rear cover adhesive for the S7 edge...probably same adhesive. I read many article and if I had followed your article I would not have cut the ribbon cable....Good article. Thank you, rexblisard@yahoo.com
rexblisard - 回复
you welcome and sorry i dont sell parts i just do repairs
Brian -
Did it work fine after that?
yes it did no complaints from the customer
Brian -
Omg. just say thx for the effort and the guide...he wasted hes time..if this guide doesn't help you..then take ur phone to a repair shop..if u already repaired ANY waterproof mobiles..u would know how to open it and deal with it..and this guide would only help to identify components and avoid posible mistakes like cutting a ribbon or damaging something inside...
I really thank you for your time....i just got mad when i saw ppls coments...
thank you for understanding
Brian -
Why take the back all apart if only wanting to change the screen???? Can't I just take the screen off an put new one on??? Really don't see the point of taking back off and a few boards as well ?
because the cable connects in the back so if you don't open the back you can not plug the lcd cable with the motherboard
Brian -
Lol the one guide on iFixit where OP doesn't completely hold your hand and everyone gets all upset.
I think it was a dope guide. Helped me catch all the tiny ribbon cable connections - I totally would've missed one without this.
Although, yeah, it seems like you really only need to disconnect the display cable from the daughterboard to get the display off.
thank you i hope it was some help
Brian -
i apologize for asking a repeat question but I do not see answers - Is it possible to replace just the glass for this phone? i have cracked glass and a working digitizer. another electronics outlet sold me a glass replacement kit but no instructions. All the vieos i’ve been watching and the forums/guides I’ve read all discuss replacing the entire front(digitizer/glass).
is it possible to replace just the glass? if so, can it be done without removing all the parts from the back? since technically I won't need to plug in to the motherboard?
Its possible but very hard to do i tried few times just changing the glass i end up breaking the screen but on youtube you have some people that are able remove just the glass with bussiness cards.. chances are 20% can get just the glass out withought breaking lcd unless you have freezing mashine thats a different story..good luck
I’m not sure what everyone is complaining about… this seems like a great tutorial and you show exactly what to remove. My first time taking a phone apart and this is incredibly helpful Thank-you for taking time to post!
thank you appreciate your feedback
Brian -