跳转到主内容
加入维修社区 - 创建账户

此翻译由机器生成,尚未经过人工审核。 会说这种语言吗? 查看评论。

如何进入 Patagonia 羽绒服内部

你所需要的

    1. 如何进入 Patagonia 羽绒服内部, 如何进入 Patagonia 羽绒服内部: 步骤 1 中的图像 1,2 如何进入 Patagonia 羽绒服内部, 如何进入 Patagonia 羽绒服内部: 步骤 1 中的图像 2,2
      • 拉开你的 Patagonia 外套拉链。

      • 检查外套需要修补的区域。如果你的外套有内衬,或者需要维修的区域没有充绒格缝线且可以从外套前侧拉开,请按照本指南操作。

      • 如果外套需要维修的区域没有内衬,请查看我们的充绒格维修指南。

      询问修复机器人

      添加评论

    2. 如何进入 Patagonia 羽绒服内部: 步骤 2 中的图像 1,2 如何进入 Patagonia 羽绒服内部: 步骤 2 中的图像 2,2
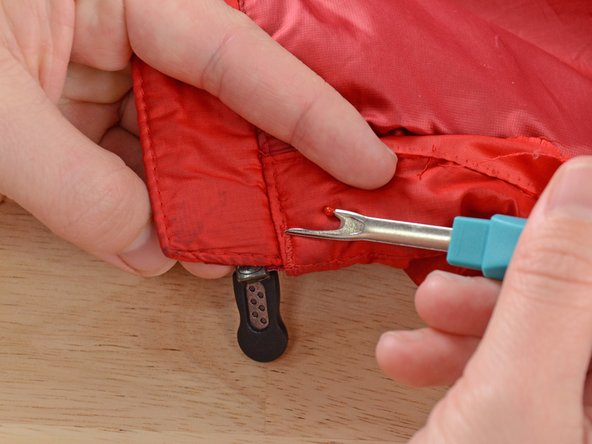
      • 找到最靠近需要维修区域的接缝。在我们的例子中,它是夹克的底边接缝。

      • 使用拆线器,轻轻拉出接缝上可见的缝线。

      • 拆线器非常锋利,很容易刺破或撕裂夹克的面料。请务必确认你拆掉的只是缝线,而不是夹克本身。慢慢来,不要着急。

      询问修复机器人

      添加评论

    3. 如何进入 Patagonia 羽绒服内部: 步骤 3 中的图像 1,2 如何进入 Patagonia 羽绒服内部: 步骤 3 中的图像 2,2
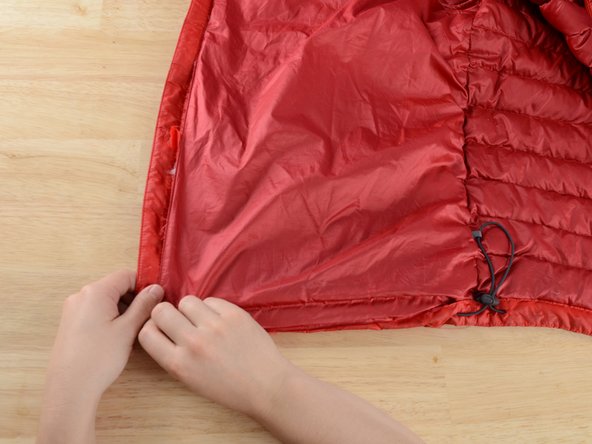
      • 拆开接缝,直到破洞两侧的接缝各拆开了几英寸。然后沿最靠近的垂直接缝方向继续拆开。如图所示的情况中,此处为拉链接缝。

      • 拆开该接缝后,你应该能看到夹克内部的挡片。

      询问修复机器人
      添加评论

    4. 如何进入 Patagonia 羽绒服内部: 步骤 4 中的图像 1,2 如何进入 Patagonia 羽绒服内部: 步骤 4 中的图像 2,2
      • 找到最近垂直缝隙中的缝线。在本例中,即衬里与拉链盖布连接处的缝合处。

      询问修复机器人

      添加评论

    5. 如何进入 Patagonia 羽绒服内部: 步骤 5 中的图像 1,2 如何进入 Patagonia 羽绒服内部: 步骤 5 中的图像 2,2
      • 拆开缝线,直到接缝开口处超过需要维修区域三到五英寸(约 7.5 到 12.5 厘米)。

      • 在本案例中,我们拆开了夹克大约一半的长度。

      询问修复机器人

      添加评论

    6. 如何进入 Patagonia 羽绒服内部: 步骤 6 中的图像 1,3 如何进入 Patagonia 羽绒服内部: 步骤 6 中的图像 2,3 如何进入 Patagonia 羽绒服内部: 步骤 6 中的图像 3,3
      • 使用拆线器拆掉底部的缎面缝线,使内衬脱离。

      • 并非所有夹克都需要这一步骤。如果你的内衬无需拆除这些缝线即可取下,则可跳过此步骤。

      询问修复机器人

      添加评论

    7. 如何进入 Patagonia 羽绒服内部, 拆线: 步骤 7 中的图像 1,3 如何进入 Patagonia 羽绒服内部, 拆线: 步骤 7 中的图像 2,3 如何进入 Patagonia 羽绒服内部, 拆线: 步骤 7 中的图像 3,3
      • 将拆线刀插入两片面料之间,小心地切断连接两片面料的缝线。

      • 注意只切断缝线,不要损坏衣物!

      询问修复机器人

      添加评论

    8. 如何进入 Patagonia 羽绒服内部: 步骤 8 中的图像 1,2 如何进入 Patagonia 羽绒服内部: 步骤 8 中的图像 2,2
      • 将衬里向后折叠,确保其远离需要维修的区域。

      询问修复机器人

      添加评论

    9. 如何进入 Patagonia 羽绒服内部: 步骤 9 中的图像 1,3 如何进入 Patagonia 羽绒服内部: 步骤 9 中的图像 2,3 如何进入 Patagonia 羽绒服内部: 步骤 9 中的图像 3,3
      • 如果你的夹克有口袋,请确保固定口袋的两个饰片处于自由状态。

      • 如果饰片未松开,请拆掉所有残留的缝线以将其释放。

      • 将口袋折向远离需要维修区域的地方。

      • 重新缝合衣物时,请务必将两个口袋饰片缝入接缝中。

      询问修复机器人

      添加评论

    10. 如何进入 Patagonia 羽绒服内部: 步骤 10 中的图像 1,2 如何进入 Patagonia 羽绒服内部: 步骤 10 中的图像 2,2
      • 除非维修位置正好在衣物的最底边缘,否则请保持抽绳完好。如果能在不拆除的情况下进行维修,会比拆下后再重新缝回去要容易得多。

      • 在重新组装你的夹克时,尽量沿着原有的针孔缝合,以避免产生新的开口,防止羽绒从中漏出。如果条件允许,请在维修完成后用蒸汽熨烫一下夹克。这有助于闭合缝合孔,防止羽绒进一步流失。

      询问修复机器人

      添加评论

结论

要重新组装你的外套,请按相反顺序执行这些说明。

取消:我没有完成这个指南。

5等其他人完成本指南。

Brittany McCrigler

于03/05/12注册

91,093 声望

创作了142篇指南

3指南评论

Does this have to be hand sewn back up? Is it just the basic handsewing stitch? It feel like the sewing up of the garment is just as challenging if not more than the seam-ripping of it. From this guide, I'm not at all confident about how to put my coat back together again - which has me be very wary of ripping the seams to take it apart. Please help! Thanks!

Byron Go - 回复 分享

Great question Byron! You can either hand-sew or machine stitch your jacket back together. If you hand sew, you'll want to use a straight stitch (guide here: 缝制直线线迹). If you machine sew, be sure to use a very sharp needle in your machine. You will also probably want to use some sewing clips (like these: https://www.amazon.com/Clover-Wonder-Cli...) to hold the garment together while you sew it up, instead of pins that will create more little holes. In either case, take your time, as the material is very slippery. You will also want to follow the guide backwards to ensure you have the layers in the right positions and order. Good luck on your repair—you got this!

Brittany McCrigler - 回复 分享

👏 Great guide on accessing the insides of a Patagonia down jacket! The step-by-step instructions are clear and helpful. For those worried about reassembly, hand-sewing or machine stitching with a sharp needle should do the trick. Remember to take your time and use sewing clips instead of pins. Happy repairing! 🧵🧥

fawwad qureshi - 回复 分享

添加评论

浏览统计数据:

过去 24 小时: 7

过去 7 天: 43

过去 30 天: 141

总计 18,437