简介
如果您的 Switch Pro 手柄的方向键过于灵敏并导致误触,请看本指南!
你所需要的
-
-
-
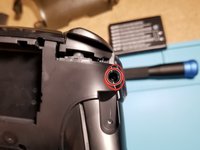
使用撬动工具或指甲轻轻拉开控制器的两半。当心连接两块板的排线!
-
这是一个 ZIF 接口。翻开接口上的黑色卡扣,让您可以很轻松的将电缆直接从接口上拉出。我翻开的是摇杆部分的黑色固定卡扣。
-
-
-
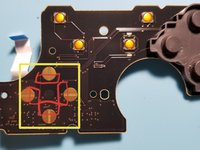
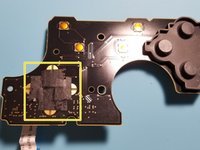
瞧!這是方向鍵觸摸感應器。我已經用紅色勾勒出了您想要覆蓋的區域。
-
使用膠帶(我推薦黑色電工膠帶,但其他人說它適用於透明透明膠帶或包裝膠帶,只是要注意它可能會在一段時間後拉起並導致按鈕粘住!),覆蓋突出顯示的區域。這確實減少了意外按下按鈕的次數。
-
經過一些測試後,我將膠帶貼在頂部和底部觸控連接器上。這使得操作最流暢,意外按下按鈕的次數最少。在完成重新組裝之前,請務必進行測試(並確保您喜歡它的感覺!)。
-


要重新组装(昂贵的)手柄,只需要按照与说明相反的顺序进行操作即可。
希望本指南和实际的维修对你来说都很简单 。在我修复好我的手柄的灵敏度以后是白天和黑夜的差别!
祝你有美好的一天,享受快乐的修复过程!
17等其他人完成本指南。


13指南评论
Thanks!! I got a bit confused on the 2nd ribbon cable because I wasn’t sure if it was a latch like the first but it worked out. Also reassembling the ribbon cables was a bit difficult and I wasn’t exactly sure how much I had to “plug” them in before closing the latch but I figured it out, thank you! Controller works wonderfully now.
Glad to hear it! Thank you for your comment!
Not to my knowledge (I don’t have any on hand to test with though). May be worth a shot!
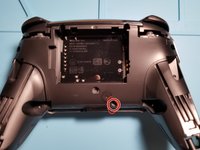
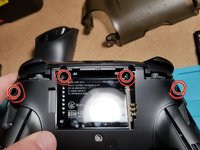
It should be noted that the official iFixit kit is recommended for the back screw removal (especially the ones at 11 and 1 o clock by the battery compartment) or you should have a screwdriver that is skinny enough to get it straight on. I barely got it with the iFixit kit and maybe left them a little bit loose because of that. Otherwise, this guide is very good for disassembling and cleaning.