简介
使用本指南更换华为 P10 Lite 的电池。
你所需要的
-
-
用一把镊子去除贴纸。
-
取下两个菲利普斯#00螺丝。
-
拆下四个2.5毫米菲利普斯#00螺丝。
Schritt 3 und 4 kann man sich komplett sparen. Wozu auch. Kann gleich mit Schritt 5 weitergemacht werden, zuvor einfach das Flachbandkabel vom Fingerabdrucksensor an der Rückabdeckung abklemmen und fertig.
Translate what Bobby mcgee said:
Step 3 and 4 can be completely ignored. What for? You can continue with step 5, just disconnect the ribbon cable from the fingerprint sensor on the back cover and you're done.
However, the reason step 3 and 4 should not be skipped is Step 6 — Use an iOpener to loosen the adhesive beneath the battery. I.e., the adhesive cannot be easily removed without heat, however, that heat might damage the electric chips. Thus they’d better be removed first.
-
-
-
-
用镊子取下主板护罩。
-
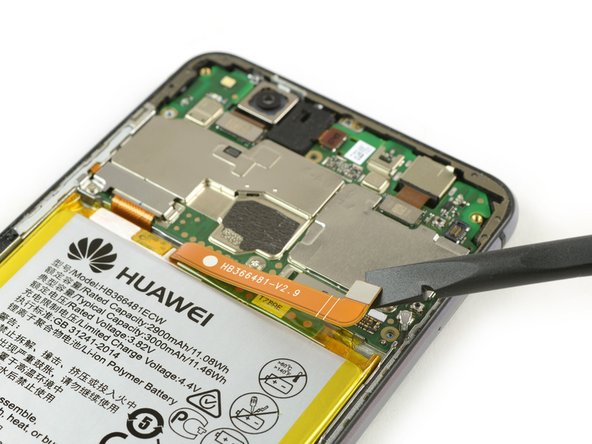
使用撬棒的平端断开指纹传感器柔性电缆。
Welchen Klebstoff soll man verwenden?
Hallo Josef,
sollte bei deinem Ersatzteil kein Klebstoff oder Klebeband dabei gewesen sein, kannst du dünne Streifen Doppelseitiges Klebeband verwenden. Es gibt für das Huawei P10 Lite auch schon zugeschnittene Klebestreifen zu erwerben, hierbei gilt aber je nach Händler Rezessionen zu lesen, ob die Klebestreifen auch wirklich halten.
Hi darren,
pre-cut adhesive would be the best solution if you can source it. Otherwise a two-sided adhesive tape or carefully used E6000 adhesive glue will be your friend. -
-
-
拧下将电池接口板固定到位的十字螺丝。
-
卸下电池接口板。
-
使用撬棒的扁平端断开电池柔性电缆。
-
-
-
使用 iOpener 软化电池下方的粘合剂。
-
在电池和中框之间插入撬片以形成间隙。
-
插入三角撬片或使用间隙中的撬棒切割电池下方的粘合剂。
Ohne eine Erwärmung des Klebers ist die Entfernung des Akkus wirklich sehr hakelig und zeitintensiv!
Is it possible to soften the adhesive using isopropyl alcohol?
Hi Michele,
yes, the use of isopropyl alcohol is a common technique when removing a battery in a smartphone. Especially when the adhesive is very strong. Try to apply the alcohol to every corner of the battery and let it penetrate the adhesive for several minutes. Start the prying procedure with the spudger afterwards. In case the adhesive isn’t loose enough you can reapply isopropyl alcohol any time during the removal. Keep in mind, that there’s a gap in the midframe for the display flex cable. It can happen that the isopropyl alcohol runs trough that gap and loosens the adhesive of the display as well. When the display adhesive gets loose you’ll need replacement adhesive for the display. To avoid that, apply as less alcohol as possible at a time and take especially care during prying to avoid damage to the flex cables underneath the battery. The adhesive of the cables will get loose as well.
The battery was very hard to remove. Please note: it is glued everywhere around the ribbon cables at the bottom. The battery is not glued with little strips like the back cover. The spudger and the blue cutting triangles were not very strong and the plastic tip bent upon removal of the battery. I eventually got the battery out with a metallic spatula. Be careful not to rip the shining lining of the battery while cutting the adhesive. I don’t know how people get the battery out without bending it, also every YT video I watched had - slightly - bent batteries. The glue is so strong snd sticky I did not need to apply new adhesive strips.
If you are operating on aged ones:
The Old double sided tape doesn’t really much care about the heat from the iOpener.
Use a metal spudger (round edges) instead but use it with care. Slowly and evenly lift the battery and go around it in a circle. Stay close to the edges to not damage cables under the battery (seen in step 7). Start pushing closer towards the middle only when you can see the cables yet and are sure not to damage them.
If this still doesn’t bring you closer to lifting the battery safely:
Two Options:
1. Try to use some small drops of adhesive remover . Best to use not to much is use Q-Tips or Cotton Swabs to evenly apply the remover through a little crack under the battery.
2. Use unwaxed dental floss push it under the battery. Then gently move it upwards with a pulling-side-to-side motion. To accelerate the process you can also use ***adhesive remover***. The dental floss will soak it up (only works with unwaxed dental floss) and assure that it will only be where it’s needed.
-


请按逆序重新组装设备。如有需要,请重新涂抹粘合剂。
请按逆序重新组装设备。如有需要,请重新涂抹粘合剂。
58等其他人完成本指南。


12条评论
Réussi en 50min.
J’ai passé 17min juste sur l’étape 1 pour comprendre où était la limite entre la coque et le chassis et comment passer un outil.
Pour les étapes 1, 2, 6 et 7, je n’ai pas réussi avec mes médiators et mes spudgers, trop flexibles (ils étaient vendu en kit avec ma batterie, rien à voir avec ceux vendus par ifixit). Je m’en suis sorti avec un tout petit tournevis plat de précision mais ce n’est pas l’idéal.
L’étape 6 est particulièrement difficile. J’ai chauffé la batterie avec un décapeur thermique réglé sur 120°C pour ramollir la colle mais c’était encore très adhérent. J’ai fait très attention mais j’ai eu quelques ratés et j’ai percé l’enveloppe de la batterie (je pense qu’il y a moins de risque en utilisant un spudger très rigide plutôt qu’un petit tournevis). Une odeur très forte en est sortie, attention à ne pas la respirer.
fait en un peu plus d’1h.
Une bonne demi heure rien que pour décoller la batterie, je ne souhaiter pas l’endommager ni le téléphone donc j’ai pris mon temps.
je trouve le iOpener trop petit, du coup je m’en suis inspiré pour m’en faire un plus grand, avec de l’eau et des sac congélation 3 épaisseurs pour éviter toute fuite et condensation non souhaiter.
Bonjour, pourquoi déconnecter le capteur d’empreinte cela ne semble pas obligatoire pour accéder à la batterie ?
g.mouakkeh - 回复
Je pense que c’est principalement pour une question de pratique, comme la batterie est vraiment très énervante à retirer (dû à la colle) la plaque arrière du téléphone nous gêne inutilement lors de la manipulation, comme ça coûte pas grand chose de la retirer autant le faire :’)
Lucas -
Guia de molta utilitat. Vaig fer servir un assecador de cabell per a estovar l’adhesiu i va funcionar molt bé. No vaig utilitzar iopener.
En desenganxar la bateria però, vaig malmetre el cable flex de la pantalla. La propera vegada hauré d’anar amb més compte.
45 mns nécessaires pour mener à bien cette opération. Enlever l’ancienne batterie était le plus compliqué… Ca tient bien!
First: Heat the back of the smartphone. Than: Start at the bottom with the “iFixit Opening Tool”. Getting the Picks in between is way harder. Be very careful with the Fingerprint-Cable and the cables behind the battery.
My phone works like a charm now! The battery is very hard to get out though.
Translate what Thibaud had said:
done in just over an hour.
A good half hour just to take the battery off, I don't want to damage it or the phone so I took my time.
I find the iOpener too small, so I was inspired to make a bigger one, with water and 3-layer freezer bags to avoid any unwanted leaks and condensation.
Good tip, thanks Thibaud.
Muy útil! He conseguido hacerlo sin ningún problema, aunque estuve más tiempo del que se indica jajaj Gracias!
Mit dem Saugnapf die Rückseite anheben hilft ungemein…
Matthias Eberle - 回复
Had to use blue wedge tool to wedge open bottom plate from the rim part in order to then use the tip of the blue opening pick under the back plate to then cut the glue. It’s like placing a pie server or knife under the plate once there’s a gap between the rim and the back plate.
Jane - 回复
Be careful, there’s a cable to fingerprint sensor, very close to the edge (see pictures below)… It’s very easy to cut it through with the pick, as I just learned :)
dambig - 回复